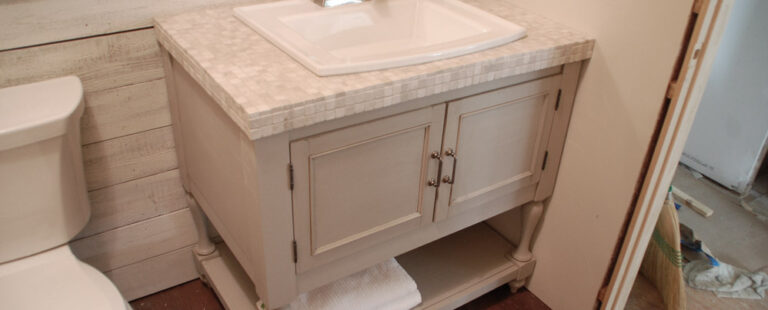
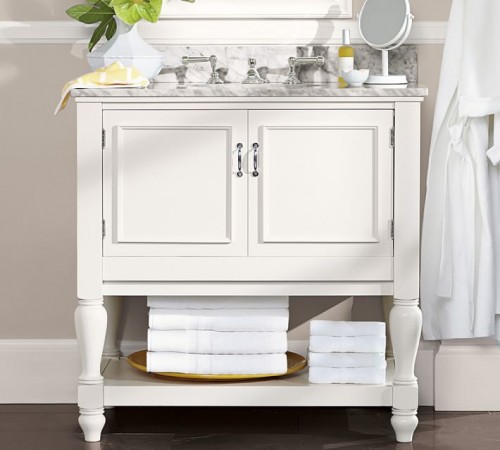
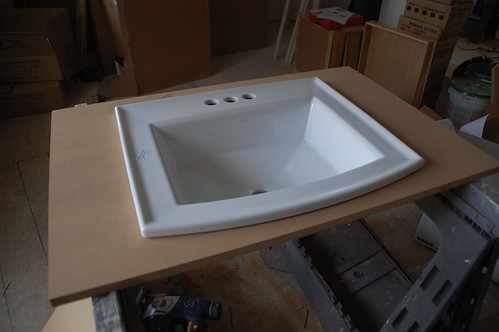
I think the most important thing on the list of stuff you need to build a vanity is the pervasive belief that you can, in fact, build a vanity. This belief may be sorely tested at some point– I’d be lying if I said you could build an entire cabinet in an hour without breaking a sweat. But, this was the first freestanding cabinet I’d ever built and my first time using dowel joints, and I didn’t have anything resembling a plan to start with, except for this picture from the PB website.
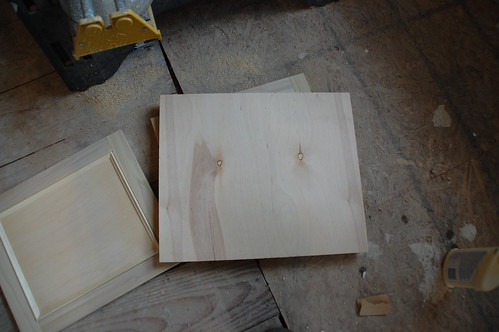
So if I can turn this…
Into this…
I think “believes it can be done” is probably the only skill absolutely required to take something like this on. Well, that and the ability to read a tape measure.
Other Things You Need to Build a Vanity. Like Tools. And Wood.
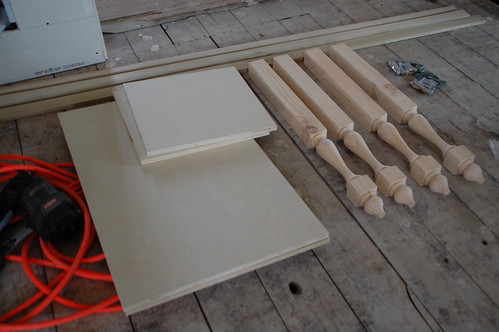
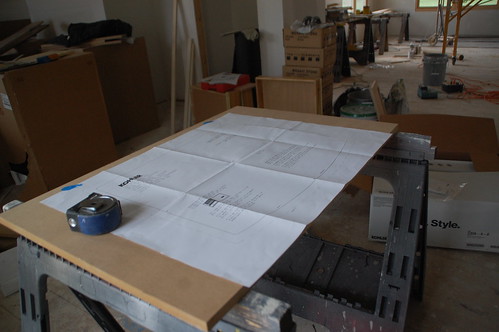
Maybe you’re the kind of person who likes to sketch out very detailed “plans” on a cocktail napkin before diving into a project (you’re in good company), but if you’d rather have something more scientific, here’s a look at the pieces I used to build my vanity. (You can also download a PDF of this here.)

- Tile counter – 2 sheets of 3/4″ MDF cut to 24-1/2 x36″ and 3/4″ tile
- Top piece (front only) – 1×2 board 30-1/2″ long
- Side panels (both sides) – 2 sheets of stain-grade 3/4″ plywood cut to 18-1/2 x 14-1/2″
- Doors (2) – made of 1×2 board cut to 13″ long for sides and 12″ long for top and bottom, a 12×10″ plywood panel, and trim cut to 10″ and 12″ for inside of panel
- Legs – 4 3″ pre-turned legs (from here) cut down to 33″ tall
- Hinges – 4 straight-mount cabinet hinges with 3/4″ offset (from here)
- Bottom piece (front and back) – 1×3 board 30-1/2″ long
- Bottom piece (sides) – 2 1×3 board 18-1/2″ long
- Cabinet bottom – 3/4″ plywood, 22×34″
- Back panel – 3/4″ plywood, 14-1/2″x30-1/2″
- Bottom shelf – 3/4″ plywood, 22×34″
- Shelf piece (front and back) – 1×2 board 30-1/2″ long
- Shelf piece (sides) – 1×2 board 18-1/2″ long
Tools
- Saws – I used my table saw for the plywood and miter saw for the 1x and legs.
- Dowel jig – I made the dowels on the first side of the cabinet manually but it became exponentially easier using a dowel jig. And for $20, well worth the price
- Wood glue
- Dowels – I used 1/4″
- Drill and bits
- Clamps
- Straight-edge and small square
The Building Part
There may be better and more efficient ways to do this. Shockingly, once I had the rough plan and the parts I just dove right in, but I also spent a lot of time in the process looking quizzically at my pieces, trying to figure out my next step.
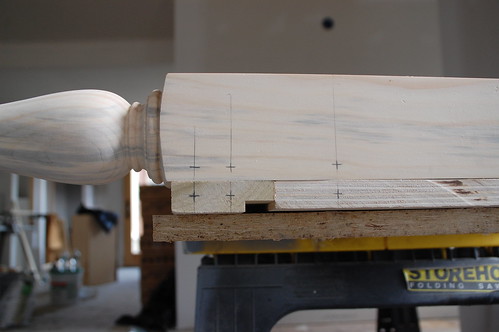
Step 1 – Cutting
I started with the three plywood side panels (two sides and a back) by ripping them down from a 4×8 sheet of plywood on the table saw. Once the guide was set up I ran each piece of the same dimension through it to make sure everything stayed square.
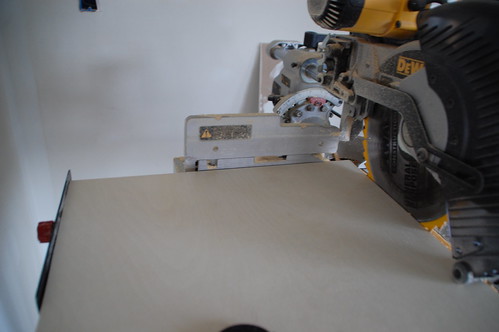
The legs and 1x pieces I cut on my baby the miter saw.

This is where it’s handy to have a stand or the saw set into a bench. You see the stop is raised on the one wing of the stand and I used that the same way I used the table saw guard, to make sure each piece was cut to exactly the same level.
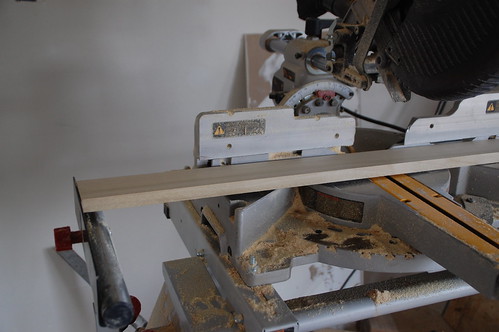
For the sides and back of the cabinet, some of the 1×3 needed to be the exact same length as the plywood panels, so I actually used a panel to set the stop on the miter saw…
Then cut my 1x.
Step 2 – Planning for bottom shelves
I knew that I was going to have to attach the bottom of the cabinet and the lower shelf to the sides and back somehow, and I also knew I wasn’t going to use dowels to do it. I tried two different methods for each shelf.
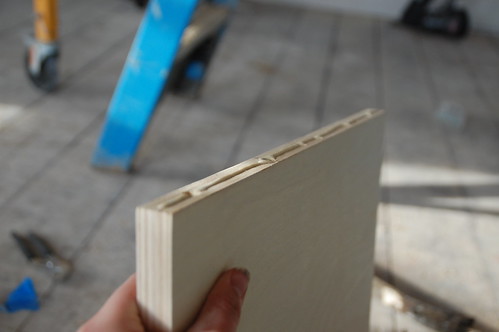
For the bottom of the cabinet I used a router to put a 1/4″ by 3/4″ notch in the wood…
When the side piece is assembled that would leave a 3/4″ space for me to slide the shelf into. (This means that the bottom piece for the cabinet was actually 1/4″ longer than I specified above, but I don’t recommend doing it this way.)
I’ll save you the suspense and tell you that sliding that piece in during final assembly while trying to glue and clamp everything was a pain in the ass. The method I used for the bottom shelf was 100 times easier, if less elegant.
Basically I took some scrap wood that was about 1/2″ square and glued it to the bottom piece to create a ledge for the shelf to rest on. (So the shelf could be dropped in later, instead of inserted during assembly.)
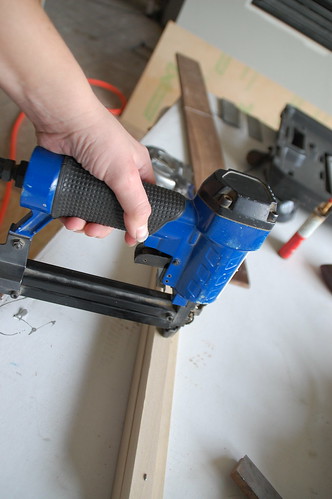
Just a few staples to hold everything in place while the glue dried…
And I made sure that when the shelf sat on the ledge, it would be flush with the top of the piece of wood so that it would all look pretty seamless.
Also, as you can see, I did the router method prior to drilling for dowels, but the scrap-piece method after I drilled the dowel holes, so it wouldn’t get in my way.
Step 3 – Constructing side pieces
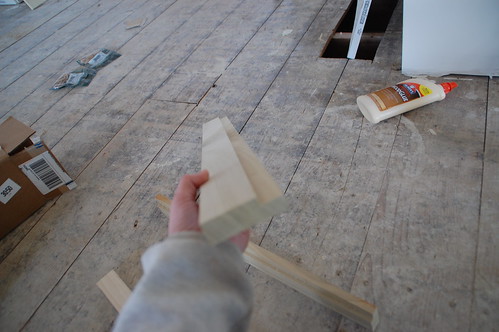
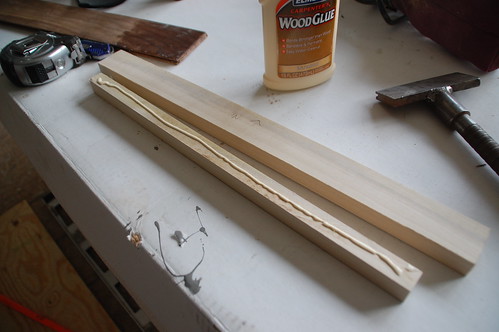
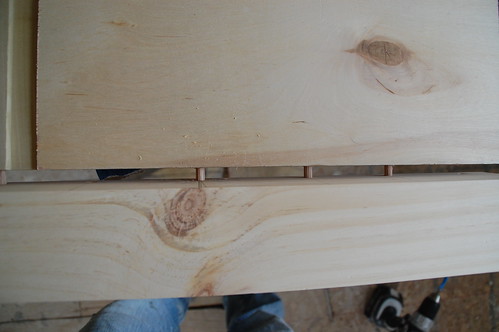
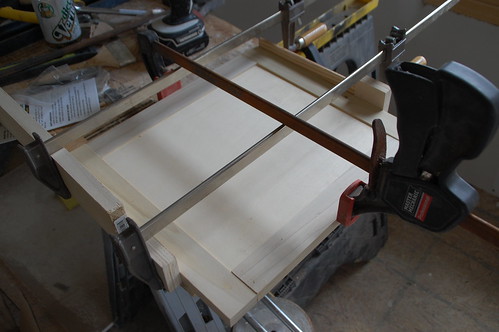
With all of the pieces cut and ready to assemble, I started with the dowel joints. The first ones I marked and drilled without a jig, which is the kind of experience that makes you think about sticking a screwdriver through your eyeball since it’s almost impossible to drill a straight centered hole with a hand drill. For more in depth instructions on making a dowel joint, check out this post, but I’ll give you the high-level.
The two pieces to be joined should be lined up and clamped completely flush, with the sides to be drilled facing out.
For the manual method I marked a vertical line across both pieces, and then a horizontal line across each piece to find the center for each hole.
Drilling commenced, and so did the swearing. But the nice thing about dowel joints is that if you mess up a hole, it will be covered up in the final piece, so you can always drill a new one.
Once I broke down and bought the jig, however, things got easier.

I didn’t have one messed up hole with this, and everything was perfectly straight and aligned between pieces.
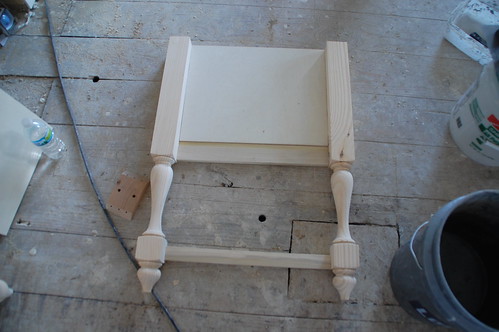
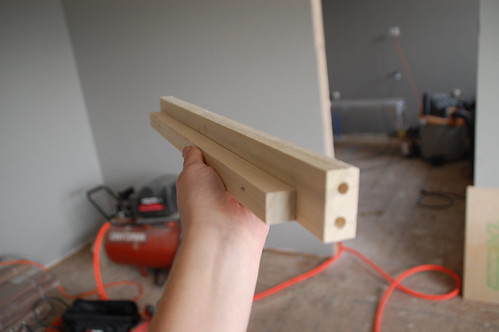
Both sides were dry fit first…
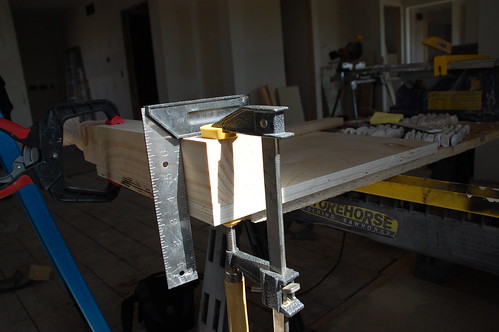
And once everything looked good I took it apart, sanded all the pieces down with 100 grit sandpaper, and then reassembled with glue.
And clamps.
Since I only have 3 24″ clamps for some inexplicable reason, I actually did these one at a time, and let them dry overnight.
Step 4 – Constructing front and back
The back of the cabinet was essentially the same as the sides– one plywood panel and a 1×3 bottom piece. The front was just a 1×3 bottom piece and 1×2 top piece since the doors would make up the bulk of it.
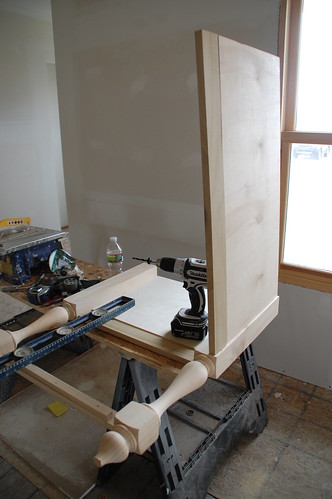
The dowels were done the same way on the front and back, it just took a little more maneuvering to dry fit everything.
And this is the exciting part where it starts to look like an actual cabinet.
If you’re not a big fan of the dowels, you could also probably use a kreg jig to attach everything from the inside with pocket screws, but I’d still glue everything.
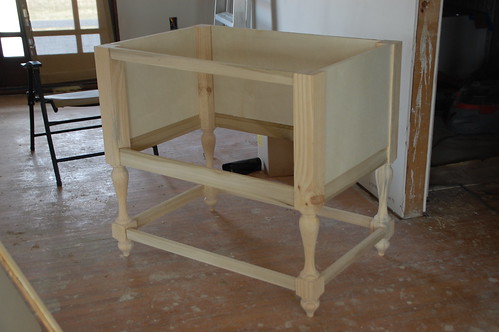
Step 5 – Shelves and final assembly of base
The bottom of the cabinet was also made out of 3/4″ plywood and required notches in the four corners to accommodate the legs of the vanity.
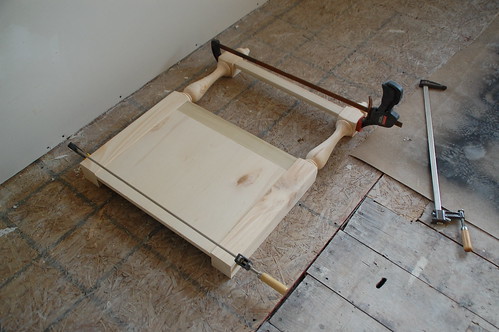
This one had to go in while I was gluing everything, but the bottom shelf I was able to drop in later, thankfully. I glued the front and back pieces to one side and then got a little help sliding the shelf into place…
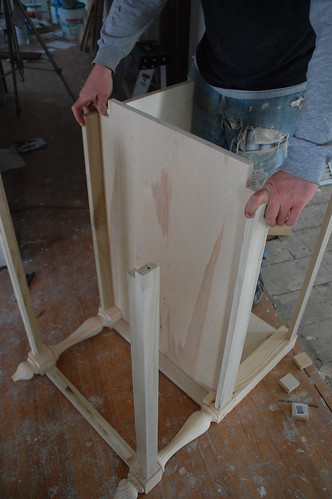
Then the other side was glued on top. (It was much easier to assemble the thing on its side like this.)
Clamping it all together was another big challenge. I used the reverse clamp method for one side, which meant building a frame larger than the cabinet and then using the clamps backwards to push the cabinet tight against the side of the frame. Sounds crazy, worked beautifully.

For the other side I used the combination of a really long clamp, and two smaller clamps that were rigged together.
It wasn’t pretty to look at, but it was passable.
After the clamps came off (about a day later) I slid the bottom shelf into place. I almost made a big mistake here because there wasn’t quite enough room to tilt the shelf on an angle and drop it in place, but thankfully the shape of the legs gave me some wiggle room and I was able to make it work.
I glued this bottom shelf and tacked it in with a couple of 1″ finish nails, but clamping it would have worked just as well.
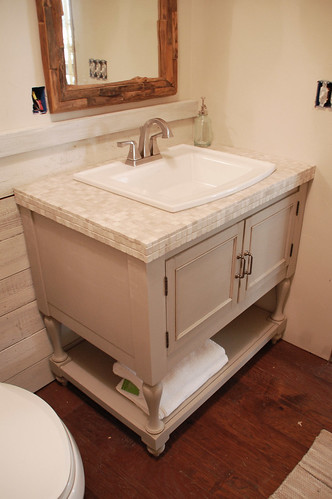
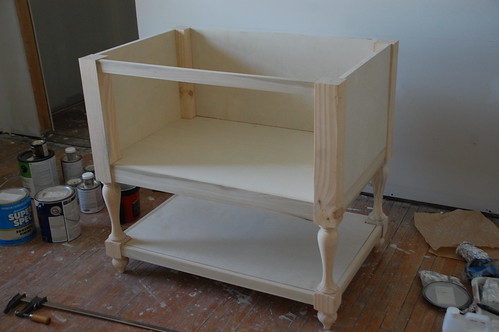
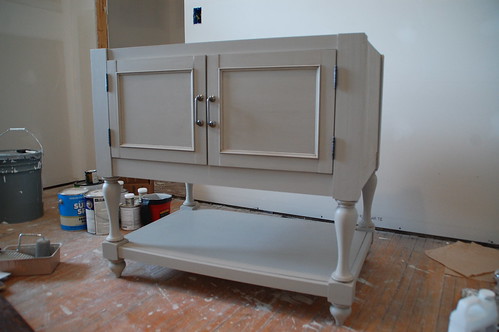
And with that, the main part of the vanity was complete!
I choose to paint it at this point, because I’m impatient and also because it allowed me to procrastinate on building the doors.
Step 6 – Stop Procrastinating. Build Doors.
This step started with having the right hinges. Most cabinets (it seems) have a 3/4″ frame for the “face” and so standard cabinet hinges are made to wrap around a 3/4″ piece of wood. It took a little research to find hinges that attached flat on one side and still offset the door by 3/4″.
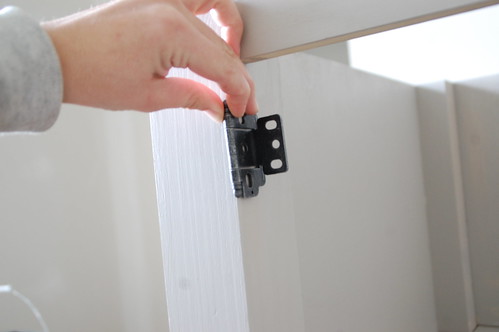
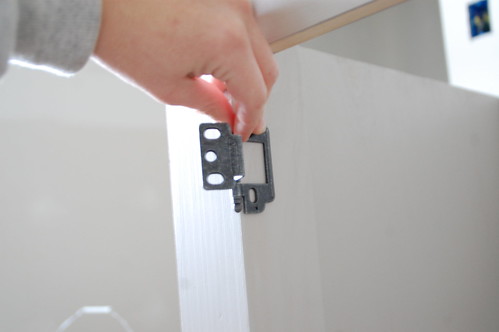
I found them here.
I wanted to have them in my hand before building the doors so I could account for the width of the hinge.
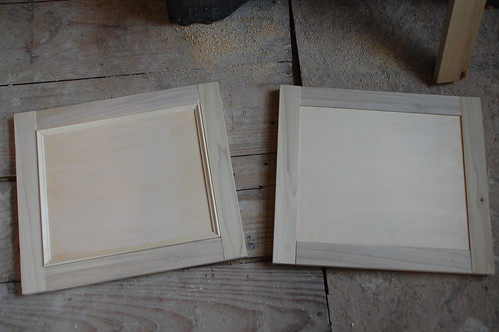
I built the doors using the same method I used for building the rest of the cabinet. A 3/4″ plywood panel made up the center of the door, and the frame of 1×2 poplar was attached to it with dowel joints.
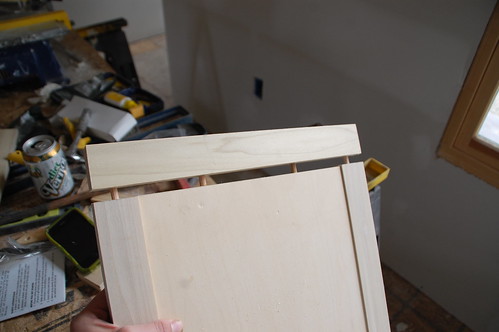
My dowels must not have been completely lined up for these so the frame pieces are not completely flush, but I just called that “character” and moved on.
Before finishing the doors any farther I attached them to the base for a trial run.
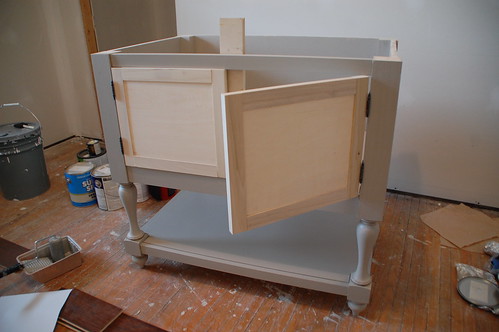
It required a little sanding and adjustment on the hinges for everything to swing smoothly, and I had a slightly larger gap between the doors than I’d anticipated. But they worked.
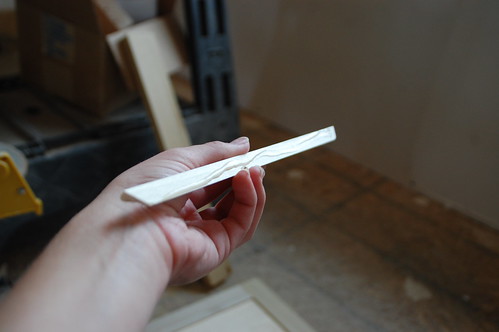
To finish the doors I tried out several different trim options…
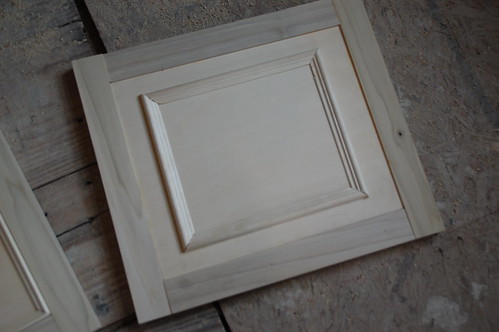
And finally ended up copying the PB door style with thin trim set just around the inside of the frame.
These pieces were attached with just a little wood glue.
Then I placed an extra piece of wood on top to keep everything in place while it dried.
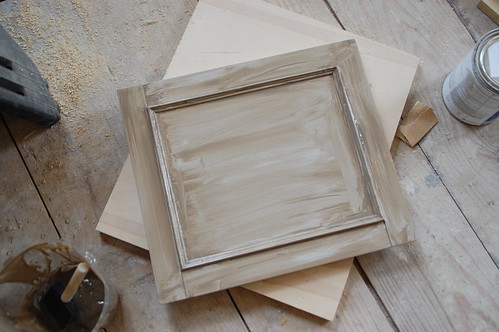
Step 7 – Paint
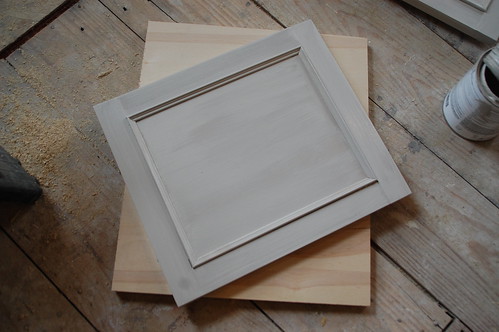
At this point, you basically have a fully constructed cabinet, and how you finish it is up to you. I used a two step process for painting the cabinet. Everything was painted a base gray color first, then I applied a darker gray-brown mixed with glaze…
And then wiped it mostly off…
Here’s the difference. (Left glazed, right unglazed)
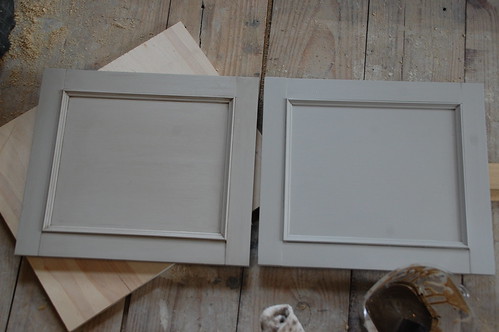
The whole cabinet was done this way, but it stood out the most on the doors and the detail in the turned legs.
After everything dried a coat of satin poly is a good idea, but I’ll go ahead and confess… I haven’t done that yet.
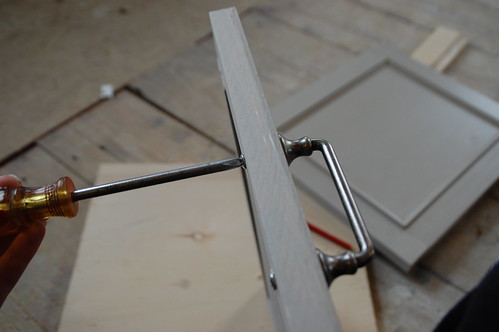
Step 8 – Hardware
The hardware installation was as easy as marking and drilling the holes…
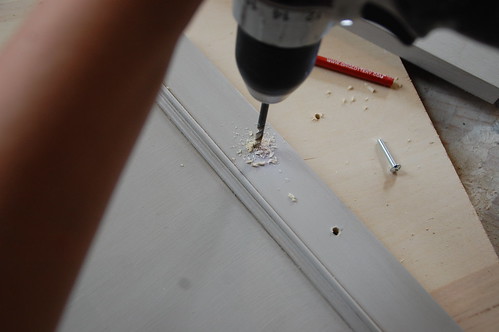
And then screwing the handles in.
Voila!
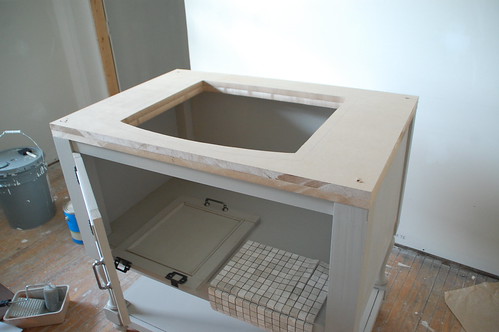
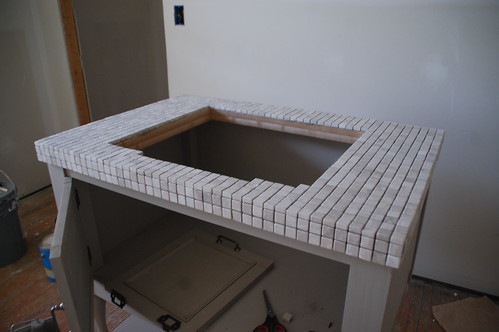
Step 9 – Extra Credit: Tile your own counter.
Any counter can be used at this point. I choose to build the counter out of MDF with 3/4″ tiles because it was quicker and cheaper than finding marble and getting it cut to size.
For detailed instructions on building and tiling a counter, check out this post.
Specifically for this project, here’s how it went down at a high level. I did a decent amount of planning and measuring once I had the tile and before I cut my MDF down to size so that I would only have full tiles. In my case this meant cutting the boards to exactly the width of the base (36″) and 1/2″ more than the depth, since I only tiled the front and not the back.
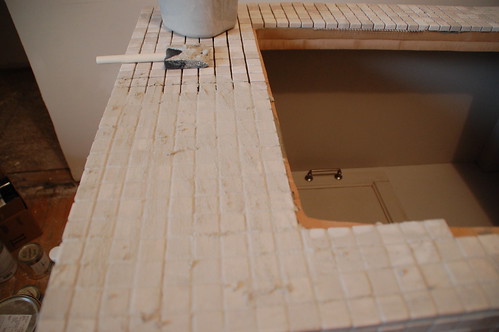
Actually, I totally messed this up and used a filler piece for the depth, which you’ll see in a minute, but in theory you should plan that out ahead of time.
Once your boards are the right size, the sink should come with a template to cut the right sized hole for it.
This means you need the sink before building the counter. Obviously.
It takes two pieces of 3/4″ MDF to make a 1-1/2″ thick counter. I always test the sink in the first one before cutting the second.
Then the pieces are attached to the vanity with 3″ thick drywalls screws. (Always predrill.)
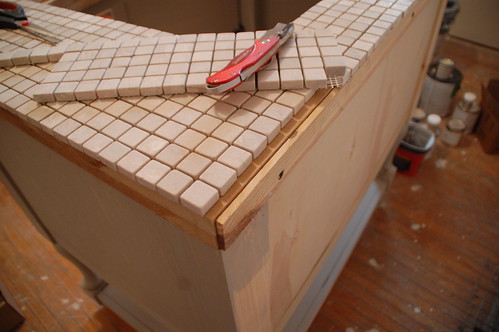
I chose to tile the front and sides and then overhang the top tiles to cover them. Here’s how I perfected the layout and cut the tiles sheets to fit prior to gluing anything down…
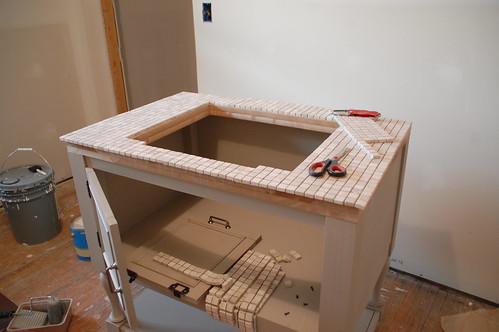
And where I added a little extra something on instead of cutting a row of tiles in half.
There’s a reason why I live with an engineer, okay?
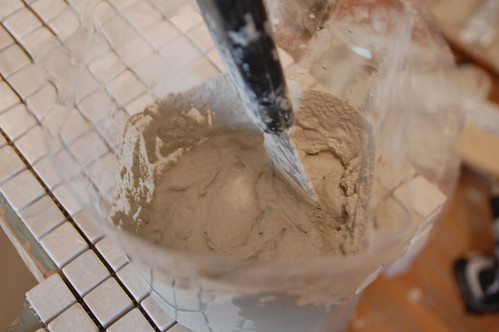
The tile gets set with a tile adhesive or mortar.
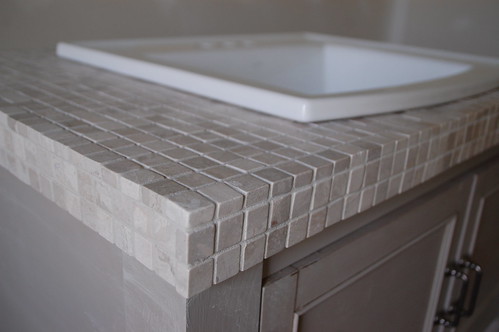
Then grouted once it’s dry.
Use a grout float and not a foam brush. Unless you live in a garage and are desperate to have a working bathroom in your house, which is entirely dependent on finishing this vanity counter. In that case use whatever you’ve got on hand.
Here we are, all cleaned up.
It would be an excellent idea to put a grout sealer on at this point, even if I myself haven’t done that yet either.
And after all of that work (and some assistance from The Plumbers getting the sink set and faucet in)…
In my case it needs some finishing touches, like a nice basket underneath and actual outlets installed above it. But regardless, you can bet I smile every time I see this knowing that I spent about $400 in materials for a vanity that costs $1400 from Pottery Barn.
Another thing I’ve learned is that it almost takes longer to write a post about how to build a vanity than it does to actually build one, but happily this one was done just in time for How To’s Day at The Lettered Cottage:


94 Responses
Not only do you have the skills to make this beautiful cabinet, you are also generous enough to make a tutorial (which I’m sure took hours, although maybe not as long as building the cabinet:) Now, get on that poly-ing and grout sealing – the last thing you want is for the bathroom humidity to do a number on your amazing work! FANTASTIC! Thank you for sharing your coolness with the rest of us.
Thank you for this post. I was looking at all of your bathroom sneak peeks hoping I’d see this tutorial someday! You did a brilliant job!
Ahh, LOVE! I can see some of the bathroom shaping up behind the vanity also, and I can’t wait for the big reveal!
It makes me want to re-do my bathroom, but my husband will have a coranary.
This looks fab!!! Where did you get that dowel jig? Is it a certain brand?
I don’t know the exact brand of the jig, but I found this one in the tool section of lowes. Right by the kreg jigs.
WOW, you totally rock! that looks fabulous! I have admired that same exact sink/vanity when I get my catalog.
A HUGE thank you to you being so sweet to share the step by step tutorial and written directions and pictures. I know that is time consuming.
Oh my gosh, oh my gosh, oh my gosh. I love it! I am showing this to my hubby so I can force him to make it. Hehe:) Thank you!!!
AMAZING! that is my favorite PB vanity. Great tutorial!
The vanity,walls,floor,mirror,tile countertop- all look so, so good! What colors did you use for the vanity?
The base color is Benjamin Moore Valley Forge Tan (which is also the base color for the weathered white wood boards), the glaze was a random sample I picked up from Lowes one day — I believe its Olympic “Granite” — and it was mixed with about two parts clear glaze to one part paint or less to do the top coat.
Fantastic! Thanks for a great tutorial.
If we decide to build our own, we will be “borrowing” some of your steps!
And I will totally need to see pics of it!
That’s incredible!!! Thanks for sharing.
Wow! You are a rock star! I think I like yours better than the PB vanity.
~Amanda
This is incredible! I hate to say it, but I would probably just pay the PB price because trying to build this would most likely make me want to kill someone. But of course, I would wait until it went on sale! HA
You amaze me!
Very nice job on the vanity!
This is honestly incredible! Seriously, one of the best DIY projects I have ever seen. Kudos to you on the vanity AND the tutorial- amazing!!
Wow! I actually have the double version of this vanity (and love it) but yours is REALLY amazing!! Now I’m wishing we could have DIY’d!!
I love it!!!!!!! Where did you get the legs from though? I’m going to see if my husband can make this. Thanks!
Nevermind about the legs. I really need to work on my reading skills.
I was totally going to re-post the link for you anyway… I do that ALL the time! Also, I didn’t really shop around for those legs since I was in dire need of a vanity at the time, so I’m not saying those were the cheapest option.
Unbelievable! That is absolutely stunning. I curse when I sew a seam so I can imagine my children would have been in for an earful if I’d tried to conquer something as amazing as this! I’m sure you are, but you should be SO proud of yourself!! GORG!!
Wow! I have been trying to find vanities for my bathroom and I am not finding anything I like. Then I see your blog and I am now reconsidering the possibility of making my own. I love the tile on the top! Thank you so much for taking the time to make this tutorial.
Simply amazing! I don’t have all of the tools that you do, but I’m wondering if I can tweak the plan a bit and still make it work. You’ve inspired me!!
You’re on re-nest!! http://www.re-nest.com/re-nest/diy/diy-idea-create-your-own-potter-barn-inspired-vanity-diy-diva-148309
I’m a little behind on my Google Reader and am just now seeing this but um, BRAVO! Seriously, awesome job.
This is fabulous! Great tutorial too – I linked it to my bathrooms post as well! Thanks!
Wow! SO impressive and pretty!
That vanity is absolutely beautiful! BUT, guess what I want to see? Yes, the inside. I want to see where the pipes for the sink are and how they fit in there. Indulge me? LOL.
You are so talented… I love it.
Wow, very impressive! Great how-to post. The cabinet looks so beautiful
I love your site and am planing on building one of these. Thanks.
That is amazingly beautiful! I have loved the PB version for a long time, but would never be able to afford that. I haven’t shared it yet with my hubby, but I would want to try to follow your tutorial. I would love to know what you and others would think about one that was painted black and antiqued/distressed. Thanks! Kim
Kim, I think distressed black would be an awesome look for this piece. You could go a dozen ways with the counter on something like that! If you make one, definitely send pics. I’d love to see it.
I love this and we are going for it! Where can I purchase the legs for the vanity???
Here: http://www.tablelegs.com/?gclid=COTL54fli6sCFdV25Qodv3eAzA
Good luck!
You are so awesome and helpful. THANKS! I’ll send you pictures when it is completed.
Awesome vanity!
Can you tell us about the wood boards installed on the wall behind the vanity? LOVE THAT TOO!
Hey Jody – Glad you like the vanity, it’s one of my faves! Here’s how I did the wood wall using some mis-ordered 1x cedar from the house exterior: Rustic White Wood Wall
And here’s a look at the whole bathroom: Beachy Bath Reveal
That is a freaking awesome project!! I’ve got to consider using dowel pins for my next project. For doors, I’ve mainly used a loose mortise and tenon, because it’s quick and easy. Dowels looks quicker and easier.
John – I really enjoyed the dowels, but I suggest using a dowel jig, which made it 100 times easier!
I love the vanity, especially the distressed/glazed color. I did this a few years ago and I totally screwed up a cabinet. I never could smear it out right. Looks great, thanks for doubling your work and posting this thread.
We live in Surrey, BC
Where do you find the spindles.
Cannot find that size anywhere.
Thanks
This is absolutely gorgeous. You do amazing work. I’ve been doing some tile projects and was told that you have to use the cement backer board; otherwise, the grout/adhesive would not adhere to wood in the long run. Maybe I’ve been misled!! Did you use a grout/adhesive that said it would stay attached to wood? Thank you so much!
Hey Joni – This is a really good point. It definitely never hurts to use a backer board, or if that is too thick, something like the Durock Tile Membrane. I don’t think adhesion to wood is a problem, usually what backer board solves for is the expansion and contraction of wood (which can crack grout). For something like this that is a really small area and won’t be getting any wear (like being stepped on, etc.) I didn’t feel like a backer board was necessary. I actually did my entire kitchen like this in the last house– covered with 2″ tile and didn’t have a problem with it in 5 years.
So, it’s a little bit of a judgment call. One thing I would always say is to use a backer board on a large space like a floor!
Thanks for everything! Which exact legs did you order? I couldn’t figure out which finish to order and whether you ordered regular sonoma, large sonoma, or extra large sonoma? I hope you still look at this so I can order quickly.
I know she ordered the Sonoma Stretcher Block legs in 2 3/4″ in white pine, because I saw on another post of hers that she only paid $24 each leg.
http://www.tablelegs.com/Legs/VanityLegs/StretcherBlockLegs/Sonoma-Stretcher-Block-Legs/Sonoma-Stretcher-Block-Legs-36.aspx
Ha. Thanks Kathy for being so perceptive. You are correct!
I absolutely LOVE your vanity! Thank you so much for sharing your instructions, I plan on making this next month with a few tweaks. One question I have is, I see you bought the white pine legs from tablelegs.com, which are the same ones I plan to buy. I was just wondering if you had any issues with the knots in the legs, or the knots showing through when you painted?
I’d love to see pics when you’re done! Regarding the legs… I believe only one of them had a knot in it, and it wasn’t visible at all through the paint. Now, I like things to look a little rustic so I may not have noticed it as much as others, but I think it will be fine!
You are my Shero!!! I would have to reread this several times to get. May just look for an old dresser and incorp some of your ideas!
AWESOME! I just googled “how to make a sink vanity DIY” because I’m in love with the SAME pottery barn vanity, and can’t stomach the price, and your site came up! love it! thanks for sharing!!
Okay – question:
in another picture on your site, you have this vanity in a bathroom that is GORGEOUS. Where did you get your tub that is rectangular-looking from the side? and the tile surround? love it!
Stunning! You did an AMAZING job!
I love the design… I’d change the legs for square type, but that’s just personal taste.
Is there a plan for a matching linen cabinet? We are going to remove the doorway leading from the guest room into the bathroom and I’d like to put the linen cabinet there.
This is such a wonderful tutorial. thank you so much for sharing! Would you mind telling us how much money the materials cost roughly? thank you !
Does your $400 price include the tile counter top and sink, or is it just cabinet alone?
Thanks!
You know Marcella, it’s been a while since I built this, but I’m pretty sure it included all of the cabinet materials and the counter, the sink I already had.
Comments are closed.