Miniature donkeys, we are ready for you.
I can’t even explain in words the number of hours we spent contemplating this fence. What type of posts to use, how far apart to put supports, what type of fencing, and where to get everything.
The length of time it took us to make these decisions is likely responsible for the fact that we were installing the fence in 35-degree weather, 24 hours before we were blessed with our first inch of snow.
To spare any future fence-installers up here in the northern climates those frozen fingers, let me share with you what I learned.
Types of Fence (particularly for pastures)
I’m pretty insistent on a split rail fence, strictly for looks, and will have it on two sides of this pasture. Eventually. The other two sides of the pasture and the back of the property will be T-posts with woven-wire or “horse fence” as MysteryMan’s grandpa calls it.
Options:
- Post and board fencing- You see this around horse pastures a lot. It reminds me of Kentucky. My grandparents post and board fence lasted a good 30 years, so it’s worth the money, but I think it’s safe to say, once it’s in, it’s in. So plan ahead.
- Split-rail fencing– Like the post and board, it’s not ultra flexible and it costs some, but it’s quicker to install than a post and board. For a pasture, or to keep the dogs in, you’ll need to attach welded or woven wire to it as well.
- Electric fencing – Benefits: You may be able to zap unsuspecting neighbors with it. Practically, it seems pretty easy to string a couple of the hot wires up to some posts. Quick, easy, lots of flexibility, but it does require electricity (ok, duh) and that can cost, also, repairs are probably something to think about. And whether or not you’re clumsy enough to accidentally bang into one of these.
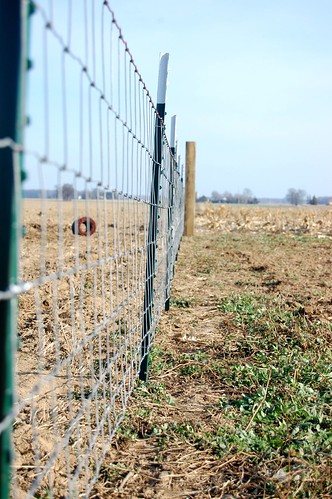
- Woven wire fencing – (aka field or horse fence) Has larger spacing between wires than a welded wire fence, and can take more of a beating. It also comes in longer lengths, but you can’t find it a your regular big-box store (You can order it from Tractor Supply though)
- Welded wire fencing – A light-duty version of the woven wire/ horse fence, this one can be strung with lightweight T-posts as well.
If you’re looking for materials or tools, Tractor Supply is the place to go, unless you have a local fence company. We did a lot of price shopping and didn’t find significant savings anywhere, but TSC had the most options to choose from. Check out their selection of fencing products here. Unfortunately you can’t order online, but you can call in or order through a store.
Installing the Fence: Basics
A woven wire fence installed with T-posts would consist of 6 basic materials
- T-posts
- Wood “anchor” posts (4×4 is probably adequate, we use 6×6 because we had some)
- Concrete for anchor posts
- Wire fencing
- Clips to attach fencing to T-posts
- U staples or nails to attach fencing to anchor posts
Spacing:
- Anchor posts should be at the corners or ends of the fence, and every 30- 50 feet throughout the length of it.
- T-posts should be every 10 feet.
Depth:
- Anchor posts should be treated like any wood post and go down at least 2.5 feet for a 5 foot tall fence. (The bigger the post, the deeper you want to set it.)
- T-posts have “blades” on them that should be buried, again, at least 2 feet for a 5 foot fence I would think.
Tools:
- Post-hole digger for the anchor posts
- A good tape to measure everything out
- String line & level to keep you straight
- T-post “banger” – or “post driver” as they are more appropriately referred to. Like this.
- Heavy-duty pliers to attach the clips
- Hammer for the U nails
- pulleys and a board to stretch the fence
How We Did It
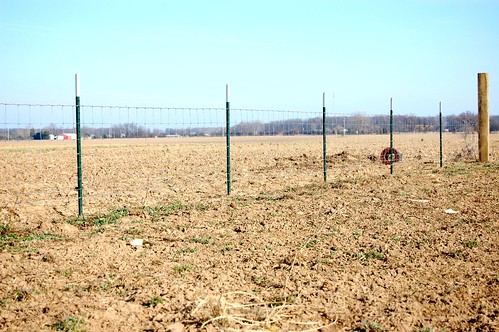
1.) We set the corner posts and marked the T-post and anchor post locations, then put the anchors in first since it took the most time. (String line, dig hole, level post, concrete in place, rinse and repeat til finished.) The anchor posts were set on the “inside” of the fence, so the wire would go on the outside and around the corners.
2.) T-posts were installed by banging them into the ground with the banger. Post driver. Whatever. We aligned them so the fencing would be on the “inside” of the pasture and the T-posts on the outside. (Opposite of the anchor posts.)

3.) The fencing gets rolled out. If you happen to be the person holding the other end of the wire, don’t let go. Or you’ll be chasing a rapidly re-rolling bit of fence for then next 150 feet. Not that I’d know from experience, but I suspect it could happen.
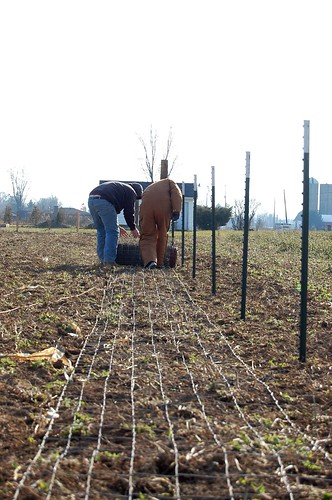
4.) Once the “frame” of posts was up (the T-posts being significantly faster to install than the anchor posts, but also significantly harder to keep level) we stretched the fence. Conventional wisdom says to attach the fence to one corner/anchor post with U staples/nails, and then put a temporary post in the ground beyond the other corner or anchor post, which you will attach the pulleys to in order to stretch the fence.
We thought that seemed like a lot of extra effort, so we decided to use the truck as our stretching post instead.
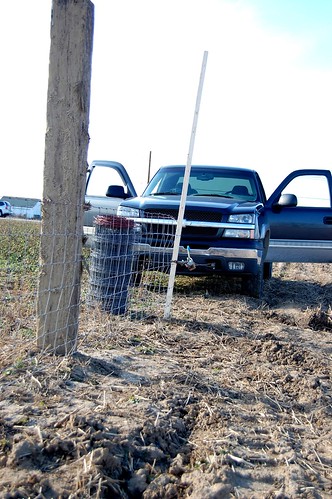
What? It worked.
Note: We didn’t stretch the fence by backing the truck up or anything, we used the winch on the pulley for that. We basically just stuck a 2×3 through the holes of the fence, which is probably the less-than-appropriate way to do that, then wrapped a chain around it and attached it to the pulley (which was attached to the cable hook on the front of the truck.)
I hear the fence should be stretched until the little V shaped crimps in it become about 1/3 straighter. I have no idea how a person would eyeball that, so we went with the “straight, taught, looks good” method.
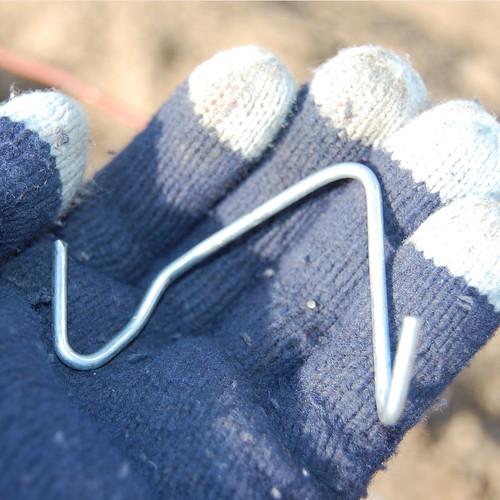
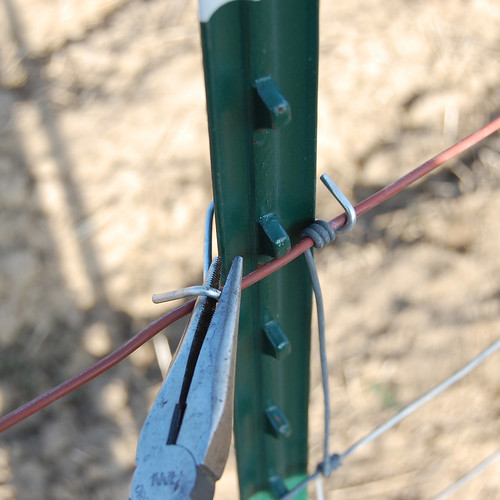
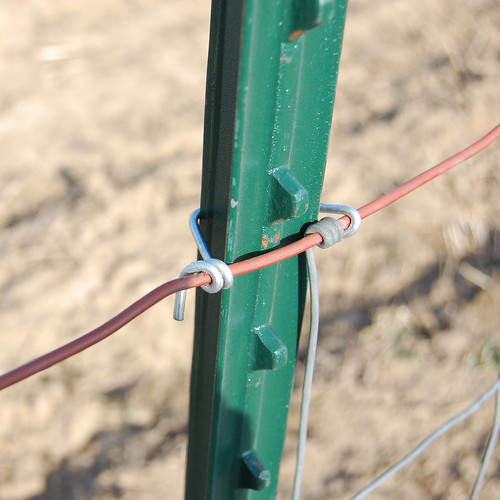
5.) Once the wire was stretched we started at one end and began attaching the clips. For a 32″ fence, we used 3 clips per T-post. 5 clips per post is recommended for a higher fence. The clips work like this (to the best of my knowledge)
Don’t knock the gloves. I lost my work pair somewhere and this was what was available to me to keep my fingers from freezing and breaking into a thousand pieces.
Okay. They are ridiculous.
In any case, these clips baffled me for about 3 minutes, and thank god I decided to own donkeys with an engineer or I might still be out there with my blue-tipped-blue gloves.
Wrap…
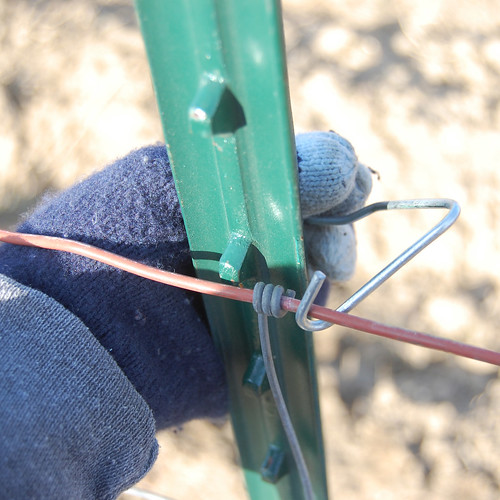
One side has a longer end, and if you bend at the kink everything with tighten up nicely.
Finish it off with another wrap and tighten down the other side of the clip.
Looks easy. Gets to be a pain in the ass after you do it seven hundred times. Also, unlike some people who were too busy taking pictures to pay attention to what they were doing, make sure the top of the fence is over one of those handy notches on the post. (MysteryMan rolled his eyes so hard he almost fell over. Don’t worry, I redid it.)
6.) Get donkeys. Enjoy life.
Now I just have to build the donkey shelter sometime before spring.
More Info from People Who’ve Done It:
- Constructing Wire Fences – From the University of Missouri.
- Build a Fence for your Homestead– For barbed wire, which looks significantly harder and more painful to install
- A “Put-Up Guide for Field Fence – More info-by-exprerience from a website with the longest URL ever. They call the post driver a “rammer” which is awesome, and makes me feel better for using the term “banger” repeatedly in this post. (Also, they have a “Like this? Buy us a beer!” link at the bottom of their page. Our kind of people.)

73 Responses
Fencing is supposed to go on the inside of the T post – esp. since I wanted to put electric (to keep the bears out) on the outside. Got home from running errands and hubby and the kids had run 1 long side between 2 wooden corner posts with the flat side of the T posts facing OUT. The first short side I had him put the flat side facing IN. I figured we’d have to run the field fence around the outside of the corners due to the bracing, but can we run it on the outside of the whole side, as long as it’s stretched tight and I get long insulators? Or do I have to make them pull out all the T posts and turn them around? (The other 2 sides of the fence are primarily going to be attached to trees, so will be on the outside of the trees, I’ve already bought long nail-in insulators, I figured keeping the weeds from growing up between the field fence and the electric would be too hard when they’re separated by the width of a tree trunk.)
I need the wire here in Kalulushi, Zambia
I want to install this type of fence – but my space is not even ground. Any tips?
Seriously! It’s that easy!
I thought about rolling it out flat as you did n’ then I wondered how to tighten it taught enough to play a tune on…2×4 woven vertically down thru as you have and a Come-Along to a tree to stretch. (..no room for a truck.)
With a 300′ roll n only 250′ to run, two sides of the property (3 gates etc.) I can aford 1 or 2 spaces of waste…or just a 2×4 before the roll n pull.
Thank so, SO much 🙂 for this info…now this is a simple countryboy walkthru.
Love it!!
D.
I will be needing wire fence woven metal poles along my property line which is 4 Acres I would need an estimate I can send you the measurements it’s a straight or Acres flat-out no obstacles
I will be needing wire fence woven metal poles along my property line which is 4 Acres I would need an estimate I can send you the measurements it’s a straight or Acres flat-out no obstacles
Welcomed your advice , wisdom with experience. I will be working with two mystery men . And putting up a welded wire fence with T post and wooden corner anchors. Wish you were here to supervise this project .It’s warm here in Florida thing should go smoothly weather wise . All the details in your post will be helpful .
I just wanted to chime in and say that I found this page very helpful.
We adopted a couple of catahoula leopard dogs and had to put up a six foot fence to keep them in our yard. (One side of our yard had a brick wall with a 3 foot fence and they were easily able to get over that.)
The tips and tricks here were invaluable, especially on how to work the wire clips for the T posts.
So thank you very much!
this is great! thank you for sharing. I’m curious as to how the fence looks 10-11 years after you installed it? Still happy with it and working well for your property?
Yes! I’ve had a couple of posts I didn’t sink deep enough shift over time (and have once or twice tighened up a loose secintion of wire) but overall has held up well.
Your article is quite helpful! I have so many questions, and you have answered many. Thank you! Such a nice and superb article, we have been looking for this information about how to install a woven wire fence . Indeed a great post about it!!I never thought will get to visit this Dukeswiremesh.com oh, has some nice content for everyone.
Been trying to figure out how to build my dog run. 25’x100: I want to use welded wire fence everything is at tractor supply yay go tractor!
Then I discovered your article…. was wondering how to stretch it so yeah I’m going to take that idea and many more. I’m not going to use my truck cuz then I’ll tear up the yard and you know how that goes! Ugh more work. Go blue thanks for the help And the laughs! From another DIY diva.
A hint for pulling the wire, cut 2 2x4s about 6 inches shorter than the fence is tall 47″ fence about 40 in 2×4 ,s drill 3 holes in both bords top bottom and middle and then after the fence ia rolled out about 5 ft past you anchor pole sandwich the wire between the boards and use a carrage bolt and but to tighten then wrap a chain around the boards on top and on bottom and then pull the with a comealomg or pull it pulls nicely and store away for later use next time
I want to thank you for a very well documented and informative article on fencing. Your article is perfect timing for me. I’m building paddocks and also like split-fencing. I enjoyed reading ur overlaid humor…. “go blue gloves”.. I support the blue!
Thanks again.
I love her tip #6, get donkey haha. My friend just purchased a farm with cows and chickens – her first foray into farm life, so I’ll forward this page to her.
Hi!
A tip to tighten the fence if you are limited in space, helpers or have a septic field or other areas you can not drive a vehicle or don’t have machinery like a tractor. I used a piece of rebar woven through the
folded wire and a rachet strap. I hooked to the center of the rebar and gently pulled the welded wire snug and was able to staple the wire on my own. Works for steel t-posts also. The ratchet strap holds while fastening the ties too. This is great option if you have no helper available and doing this by yourself. After you are done simply loosen off the ratchet.
Oh brilliant, I’m trying that method tomorrow!
What’s your opinion on woven wire fence? Many people are apprehensive about its installation because they don’t know how to install a woven-wire fence.
Very informative article that kept me smiling.
What do you do for a gate?!
Two posts with a pasture gate attached to them (you can get them at Tractor Supply!)
Indeed! I’ve had several posts I didn’t sink profound enough shift after some time (and have more than once tighened up a free secintion of wire) yet generally speaking has held up well.
Your article is very helpful. I have 300’ of wire fencing that is on the side of a 25’ slope and has a lot of unground boulders. I hired out and had a dozer move most of the above ground/down to China boulders. However, some underground boulders are still in my fence line. What’s your recommendation?
Comments are closed.