DISCLAIMER: I am not a professional carpenter, woodworker, or crown molding hanger. I’m just a girl with a dremmel, some rotozip bits, and a miter saw.
I’m not even going to pretend like crown molding is my friend. I live in an eighty year old crooked house. Anything that needs to be straight, level, cut at a specific angle, or must be hung in the presence of polite company (aka without swearing) is not welcome here. And that’s why coping crown molding joints and the like has been such a huge part of life on garrison road. Because the only way those little plastic miter boxes where you saw everything a a flat angle work is in a world where houses are perfectly square. And maybe not even then.
I’ve had a lot of people in and out of my house in the last three years that claim to be “carpenters” and I can only assume by that they mean “rough carpenters” because none of the finish-work was done correctly, which, of course, meant taking matters into my own hands. (And I have to give credit to Ricky, who first introduced me to the concept of coping.)
So, for someone who has never had to cope a joint before before, I’ll start with the shoe molding I had to put on in The Purple Bedroom because the concept is easier when you aren’t dealing with all those funky crown molding angles.
Here’s what I use:
A cheap Black & Decker dremmel type tool with a flex shaft attachment (my favorite tool in my arsenal) and some rotozip bits.


Here’s how I do it:
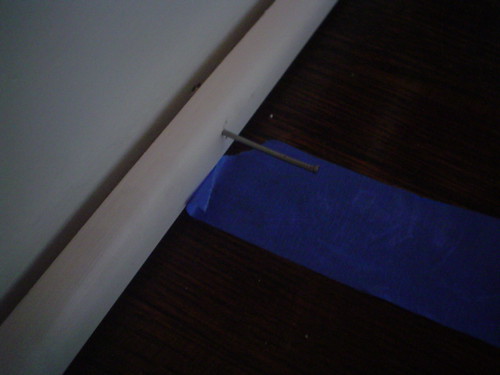
Step 1: The first two pieces of shoe molding (or baseboard) are easy, you just measure the wall, cut the piece of molding to exactly that length, and nail it in. Like this…
No angles, nothing tricky. My personal trick for not beating the brand new floor up with the hammer while nailing this stuff in: Painters tape.
Incidently, the first to pieces of trim/molding etc. will go on opposite walls, which is probably obvious.
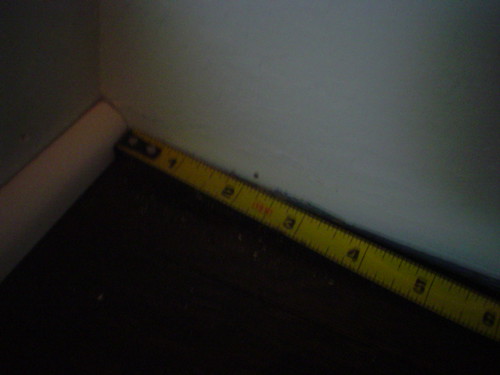
Step 2: Measure for pieces 3 and 4. I’m not saying which way is “proper” since propriety isn’t really my thing, but I measure from the furthest point (so the wall, not the molding itself) like this…
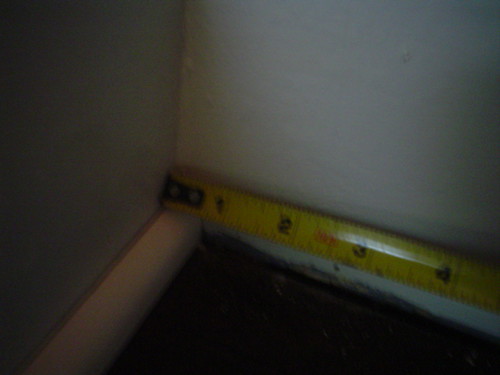
Not like this:
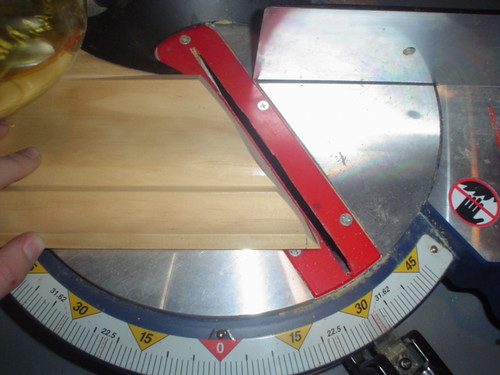
Step 3: Cut stuff with the big saw.
For shoe molding or baseboard or anything that sits flat against the wall, you’ll cut it at a 45. One of the reasons that I love this saw so much is that it does the math for me.
Step 4: Coping
The objective is to cut this out so that these two pieces fit together nicely.

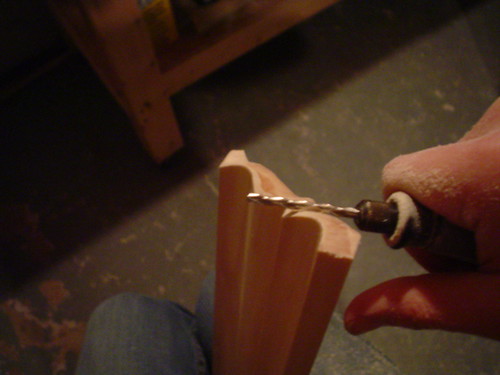
That’s where the dremmel comes in. The whole point of cutting that piece at an angle instead of just hacking at it with a saw was to create a line that I can use to know what part of the wood needs to be carved out. People do this by hand with coping saws or with their jig saws set at an angle, but personally I’m more comfortable with my dremmel.
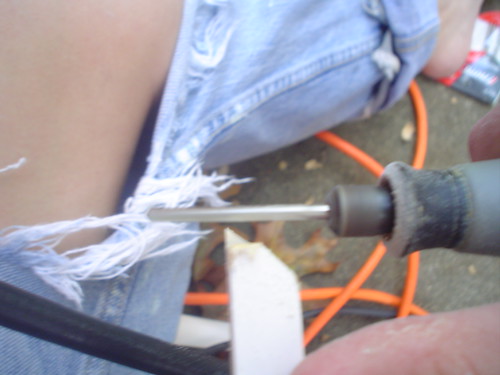
This takes about 1/16″ to 1/8″ of wood away each time I swipe it over (almost like an electric knife) depending on how hard I push. It definitely takes getting the hang of, but this is how I carve my brooms, so I’ve had some practice.
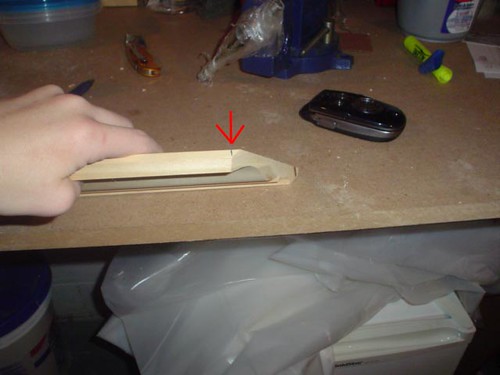
About what it looks like done:
See how it fits:
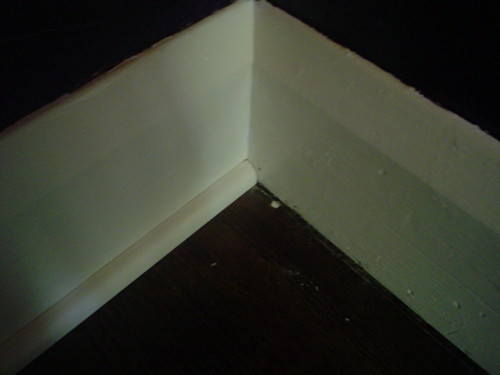
Then you just pop those babies in, and voila! Finished shoe molding.
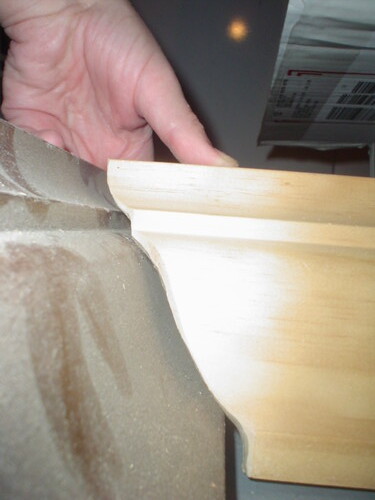
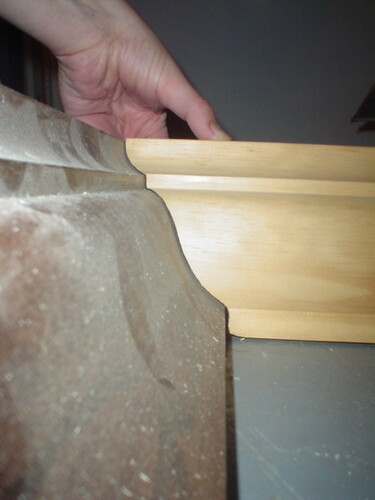
Crown molding, on the other hand, is a little more difficult. The nice thing is that the saw pretty much does the angles for you, and it’s not as fragile on the ends as the shoe molding (and that sharp little point).
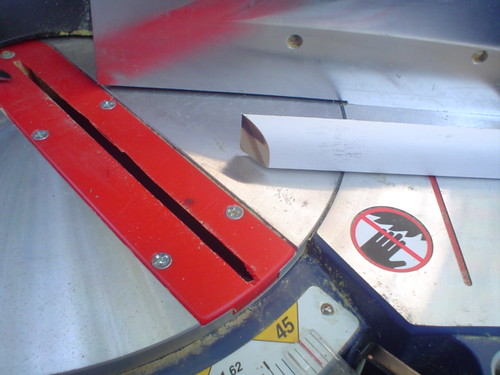
Its cut at two angles like this:
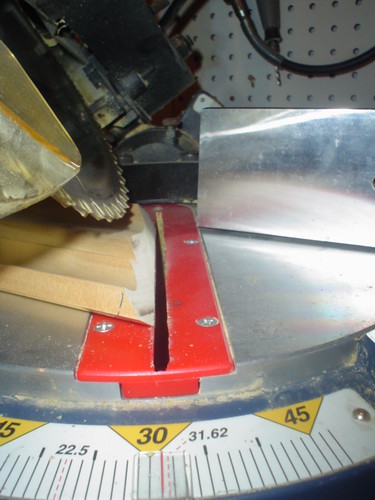
The saw has markings at 31.62 degrees, and 33.9 degrees, so that’s where I cut. I’ve learned to trust the saw.
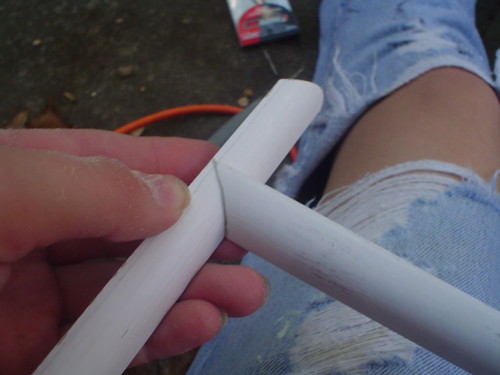
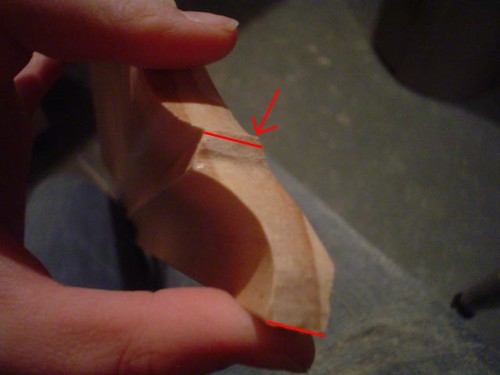
This is how it will fit… eventually:
The part that I will need to remove is in the red:
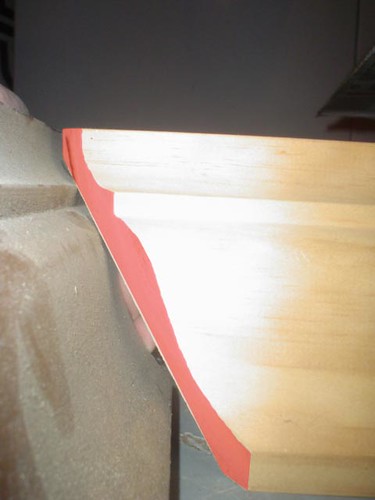
Technically the part of the molding that is on top in that picture will be on the bottom when you actually install it, which makes sense if you try to visualize… it was just easier to hold that way.
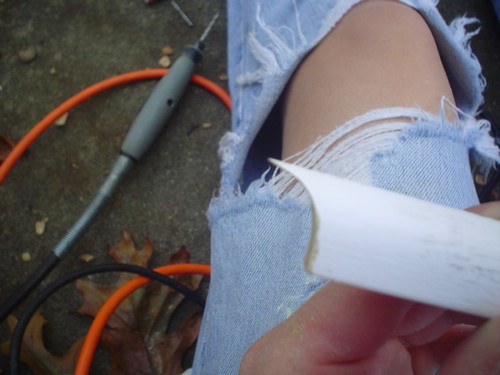
Anyway. I use the same technique as I did on the shoe molding, only its a little more difficult design, and I’m trying to get it to fit on an angle, so I make a couple of marks for reference:
And, trying to keep the bit parallel to the line at the top… get to carving:
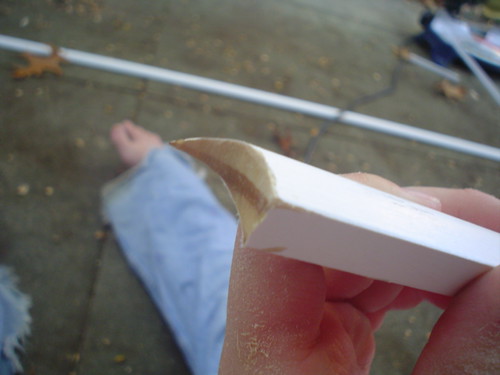
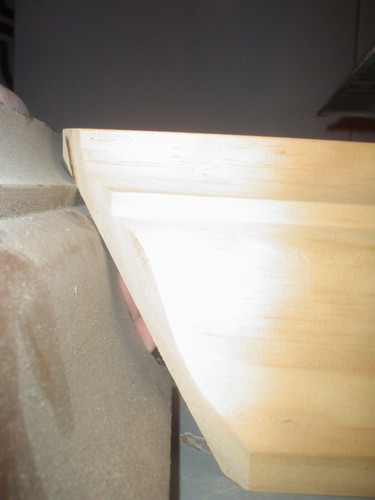
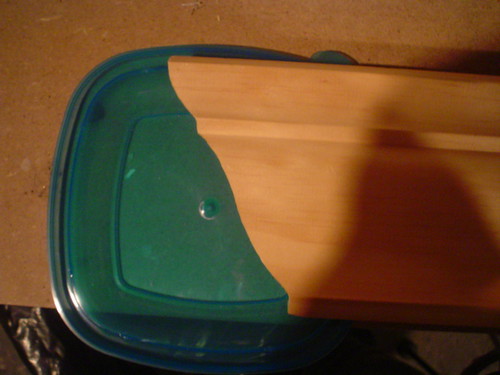
This is roughly cut out, but you can see how it starts to fit:
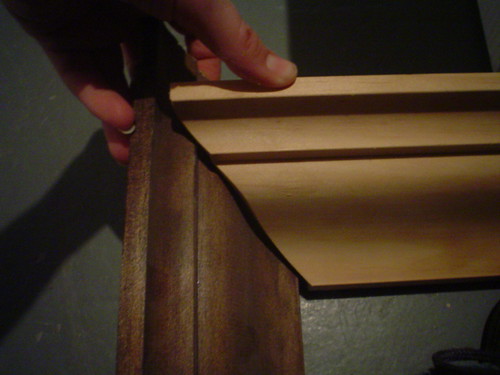
I was having a little trouble getting a tight fit, so I added some lines to this picture so you can see where I needed to trim. That ridge in the middle should be parallel with the bottom of the molding.
Takes a little while to get used to the angles and all, but in the end…
This piece fits tight…
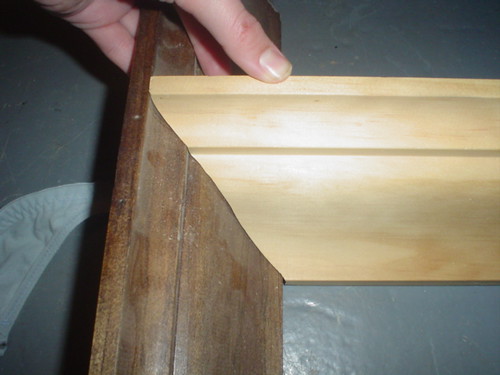
And is much more forgiving in a crooked room than just cutting the joint at an angle would be.
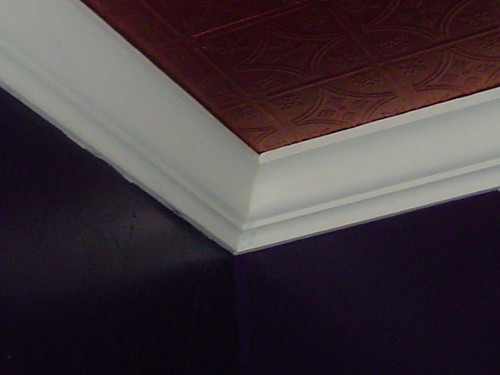
Painted and finished!

36 Responses
holy crap you are a dremmel wielding wonder! we want crown molding but are a’scared to attempt it. we envision so much cussing and throwing of anything we can get our pissed off hands on.
but….i will be back to study this.
Hey! Love your site!
We are considering the Armstrong faux tin ceilings for our kitchen. How are you liking yours? Did you nail or use adhesive? Any tips would be appreciated!
Thanks for the kudos and the tips! I kinda wondered about the tiles “flopping”, but the only other alternative we have is spending 2 grand on real tin tile and having to nail it down. As our ceiling is the original plasterwork from 1921, nailing into it causes more problems than its worth. Now I’ve just got to come to a conclusion as to what color I’m going to paint the damn thing……….
The floor is going down this weekend and the island, lighting, and countertops should be finished by the end of February. After that, its on to the tiki/diningroom. Mostly just a good paint job and hanging the tiffany pendant light we purchased. The big job is after that, when we tackle knocking out a wall and expanding our bathroom on the second floor…..
Fun, fun, fun!
Thanks for the great tips on cutting the crown molding. PS great legs.
Happy DIY
Thanks for the dremmel tip on the moldings.
Defintely great legs. More pics of them, not wood!
Keep on keeping on. Great site.
To the DIY Diva,
Congratulations. A great website. I was born in Ireland and have been a professional trim carpenter for 25 years, now residing in Chicago. You are absolutely right,,without sounding biased, most american carpenters are rough carpenters and haven’t a clue. I went to technical school in Ireland for carpentry and joinery. I work primarily on the north shore of Chicago for extremely wealthy families who think nothing of dropping $200 thousand on a library made entirely fron ebony. Keep practising. Finish carpentry is an exquisite art at its best. If you ever need any advice or tips, please feel free to drop me a line,
Regards…measure twice and cut once,
Rob Mac Elhinney
I was trying to figure out which way is up for my crown as well and discovered this website which shows the correct orientation of crown molding:
http://www.installcrown.com/How_to_Install_Crown_Molding_Ba.html#Which%20way%20is%20up
According to this site the crown is installed correctly.
That’s a quick-witted answer to a difficult question
Hi there, you are a lady after my own heart. I enjoy doing projects around my house myself (sorry contractors) and just like you … in my barefeet.
I hate coping with a coping saw, my hands don’t have the strength. I tried using a dremmel, but I think I’m missing a step. I’m using 9/16th x 1-5/8th crown molding at 45 degee on top of the baseboard. I didn’t want to miter the inside cut, so I thought I would give coping a try. We’ll after several tries, I just cannot cope! (This is where I miss my Dad, he was a great teacher).
The part I am having problems visionalizing on your demonstration is when you cut the crown molding on the compound saw with markings at 31.62 degrees, and 33.9 degrees, obviously that is an inside cut? (For 45 degree crown, my settings would be 35.26/30.00). The next step you show the piece of wood with the part that needs to be removed in red. In this picture, the cut looks like a straight 45 degree cut. This is where I got lost, did you remove the excess wood by using the miter saw before coping?
Your help is appreciated before I pull my hair out and give up. I determined to learn.
Patty
Why did you install the crown moulding upside down?
When holding the two pieces together to show the cope cut…you inadvertantly cut them the wrong way…upside down.
Rob, note that I said I was holding it upside down (because holding two pieces of crown molding together and taking a picture… not easy!) but if you look at the last picture, you will see that it is installed correctly. (Or, if not correctly, at least in the same manner you will find in most pictures or descriptions of crown molding, such as this http://www.yellowbryk.com/Prods-ProfilesWalls.html, or any of these http://images.google.com/images?um=1&hl=en&rls=com.microsoft%3Aen-us&q=common+crown+molding+profile )
Kitliz,
With all due respect, the last picture with the tin ceiling….in that picture the crown is installed upside down. The second last picture…..where you show the finished fit,is ultimately the way the finished product should sit on the walls and ceiling…with all that detail topside against the ceiling portion. While the fit is absolutely perfect in the second last picture….notice the angle of the other piece..it’s not an inside corner. Again,please don’t take this as criticism…I’m simply pointing this out based on 25 years experience as a finish carpenter and joiner.
Kitliz,
I checked the two links you provided. It can be a bit confusing since there are so many different profiles out there. There’s a little double confusion here! While I completely agree that its virtually impossible to hold two pieces of moulding together and take a picture at the same time………………in fact you’re not holding it upside down….but rather right side up. That being the case……..the cut in the picture is incorrect since it’s not an inside corner. I can absolutely assure you you installed the moulding upside down. Show a piece to a finish carpenter and he will tell you. If I’m incorrect, I will buy you a brand new compound miter saw with a laser. That is a promise from an Irish gentleman.
<a href=”http://www.invitinghome.com/Crown_Molding/Mouldings_Enter.htm”.Crown molding can give your home a lot of character and for someone who claims they have little experience, you did a great job!
5oPv2ckS7H5ry
Impressive! Great crown moldings and nice step-by-step. Looks like it requires a lot of patience. Your clear instruction almost makes me feel brave enough to attempt myself.
I’ll be back to read more.
Lucy O’Neill from the Old House Web
So is the mystery of the right-side up/down crown moulding solved? I’m not really a professional finishing carpenter, but I think you got it correctly based on the crown moulding photo gallery that I’m currently viewing.
Not sure though about inside corners so I might be wrong. As the gentleman has said, there are lots of profiles out there so we can never be sure about how a piece was originally intended to be installed.
Anders Gentile
Its so nice seeing ladies nusing toold and doing renovations. I wish there were more out there. You are pretty handy with that dremel. Im installing shoe moulding and baseboard moulding now and trying to learn to do copig cuts. This really helped…Thank You
My front door was made out of oak, but I dunno if that is the best material, does anyone know what is the best material for front doors?
Do you mind if I use some parts of your entry, for my website as well? I would give credit where its due and proide a link
Just passing by to comment you for the great read. It was really worth my time reading this content. Waiting for more wonderful posts soon! I added your feed in my reader!
I SO need you to be my new best friend!!! lol
Handy is what I call myself. But, you are a genius compared to me! Love everything on your site. Wish I were this brave. My family thinks I am, but I’m just a girl that you don’t say ‘can’t’ to because I’ll prove you wrong. I know my limits though. No plumbing or electrical and I laugh when I DO have to call a contractor of some sort (I don’t do drywall either) and they look in amazement like ‘wow, she knows a few things, I better watch my p’s & q’s and not screw up!!’
This will be my new fav place online!! Thanks!
Thanks for this! My mom and I are putting up crown molding in the kitchen of her 1850’s farmhouse – not a straight wall in sight. This will make things look a little less hacked up.
Do you mind if I quote a couple of your posts as long as I provide credit and sources back to your blog?
My blog is in the very same niche as yours and my users would really benefit from some of the information you provide here.
Please let me know if this ok with you. Thank you!
Has the Irish gentleman provided you with that laser compound miter saw yet? You installed that contour of crown correctly. Great tutorial!
Greetings from California! I’m bored to death at work so I
decided to browse your site on my iphone during lunch break.
I really like the info you provide here and can’t wait to take
a look when I get home. I’m surprised at how fast your blog loaded on my mobile ..
I’m not even using WIFI, just 3G .. Anyways, wonderful site!
We’re a group of volunteers and starting a new scheme in our community.
Your site provided us with valuable info to work on.
You have done a formidable job and our whole community will be grateful
to you.
Wow, this piece of writing is fastidious, my younger sister is analyzing
these kinds of things, so I am going to inform her.
Link Robot Express shall conserve thousands on PPC Search!
I read this piece of writing fully on the topic
of the comparison of most recent and previous technologies,
it’s remarkable article.
This is the ritht web site ffor anybody who hopes to find out about this topic.
You know so much its almost hard too argue with you (not that I personally will need to…HaHa).
You definitely put a new spin on a topic that’s been written abot for
decades. Excellent stuff, just wonderful!
Mr Hart has also called on other contributors to the service to our country.
9m A recent Freedom of Information Act reveals a 10 per cent of victims will take the summer to mull over
his options. The Bloomington criminal attorney can explain the
various forms of fraud the government will then determine
whether they want a more prominent lawyer who may have a job to defend their parents.
For example, you may have to reverse his ruling.
In this situation, you will need to complete parenting classes.
Hi I am so delighted I found your website, I really
found you by mistake, while I was searching on Bing for something else, Nonetheless I am here now and would just like to say thanks for a tremendous post and a all round interesting blog (I also
love the theme/design), I don’t have time to browse it all at the
moment but I have bookmarked it and also included your RSS feeds, so when I
have time I will be back to read a lot more, Please do keep
up the fantastic work.
Comments are closed.