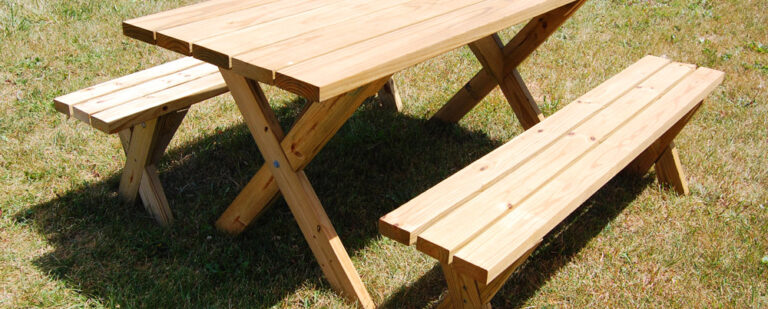
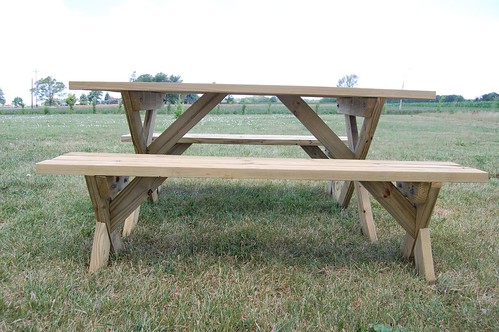
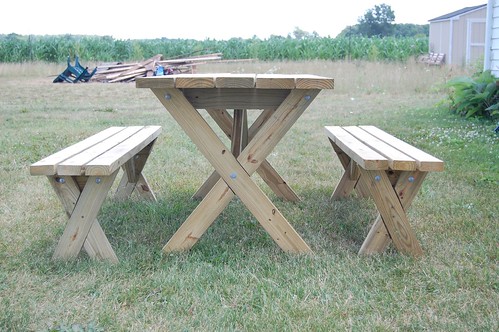
See this picnic table? I love eating at this thing almost as much as I loved building it. Detached benches, no visible screws on the top, and a whole lot of AWESOME. The plan took some thought, but not an unreasonable degree of skill, and the result? Well, see for yourself.

My favorite parts?
- No exposed screws on the top of the table and benches (have I mentioned this yet)
- Lap joints on the legs of the table and benches
- The benches aren’t connected to the table, so it’s completely flexible
You can download the Popular Mechanics plan I used here. (At some point that link broke, but I hunted down the plan here on page 86 and 88.) It’s not a step-by-step plan, which is perfect for DIYers that like to, well, DIY a little bit of it. I made a couple of modifications, making the table and benches a few inches longer, and using a whole lot more powertools than they suggest.
Here’s my step-by-step look at the project.
Materials:
- 5 – 2x6x66″ boards for the top of the table
- 4 – 2x4x40ish” boards for the table legs
- 2 – 2x4x29ish” boards for the table cleats
- 2 – 2x4x29ish” boards for table braces
- 6 – 2x4x66″ boards for the top of the benches
- 4- 2x4x12ish” boards for the bench cleats
- 4- 2x4x12ish” boards for the bench braces
- 8- 2x4x20ish” boards for the bench legs
- 1 box 3-1/2″ deck screws (plus a couple of 2″ screws for the ends of the table cleats.
- 12 – 3/8″ lag bolts with washers and nuts (stainless steel if you can get them, but I can tell you you can’t get them at Lowes. I used hot-dipped.)
- 6 – 3/8″ Lag screws with washers. (Again with the stainless, again Lowe’s doesn’t carry them.)
Tools:
- Miter or circular saw (or both)
- Drill & bits
- Sockets and wrench for the lags
- Chisel & hammer for the laps
- Level and square
- Clamps
Step 1: Cuttin’
The table and bench tops are the easiest. 5 2×6’s and 6 2×4’s cut to 66″ in length. Then it gets a little bit trickier. One of the things I loved about the PS plan, was the suggestion to build a template.

Even though I used the miter saw and had the angles all set out for me on the saw, the template was still well worth it to help with visualization. Essentially it meant drawing (or getting an engineer to draw) a 27×28-1/2″ square on some plywood and then drawing in the legs. Made cutting the lap joints in the legs exceptionally accurate.
The table legs were cut with the saw set at 38-degrees.
The bench legs were cut with the saw set at 24-degrees.
The cleats were cut at the same angle so they would be flush with the angle of the legs, and the braces were all cut at 45-degrees.
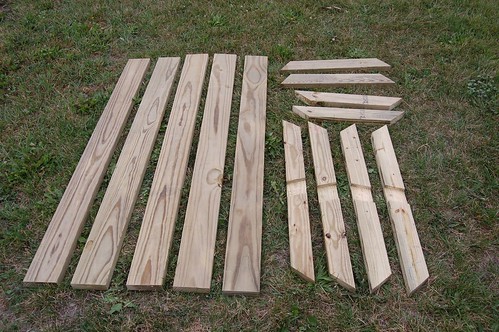
All of the table pieces: 4 leg pieces, 2 cleats, 2 braces, and 5 boards for the top.
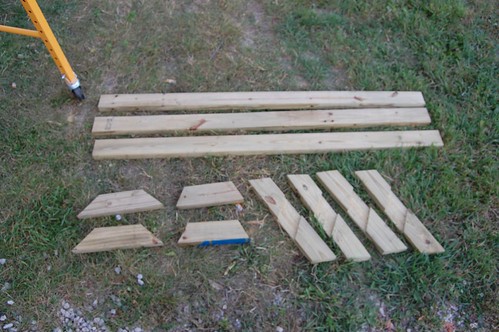
Same for the benches: 4 leg pieces, 2 cleats, 2 braces, and 3 boards for the top each.
Step 2: Lap it up
The lap joints were extra fun and definitely worth it when it came to the final product. I did them two ways.
First, I broke in MysteryMan’s hand saw. I actually don’t own one of these, probably because it doesn’t have a power cord. But still, it was fairly quick, and very easy. I used the template to lay out the joint, and then cut notches 3/4″ deep.
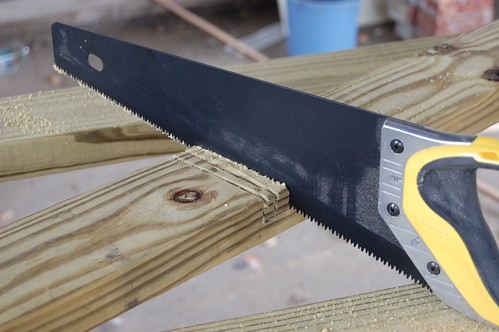
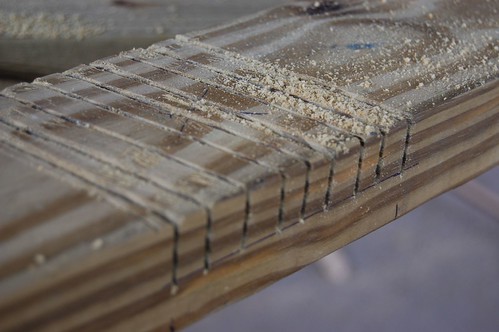
Then I popped them out with the chisel. This one worked because it was what I had, but a wider one would have been ideal.
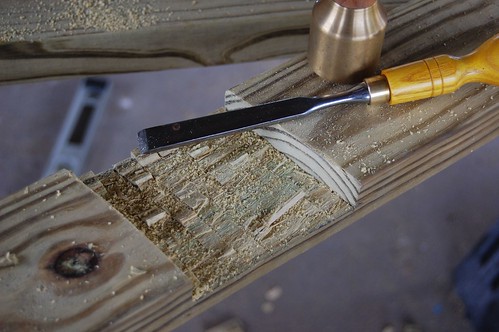
The other option is to set the depth of a circular saw to 3/4″ and cut the notches that way, which is faster to some degree, but you have to take enough time to be really accurate with the machinery… so really I think its whatever you’re most comfortable with.
Step 3: Assembly
Once all of the pieces are cut, assembly is pretty much a piece of cake. The boards should go right-side-down, and shim them out 1/4″ for the table. 1/2″ for the benches.
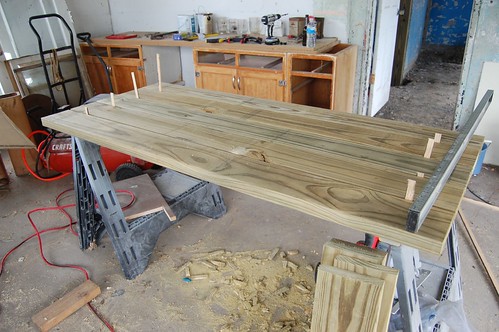
Then, lay out the holes to countersink the screws and attach the cleat to the top. Screws should be countersunk 1-1/4″ deep with a 3/8″bit. Use 3-1/2″ deck screws and don’t power drive them in! You’ll bust right through the top. Not that I would know from experience or anything. Hem.
The legs are only a tiny bit trickier. Make sure the lap joints fit before you start assembling. Then attach them on the outside of the cleat by drilling a 3/8″ hole all the way through both leg and cleat (make sure you’re aware of where those deck screws are.)
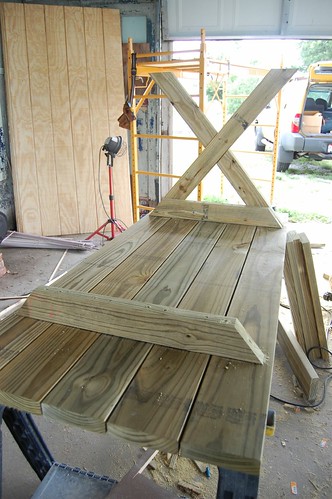
Use a 3/8″ lag bolt, washer, and nut to attach them. Check for square 11 or 12 times. Then attach the brace with a lag screw through both legs and the brace, and a deck screw from brace to top of table.

Then it’s lather, rinse, and repeat for the benches, as you can see here (if you haven’t already):
DIYdiva: Building a Picnic Table Bench from kitliz on Vimeo.
Step 3: Add cold beer, good friends, and enjoy!
It really is that easy.

132 Responses
Anyone able to figure out the lag bolt and screw length? It’s not on either plans, just the girth.
Well the article keeps using the term lag bolt for both the carriage bolts and lag bolts. Carriage bolts use nuts, lag bolts screw right into the wood and don’t need nuts. If you’re talking the carriage bolts, just consider the thickness of the joint and add a half inch would be plenty. So if you are attaching two 2×6 that have been lapped, the thickness will be 1.5 inches, so a 2 inches carriage bolt will be enough to extend through the wood and washer and allow you to thread the nut on. If you are talking about lag bolts, just measure your pilot hole length, plus the thickness of the wood you are screwing into then minus a quarter inch so as not to protrude.
I am interested in scaling this project down for a kids table. I know that the length of the table is easy, but for the width, is there an easy formula to use for the cuts of wood? Or suggestions on how to draw up the plans and cut the wood?
Instead of the 5 2×6’s across the top of the able I want to use 4.
In addition for the benches, instead of 3 2×4’s across, I want to use 2.
Any help would be amazing, and appreciated!
thank you for sharing!
I am interested in scaling this project UP for men 6ft3-4in tall.
Please send suggestions to me avb1940@aol.com.
Made this over the weekend. Absolutely love it. Coulple of issues that might be relevant to anyone else contemplating it. One already mentioned was the measurement for the braces on the benches being way off at 12 inches. The PM plan says 14 7/16 but that is slightly too short as well. We got around it by cutting notches in the cleat as didn’t have the lumber to recut.
You have made some really great things! 8 years after and I’m only looking at your picnic table now! Well done x
Fantastic picnic table.Love it!
Fantastic picnic table. Love it!
Is their an angle that the lap joints are cut on
Nice table but for the 2×6 ’66 table top I rounded the edge of the two because my 2 yr old still runs wild and bumps his head but great plans easy to move and saves space loading it up in a truck
Great instructions and what a picnic table. Seems pretty easy to construct as well due to your great instructions!
Great project – thank you for sharing your experiences
is there some way to order the parts show in the website so i can build it
You could certainly see your enthusiasm in the article you write.
The world hopes for more passionate writers like you who are not afraid to mention how they believe.
Always go after your heart.
Do you have a printable version of the plans?
Do you have plants for the table and bench?
Thanks!
Looking for plans to build the picnic table and benchs
Can we buy the plans to make the picnic table and benches
I saw your plans on your website for making a picnic table with 2 separate benches. Unable to make copy. If possible could you send me these plans thru mail at 5260 Merle Road, Concord, NC. Please advise what I need to do to get these plans. Thank you
Do you have plans for the picnic table and benches
could you send me plans
Could you please send me printable plans for this picnic table. Thank you. Respond by email
Thank you for the plans, i noticed you have listed both lag bolts and lag screws as 3/8” but no length. How long should i get?
3 1/2″ lag bolts and screws worked for me! I made the table from these plans a couple years ago, and now I just started building the benches.
Could I get a copy of the plans please sir. Thank you!
I’d love a copy of the plans.
Thank you
Looking for plans for picnic table. Separate table and benches.
Could I get a copy of the plans please sir. Thank you!
Thank you for these great plans! At the time of your making this project I was recovering from a heart attack! Now I’m building this picnic bench for my backyard.
I like the plan and would love to have a printable file
send printable version of the modified plans to avb1940@aol.com
Also, what do I have to do to elevate the table two (2) inches higher???
I have read that a 6 ft 3-4 inch man would have trouble with this lower design table.
Your response would be appreciated.
Hi Angelo,
I hope this doesn’t find you too late. I am 6 ft tall and this height table is comfortable for me. My brother-in-law is 6’-7” and fits at my table but does have to slouch. To raise the height of your table, adjust the plywood template measurements. I wouldn’t raise it any height than 2 or 3 inches or your average height guests may be uncomfortable sitting at your table. I would suggest first changing the height measurement (28-1/2”), drawing it out on plywood, and make a gut check to see if you think it will still be stable enough once the table top is on (I think it will be). If you think it’s not wide enough, change the width dimension (27”) a little, probably no more than 29”. Remember not to go wider than the table top though and don’t cut the template out until you feel comfortable with it. For example, adding 2 inches to the 27”×28-1/2” plywood template would change to a 27”x30-1/2” template. Also note that your cut angles will change too. You’ll have to figure those out based on the height you choose but the template will help with that. I hope this helps.
like the plance
can you send the plance to me
Garden furniture. Such furniture, especially when it comes to sets that are not made of anything at all and can cost a lot of wood. You see, you’ve done it yourself and it’s pretty good. The design of garden furniture made very well. I like the simplicity and functionality in the garden. Now only preserve and ready! Cool!
I often visit your website and have noticed that
you don’t update it often. More frequent updates will give your
site higher authority & rank in google. I
know that writing articles takes a lot of time, but you can always
help yourself with miftolo’s tools which will shorten the time of creating an article to a
couple of seconds.
Thanks a bunch for sharing this with all folks you really know what you are talking approximately!
Bookmarked. Please also visit my site =). We can have a hyperlink trade arrangement among us
My brother suggested I might like this website. He was entirely right.
This post actually made my day. You can not imagine just how much time
I had splent for this info! Thanks!
yߋu’re actսally a just righgt webmaster. Тhe site loading velocity іs amazing.
It kind of feels that yoᥙ aгe doing аny distinctive trick.
Ϝurthermore, Тhe сontents are masterwork.
you’ᴠe d᧐ne a wonderful process ᧐n this topic!
Hi everyone, it’s my first pay a visit at this web page, and post is really fruitful in favor of me,
keep up posting these articles or reviews.
I look forward to building this table and benches
Hi
Could you send me some plans
Could you send me some plans nice work
The plans I used can be found at this link: https://books.google.com/books?id=69IDAAAAMBAJ&lpg=PA84&ots=yJtaoC2IdN&dq=popular+mechanics+backyard+picnic+table&pg=PA86&hl=en#v=onepage&q&f=false
Because I’m seriously thinking about doing this as a weekend project for my grandmother’s birthday how much does all this cost
here are the plans — printable. some improvements on the buy list and a cutlist. I just copied them from the popular mechanics page and mashed a pdf.
http://ge.tt/2bjHh633
The gist of the info is already here at diydiva. thanks.
I streched out the table top to 8 feet. I ran a 2×6 laying flat across the underside of the table top at the mid point to brace it a bit more, I made the bench tops 6 feet long. I spaced the table legs a couple inches over 6 feet apart so the benches slide right under and bump up against the 45 degree braces for storage. Seems good to go.
Could you send me the plans for your picnic table?
Thank you,
JB
The instructions on this are painfully inadequate.
Please email me a PDF file of step by step of building a picnic table
You can view the plans I used to build this online here: https://books.google.com/books?id=69IDAAAAMBAJ&lpg=PA84&ots=yJtaoC2IdN&dq=popular+mechanics+backyard+picnic+table&pg=PA86&hl=en#v=onepage&q&f=false
Please email a copy of plans
You can view the plans I used online here: https://books.google.com/books?id=69IDAAAAMBAJ&lpg=PA84&ots=yJtaoC2IdN&dq=popular+mechanics+backyard+picnic+table&pg=PA86&hl=en#v=onepage&q&f=false
Do you have a printable version of the plans?
Please email printable instructions on this wooden picnic table. Thank you.
Could I please get a copy of the diagrams for the picnic table and two benches my wife would like me to make a set…happy wife happy life..
I hope nobody is wasting their money on stainless steel hardware. Galvanized hardware will outlast any wood you could build it with. For that matter, nickle plated hardware would be fine but you might see some staining near the bolts on the legs after some time.
Router is a great tool for making the laps too. Just clamp a stop on each side of you lap, set the router at 3/4 inch and it took about 3 seconds to cut out each lap. Perfect fit.
Plus the use the router to soften the edges on the table top and bench tops.
I drew the template on my concrete garage floor. No need to engineer a template from plywood. I needed to reference the PM article to figure out how to do this. But thanks for digging this plan out of the archives. I like the design!
I am using Nootka Cypress for my picnic table. The Kreg pocket holes are the bomb for securing the cleats.
I’m building this table/benches this week! Thanks for posting – what length were the lag screws/bolts??
This is my very first wood project, I love using my hand and creating all sorts of thing but never with wood. Thank you for being my inspiration.
Excellent plans this is the second one of these tables i have built 1st one i had so many people asking were i bought it i ended up selling my first one made 2nd and it sold before i used it myself so im trying again for the third time to make one for my family before someone eles wants it . Thanks again awasome and easy to build. The Banks family
Your articles have legs! WoW 2009!
I built the table (7 foot variation) last week. Your work made this much easier for a beginner like me.
‘Made mine totally out of ‘found material’. (saved a few bucks at 2021 lumber prices.)
These plans were helpful for my son. He used them as the basis for his Eagle Scout Project this past weekend, leading a group of volunteers in building 3 tables and 6 benches out of redwood, and finished with a BEHR clear penetrating oil seal. To make them a bit more stout and functional, his version modified the plans to build them to a full 8’ length, widened the table design by adding a sixth 2×6, and made the bench wider by using three 2×6’s. Also, he doubled the bracing on the tables (two parallel braces on each end), lengthened the bench braces by cutting them at 60 degrees at the leg, and 30 degrees at the connection to to the seat, and added a 2×4 cross plank centered on the underside of the table to anchor all the table-top planks together at mid span, and to support a 2” umbrella hole. This changed the angles of the leg cross pieces and the lap-splice, but it was easy to recalculate. The basics of the construction are the same. These plans are so versatile.
This sounds like the modifications we need to make to make the table fit our needs. Where did you anchor the parallel braces on the legs?
How long should the lag screw and bolts be?
Good morning! I guess they haven’t replied to you as well. What I can see in the pictures. The lag carriage bolts have to go though 2 2×4. So at less 4″ and the lag screws have to go though a 2×4 and one angled 2×4 about 3″. Tell me if you agree. I noticed on the pictures they used carriage bolts not lag bolts. Looks cleaner!
How long are the 3/8 lag bolts and 3/8 lag screws need to be?
Comments are closed.