As much as I love all things relating to sawdust, for a long time my experience in joining two pieces of wood together was limited to things that could be attached with framing nailer, a screw, or Gorilla Glue. Which may get you a pergola or a donkey barn, but there comes a point where you have to start being slightly more sophisticated for interior work.
Since I have a small tool addiction, my arsenal already consists of more than one router (I used the big one to build this cabinet) but sometimes it’s still hard to convince myself that I’ll be able to survive without owning a biscuit joiner or some other specialty joinery equipment. However, cooler heads prevailed for this project (or possibly someone put my wallet on lock-down) so instead instead of buying more tools I decided to try something less intense for the bathroom vanity I’m building.
Dowel joints. What could be easier?
(I feel like there’s some irony in that question. Like… just buying a vanity instead of building one? Getting professional help? And okay, easier yes, but not nearly so much fun.)
Since I couldn’t find a decent pictorial representation of making dowel joints on the entire internet, here’s my take on it.
What I used:
- Things to be joined
- A drill (and bits)
- Handmade or store-bought dowels
- Clamps
- A straightedge and square ruler
- Wood glue
- If you want to get fancy and/or not be tempted to pull out any of your own hair in the process, a dowel jig is also handy
The Manual Way
After I wrote the first version of this post I happened to spot a $28 dowel jig at Lowe’s, and so the second half of my bathroom vanity had some very straight, very easy to drill holes. If you don’t want to spend the thirty bucks, here’s how I made dowel joints the manual way. If you’re so inclined, you can skip down to the end of the post for a tutorial on using the dowel jig– or as I like to call it “The Sanity Saver”.
How I did it:
I’ll save you any suspense and tell you the two key factors for dowel joints working out well in the end are precise measurements and accurate hole-drilling skills.
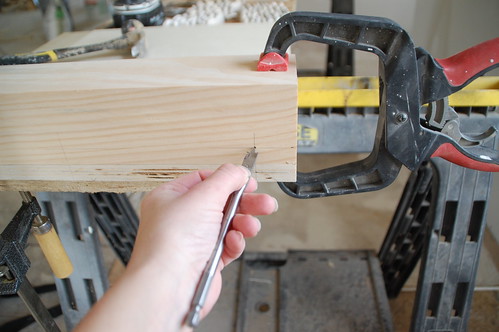
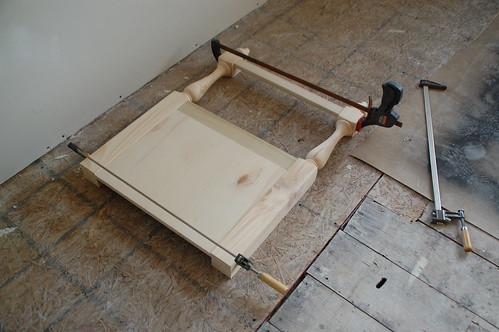
Step 1: Clamping
There is some thinking that needs to go into this before you dive into clamping and drilling things, but every project is different so you’ll need to figure that out for yourself. The point here is to line up the pieces with the faces of the two boards that will be together when you join them facing out.
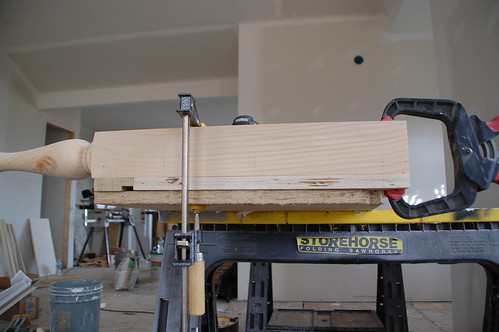
In this case I was joining the side panel of the vanity to the much thicker legs. The pieces were already cut to the exact size, and I used a square to help me link up the top and faces before clamping.
Step 2: Mark across boards
I used the square to mark a line across both boards to line up the dowels.
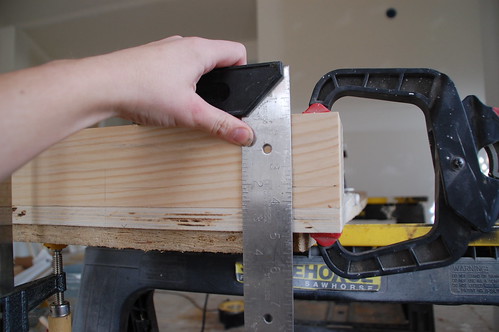
You may also be able to see the marks on each piece indicating which way was “out” and “top” for later reference. It helped me to imagine the two boards connected by a hinge so I could make sure I was marking the correct spots.
I’ve seen varying things on what size and how many dowels to use. I felt comfortable with my dowel being 1/3 the overall thickness of the smallest board. (For the 3/4″ plywood, that was a 1/4″ dowel). I used no less than 2 dowels on each board, and for the large panel I used 3.
Step 3: Hole placement
After the marks were made across the boards, I determined where the holes needed to be on each individual board. For the panel I centered the dowel in the middle. For the legs, the dowels were marked to give me a 1/4″ setback when the side was assembled.
I used a straight-edge (or spare piece of wood) to run the line down each board.
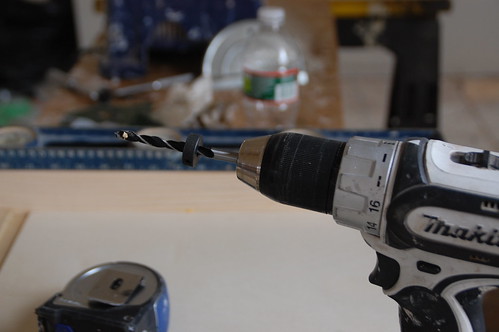
Step 4: Drilling
So up until this point it was pretty much a breeze, but keeping the drill bit dead-center on those holes was one of those excuse-me-while-I-go-bang-my-head-against-the-wall kind of experiences. I did a couple of test holes, and tried alternately pre-drilling with a small bit and using an awl to start the holes. I didn’t have a 100% success rate with either method.
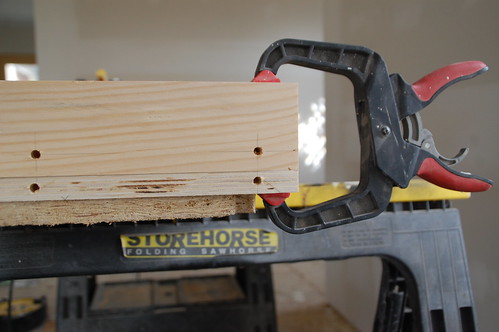
Other than “use a drillpress” (and god knows I don’t need another excuse to go buy one of those) I haven’t found any actual useful tips for drilling accurate holes on a mark.* I mean, clamp your piece, predrill, and hold your drill straight–duh– but things still won’t always go as planned, so you can always try my two backup plans. 1.) Swear. 2.) Pray.
Good luck.
The nice thing with dowel joints is that they’re hidden so if one of my holes was a little off, I just drilled another set an inch or two away and everything worked out fine.
*Actually, yes, I totally figured this out. Go buy a dowel jig. (See below.)
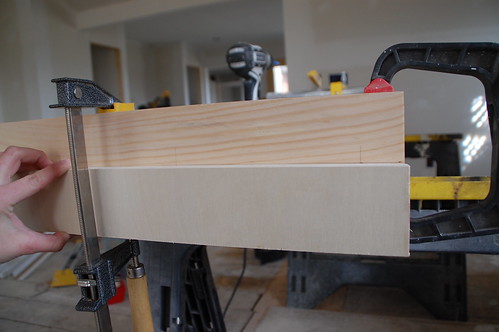
Step 5: Dry Fit
Just checking to make sure everything lines up as planned…

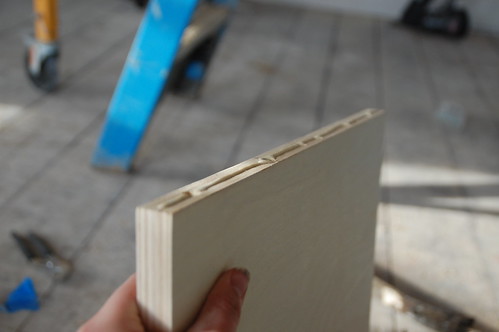
After the whole thing is dry-fit, it needs to be taken apart and sanded before gluing the joints.
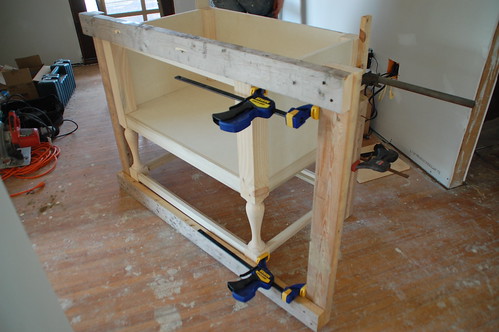
Step 6: Glue & Clamp
First the dowels get glued into place on one side. I went old-school and used elmers wood glue this time, even though I’m usually a fan of the gorilla version. I like that the elmers doesn’t expand, plus it made me feel like I was in 7th grade shop class all over again.
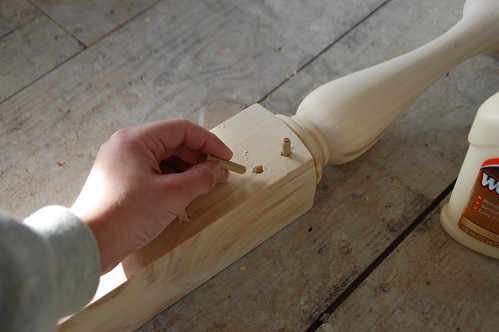
The second piece gets glue along the entire side, including in the holes…
Then assemble and clamp.
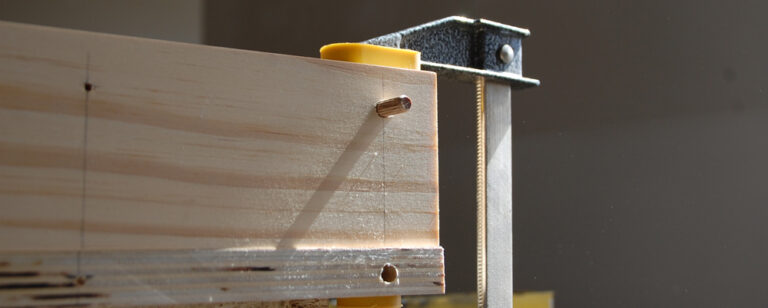
Using a Dowel Jig
If you’re going to be doing this more than once, I strongly recommend buying one of these:

Here’s the gist of how the jig works. You still need to clamp and mark your boards like in step 1 & 2 above, but the jig makes sure your holes are accurate, straight, and perfectly in line.
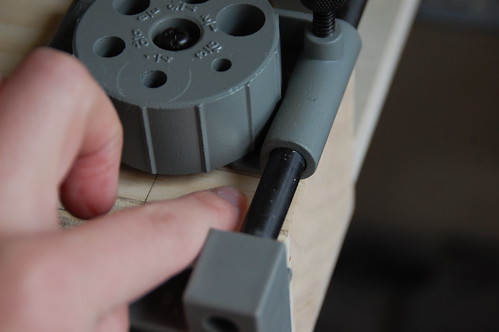
You start by clamping it on to your pieces.
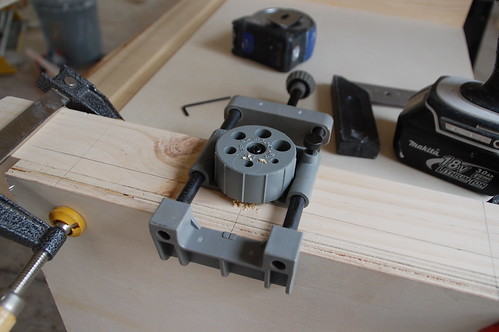
The arrow on the jig should line up with your vertical line between the two pieces.
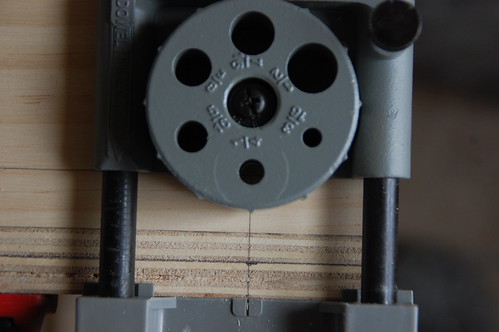
You can then slide the jig until it matches up with the horizontal mark on the first piece. After you drill this hole, the jig slides into place (without being unclamped) to drill the hole in the second piece.
This kit came with new bits and depth stoppers, which is way fancier than my usual method of putting a piece of painters tape around the bit. Hey… work with what you’ve got and all that.
The jig keeps the bit perfectly level, no matter how many beers you had the night before. Ahem.

Actually, it makes the whole thing a complete breeze. I think it took me a third of the time to make the holes with the jig, and everything lined up perfectly the first try when I dry fit it.
The joints should still be clamped and glued as described in step 6 above. Even if you have to get a little creative on the clamping of a larger piece…
All in all the dowel joints were a great choice for this vanity and I’ll definitely be using more of them in the future.

23 Responses
Ever considered pocket screws? It would give you an excuse to buy a Kreg jig!
I have! Every time I see them use that thing on This Old House. I’m hoping MysteryMan takes the hint for my birthday.
Norm seems to like them quite a bit too, and if Norm likes them then you know they have to be good.
Since you like tools so much, you’ll probably need to buy something from Festool one day.
You are something else…..Wow I can’t wait to see the step by step on your build.
I’m capable of doing it, but chicken to build my own Vanity ( never really build much furniture. Right now i can’t find anything i like in the color that I like. When i do find something it’s way out of my budget. I guess my tastes are to expensive.
Anyways wanted to give you my support to guys I love the blog, look forward to reading it everyday. Keep up the good fight.
oops i meant to say “….my support to you guys….” lol not “…my support to guys…”, not that there is anything wrong with that.
hahaha. I got what you meant… we totally appreciate the support. Also, I never really build much furniture either, but no way I’m spending $1400 on a vanity I can build for $250, so we’ll see how this works out. I haven’t gotten to the hardest part yet–doors!
Buscuits are a possible way to join those boards, but of all the alternatives, good old fashion dowels often make the most sense. I was thinking just this morning about replacing a coffee table. The leg to apron joinery is going to be executed with dowels.
Nice work!
I love that you’re making a bathroom vanity. Cost comparison to buying? I’m not finding much I like in my price range! And just so you know, my inner “Powertool Badass” is coming out….you’re really rubbing off on me….going to buy a compound miter saw so I can get started with all the new trim I want! 🙂 Makes me smile just thinking about it! Watch out for the Nona now!
Yay for the inner powertool badass! I’m modeling this off of a $1400 potter barn version, and so far it’s been about $200 in materials. I expect it to come in under $300 unless I get granite for the top. Still even with the cost of granite this is going to be far, far cheaper than buying the PB version.
Hi – Very much enjoy your blog!
I use dowels quite a bit, too – have you ever used a Dowl-It jig? It is only about $35.00 at Woodworker’s Supply and probably most other woodworking stores. It ensures that the holes line up perfectly and that they are drilled straight.
I got a Kreg jig for Christmas and also like it but haven’t had the opportunity to use it much yet.
Dolores
Dolores, you are an angel! I totally need this thing.
Everyone: check out the Dowel-It here.
Kit;
I was wondering where you got your legs (for the vanity) They are nice and was wondering if they were a stock item or a special order
thanks
Tony
Hi Kitt, I have to agree with you on the simple doweling jig. I use it all the time for large craftsman style casings. I feel the joints are stronger than the biscuit joint. as the short dowel has a high sheer value.
Would you mind letting me know where you and MM took your Mi. Contractor’s classes? I want to get Lic’d in Mi.
I Love your sense of style and you and MM’s commitment and dedication to your new home! I am fairly lucky to be able to see your new place as I drive by once and a while, which allows me to follow your progress on the outside. Ialso heartily agree with your choice of windows..Terry
Hey Terry – We love having people check out our progress as they drive by… we feel live everyone in the community is rooting for us!
We took the classes at Washtenaw Community College… I think it’s the closest place to our area. You can find out more here:
LifeLong Learning @ WCC
Hmm it appears like your blog ate my first comment (it was extremely long) so I guess I’ll just sum it up what I had written and say, I’m thoroughly enjoying your blog. I as well am an aspiring blog blogger but I’m still new to the whole thing. Do you have any points for novice blog writers? I’d genuinely appreciate it.
Cele mai bune ponturiu de promovare web
Being a professional woodworker for 40 yrs, I’ve seen lots of jigs for edge to surface doweling. What I haven’t seen is a good face frame doweling jig, and I prefer cabinetry with face frames. Problem with most jigs is you can’t drill the necessary pair of holes without repositioning. The jigs tend to move around due to bit deflection, and you can’t efficiently vary spacing for narrow/wide face frame pieces. These issues lead to joints that are not flat and/or aligned accurately. The harder the wood species, the more innacurate. I’ve owned a horizontal boring machine, but in my home shop I don’t have room. So I am building a face frame doweling jig that will handle 1/4″ and 3/8″ dowels for 3/4″ stock, and 1/2″ dowels for 1 1/2″ stock. It will utilize T-track hold-downs, integrated measuring tape, and a custom drill block (one for each dowel size) secured by machine screws. Except for clamping pieces to the jig, which will take a few seconds, I expect it to be as efficient and as accurate as my horizontal boring machine.
I know this if off topic but I’m looking into starting my own weblog and
was wondering what all is required to get setup?
I’m assuming having a blog like yours would cost a pretty
penny? I’m not very internet savvy so I’m not 100% certain.
Any tips or advice would be greatly appreciated.
Thank you
At our Lowe’s, only two dowel sizes were available
1/4″ (as on your project) and 7/16 for which size I find no 7/16 drill bit. What are the sizes of the pilot holes in any project using commercial dowels? Or do the commercial dowels expand to fill a bigger pilot hole?
THANK YOU!!!!! THis was great
Everyone loves what you guys tend to be up too. This kind of
clever work and coverage! Keep up the superb works guys
I’ve you guys to blogroll.
Woo hoo! I’m in the middle of transforming an awesome wood dresser into a bathroom vanity, and I needed to figure out how to attach some feet to make it a bit taller and prettier. Dowels, it is! Thanks for the tutorial.
Comments are closed.