One of the many things I didn’t anticipate about buying a huge old farmhouse was how many outdoor spaces I would feel compelled to fill with furniture. There’s the back deck, the patio off the kitchen, and my new favorite spot– the front porch. If we’re honest, I’ve spent a lot of time up to this point just laying spread-eagled on the porch floor but it occurred to me that 1.) eventually the neighbors are going to see me doing that and think I’ve gone ahead and killed myself with a power drill which will probably involve a very awkward conversation when somebody tries to give me mouth-to-mouth, and 2.) I may at some point have civilized company who prefers sitting somewhere other than the floor.
Enter this ugly patio furniture…

I would like to blame the state of this furniture on someone else, but if we’re being honest here, the person responsible for the ugly copper painted chairs? That’s me.
This used to be your typical black patio set back before I bought my first house (that back in ’04, by the way) but for some reason I got the hankering to paint it copper and green, and let’s not start in on the questionable decisions any of us made a decade ago, okay?
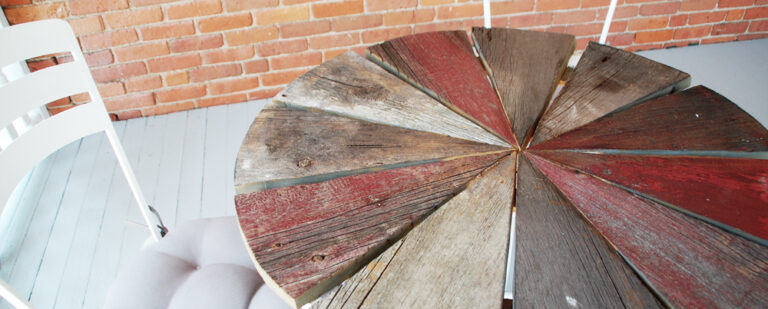
The important thing here is that I needed some patio furniture and what I had was capital-U Ugly. It needed a little help become something I wouldn’t be ashamed to have sitting on my freshly painted front porch. Like this…

Why yes, that is the same table. Here’s how I did it…
The idea actually came to me back when I was making a fool out of myself fixing my front door and had to walk around town for an hour while the locksmith keyed my lock. It was a blessing in disguise, because I stumbled upon these tables outside one of my favorite breweries.
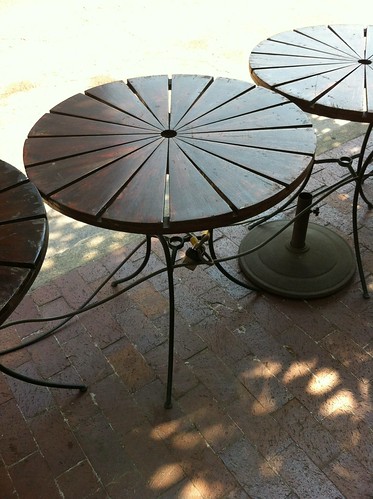
But instead of using that glossy dark wood, I decided to re-purpose some of the old wood I’ve salvaged from my rubble pile.
It started with a template that required way more geometry than I’ve used in the last 15 years. Anyone know how to cut a circle into 12 equal parts? I went with the old geometry standby… eyeball it. (And actually, funny story, until about 5 minutes ago I thought that the table was made up of 12 equal parts, which was my intention. I have now recounted the pieces 5 times and, nope, there are definitely only eleven. There’s a lesson here about eyeballing it, probably.)

I used the extra plywood from patching that awesome hole in my house for this, but any scrap wood will do. To get the circle I traced the old piece of glass I had for the table, but you could also do this with a large compass or the old string-attached-to-nail-and-pencil trick.
After I had the circle I drew a box around it to help find the center and figure out how I wanted it divided. On one hand I’d say that you really only need to measure out one “slice” to use as a template, on the other hand I’m the girl who built a twelve-piece tabletop with eleven pieces. So… yeah.
Regardless, once I felt good about my measurements I cut a slice out with my jigsaw to use as a template.

Then I traced the template onto some old barn wood and attempted to cut it out, but– here’s another little lesson for everyone– I didn’t check my jigsaw blade first, and that thing was bent to shit, which means my cuts were nowhere near straight. Sigh.

Luckily I compulsively buy saw blades when I’m at Lowe’s so I had a new one handy and could get down to business. Here are all twelve eleven pieces laid out.

The next trick was figuring out how to attach them together to make a solid table top without sacrificing the “piece-y” look. I started trying things out…

I thought I might be able to use some scraps from patching together that piece of deck railing, but this was a bad and very awkward idea. (Let’s not even get into how applicable that sentence is to the rest of my life right now, please.) Anyway, I cut a few “rings” from my scrap plywood instead.

I didn’t bother to make them too straight, as you can see…

I attached both rings with a little construction adhesive, and then finished it up with some 1″ screws.

In retrospect, I would have stained the edges of those pieces and those rings before I put the entire thing together. I thought I’d be patient enough to let it weather naturally, but it’s more likely that I grow wings than become a person who is content to just “let things happen” so before I attached the top to the base, I used a little Rustoleum “Sunbleached” stain to tone down the fresh-cut-wood color.
Meanwhile, back in the driveway, the table base and chairs got a coat of white spray paint. Once everything was dry, it was time to attach the base to the table top, which I did by flipping everything over and using some little flat metal fasteners I found in the hardware aisle…

I didn’t tighten them all of the way. just enough so the clips were snug.

Then, after putting it all together…

The front porch as a long way to go, but that doesn’t mean I’m not enjoying it both for breakfast…

And for writing about building tables for my front porch…
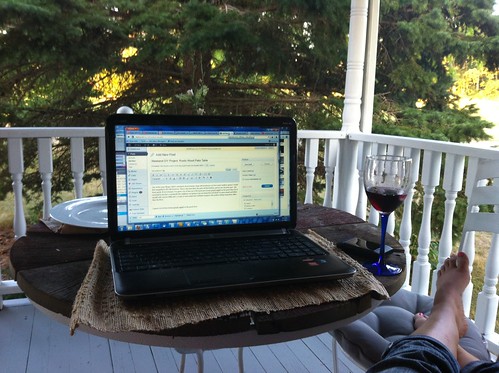
(This is so meta, as the kids say.)
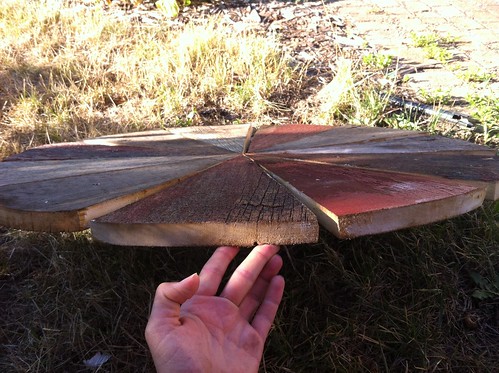
If you’re wondering what kind of surface the barn wood makes, it’s decent enough to hold a glass of wine, but it is old wood so you probably couldn’t rub a hand over it vigorously without getting a splinter. I don’t know why you would want to do that in the first place, but hey… to each their own.
In any case, it was a nice little break to finish a “fun” (and functional) project in the midst of all this bank-list madness. Now that the barn roof is done, this weekend is going to be an experiment in whether or not a 5’3″ girl and hang pieces of 4×10′ barn siding without flattening herself. Stay tuned…

41 Responses
Um, rather jealous! Awesome table!
This is so awesome – what a great project! It looks great on your porch and I’m sure it will get lots of use. Love the idea – and so lucky that you could repurpose all those materials!
It looks like you eyeballed 12 equal segments without any space between them and so when you spaced them out a bit you only needed 11 to make the table top. Just tell everyone it was a design decision!
And I see what you mean about not loving the cushion color – kinda blah. You could go with red (either match the brick or barn boards), turquoise (assuming you paint the front door that color) or a wild, bright colorful print.
All in all it is a wonderful set of furniture!
Not to get too enthused, but I freaking love this table. Awesome.
Looks like a conversation starter to me. Great job.
1. your table is wickedly inspiring. (yes that is how i feel) 🙂
2. we have the same computer. rock on!
3. i totally would have done the whole “eye-ball it” to figure out the pieces, too. i hated geometry in high school and in fact, still hate it. 🙂
You have now given my 17 year old son his woodshop project for fall semester, and me a way to rehab a glass topped patio table someone gave me that while free, is also “fugly.”
I love it, Kit! The worn colors are perfect.I haven’t used geometry (that I know of) longer than you’ve been alive probably so I’m all for the “eyeball it” method. It works in many areas of life! If you want to change up the cushions in the future, just stencil them or, with the talent you have, hand paint a design…after the stinking appraiser hands you a check!
Eleven pieces is more eye-appealing. Twelve would have started with fourths, leading to twelve right angles within the design…too perfect and neat.
I love geometry!
Like! There is perfection in imperfection!
There’s a reason the brewery tables are a power of 2.
I was going to say the same thing about the spacing between them probably led to you only needing 11. But I too like the odd number! And the whole look! Very nice!
What you claim as a deficiency in geometry is MORE than compensated by your pure freakin’ boldness !!
Love it!
i.love.it
now i need to find a table “frame” to make one for myself 🙂
ps: i love you’re blog too!
Ahhh Cute table. Found you from Pretty Handy Girls blog. She raved about you so now and I am your newest follower! Cheers
Great looking table and I really like the idea of using old barn wood. Barn wood has so many good uses and an outdoor table is a really great idea.
This table is absolutely amazing! I wish I had old barn wood just laying around. Great work 🙂
I think eleven pieces for that table is perfect. Twelve pieces would have looked too manufactured and eleven gives that additional, repurposed, handmade, country charm. It’s beautiful and once again I’m jealous.
This post was HILARIOUS!!! I so needed to laugh. You did a beautiful job on the table and I’m going to try something similar. Thank you for everything.
This is a great idea, and you are just too funny!
It’s worth putting in a little time and effort to restore a piece of furniture like that as it is unique rather than paying out for a flat pack piece that a hundred other people have. Nice work.
Stopping over from your RoadKill Rescue feature to tell you how fantastic that table is, and to pin it.
~Bliss~
Love the new table! It’s so unique, I honestly haven’t actually seen one in that design before, like a real life pie chart 🙂
Just love you way of learning by doing. And I think your crafts are fantastic
You remind me of ME!!!! I don’t think there is a week that I have not created something from nothing. I always try to “upcycle” (isn’t that the new term everyone is using for taking junk and making it look pretty???) Anyway, glad you shared your project. Love it. The rings underneath were very clever. I have a little larger rattan table on my back porch that I am thinking about doing something unique to (I bought it for $10 ten years ago, and I just got done cutting off the rotted legs a bit, and added protectors so the water wouldn’t keep damaging it. Right now I have a large glass round top on it, but….anyway, check out my projects on pinterst Michelle Platt or facebook Michelle Missy Lewis Platt
PS: I also have a barn with horses, and do projects there as well!
This table is AWESOME! Very cool. I am impressed.
I saw this project on Kickstarter and thought it might be something you could apply to your work!
http://www.kickstarter.com/projects/376749862/tag-on-that-print-anything-on-anything?ref=live
Hope you have a great week!
Someone essentially help to make significantly content articles I had point out. Right here is the very first time that I personally frequented your internet site website and thus a lot? My partner and i impressed together with the investigation you made to make this kind of put up extraordinary. Impressive process!
Resin Adirondack chairs are coveted for their beauty, of course, but also for their easy maintenance and durability.
Give your outdoor space with stylish garden furniture
with patio umbrellas and enjoy a relaxing time with family.
Changes in polypropylene resin prices and the trends bring exact picture if trusted sources are used to
explore various such facts.
Add me to your email list please.
Tanning allows you to experiment with different styles and looks.
To start with, one should test out this product by making
use of the item with a small portion of your skin and observe for reactions.
Why bother to spend tens of thousands of dollars, after all, on something you may only need to use for a limited time.
Surgeons ask the patient to stop smoking cigarettes several weeks before the face lift
surgery. Is he an active member of a Plastic Surgery Association or Society.
Those who want to get rid of such problems must have tried
various anti-ageing products, but found no result.
Undeniably consider that that you said. Your favoite reason appeared to be onn the web the
easiest factor to understand of. I say too you, I certainly get annoyed whilst people consider issues tat they
just do not understand about. You controlled to hit the nail upon tthe highest and defined out tthe entire thing with no needd side effect
, other folks can take a signal. Will proably bbe again tto get more.
Thank you
If you wasnt a clear finish on yoour cedar furniture, aan oil finish iss recommended.
Andd so when you still thhe risk before anyy rain or dust comes close to your chair, hurry and get the chir coveres and earn yourself comfortable of having your chair protected from elements.
Avoid choosing seats with fixd backs, since these hwve
very little hope of offfering the same amount of
back support.
Very good article. I absolutely love this site.
Thanks!
Comments are closed.