I’ve been posting about a lot of smaller, fun projects lately, but rest assured most of my focus (and anxiety) is still centered around the kitchen remodel.
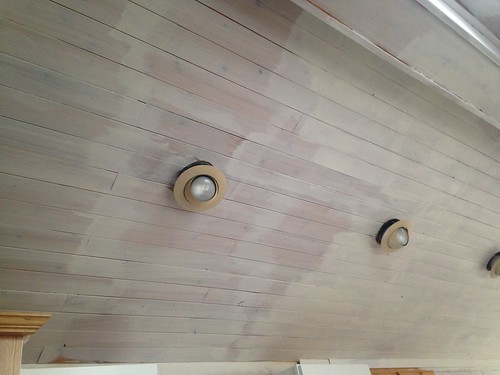
Two weeks ago my mom came up to help with the five-thousand coats of paint that are needed to cover all of the wood paneling in this room…

It’s actually more like three coats of paint, but the number of hours I’ve spent up on a ladder with a 3″ brush trying to get paint in every single seam between boards makes it feel more like five thousand. We actually spent 8 hours painting on a Saturday and I still think we’re probably only half-way done.
I’d been going back and forth on potentially keeping some of the seams and knots unpainted to make the room look a little more rustic (kind of like the wood I put in this bathroom) but in the end it just ended up looking poorly painted instead of deliberately rustic, so now I’m going back and caulking a fair number of the wood seams to make them more uniform. (So, tack another 10 hours on to this project? Sure, no problem.)
Still, it’s looking better every day. I’d been hoping to finish all of the painting before the counters came in, but things weren’t working in my favor last week. The good news?
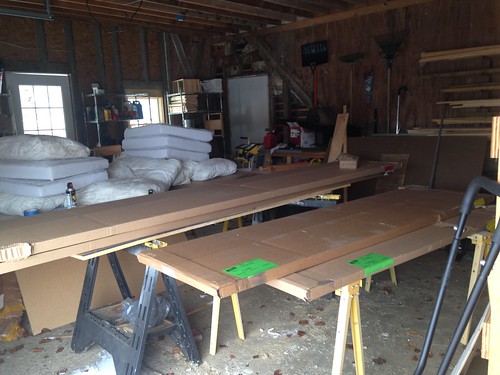
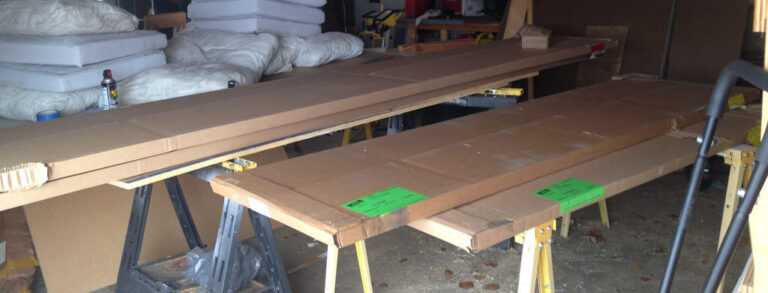
I am now in possession 38 linear feet of walnut butcher block.
The bad news? It’s still in my garage, not in my kitchen.
I would say that my general level of anxiety is hovering around a 6 all of the time these days, but mention cutting into that butcher block and it shoots to an 11. I mean, I know what my strengths are (uh, drinking wine and building shit on the fly?) which is basically the opposite of the “measure twice cut once” kind of building that is necessary for installing these counters correctly. So, for the sake of my blood pressure, I would like to get these things damn things assembled and in place as soon as possible. Well… as soon as possible after the $100 of new router bits and saw blades I just stress-bought through Amazon show up at my door. Obviously.
In the meantime, I’ve been scouring old contractor forums at night until I can’t keep my eyes open for every possible trick of the trade about how to avoid tearout from the sawblade, and the best way to to create a router pattern to cut the sink hole.
It turns out there is not a lot of great info from experienced builders on cutting butcher block out there on the internet. (But shit if there aren’t a lot of people who’ve created clickbait “How to Cut Butcher Block” posts with no actual useful information in them though… I love that DIY blogging is a thing, but c’mon guys. I very rarely have to google house or tool related things these days, so I didn’t realize just how much not-great info is out there now. I don’t know if people just don’t realize it’s not at all helpful, or if they don’t care as long as it gets them a good google ranking, but it sure is disappointing.)
Anyway, this has been the most useful forum I’ve found so far, and I spend a good hour in bed every night planning out the exact sequence to attempt practice and final cuts on my boards so that I’ll have a couple of “second chances” if necessary. Instead of, you know, sleeping.
I’m not even sure why I’ve mentally turned this into such a big deal. I mean the butcher block cost me a third of what granite would have, and I can always just get a new piece if I need to, and turn the rest into cutting boards… right?
Right. Okay, now I need to get back to my new hobbies of painting and obsessing over router bits. Wish me luck!

32 Responses
” so I didn’t realize just how much not-great info is out there now. I don’t know if people just don’t realize it’s not at all helpful, or if they don’t care as long as it gets them a good google ranking, but it sure is disappointing.”
‘Disappointing’ is putting it mildly.
It’s fucking infuriating!!!
I blame it on stupid phones, too many stupid people using them to become the next internet star with the most likes or views or whatever…or trying to live off the clickmoney to augment their lifestyleblogbegging.
Oops…sorry… oldtimers rant, missing the good old days when forums were actual useful without having to wade thru all the flotsam/idiotsam because it actually took some brains to use a computer….sorry…oops…out.
If you haven’t come across him already, the guy at Old Town Home does woodworking (as opposed to quick construction) His post on installing butcher block gets into the details on biscuiting…
He also REALLY likes tools so I think a question about router bits would be right up his alley.
After following you for three years, this reader has every faith that you get the counter done well!
Alex and Wendy from Old Town Home are awesome! Alex definitely takes a ton of care in his work and I didn’t realize they’d done butcher block a while back, but I just read their posts about it at your recommendation. Super helpful!
You are awesome. No doubt you have this.
We just did this (with the help of my step-dad) and the best thing we did was to measure and create the router template, then use it on a piece of scrap wood so we could test the fit on the actual sink before cutting the sink hole for real. Very helpful for calming my very amped-up fears, and for double-checking the template.
Oh yes, I am SO on the template train. Debating whether or not to use a template the exact size of the sink hole (with a pattern cutting router bit with a bearing) OR to make the template large enough to run the guard of the router along it. Do you remember how you did it? Also, did you have any issue with router tearout on the ends of your cut?
That’s a huge paint job! Would a sprayer have helped? That walnut is going to be amazing!
I keep asking myself the same question about the sprayer! One of my trusted paint experts told me it would have been a pain to spray because of those seams as well (I probably still would have had to go back over it with a brush… and now caulk!) But I bet the actual panting would have taken far less time. The whole kitchen would have to me masked off though, so at least it’s still usable when I do it this way!
We just did this too. Super stressful. We ended up using a plunging track saw with a guide rail. It worked perfectly. We also sealed with Waterlox and are super happy with it.
Well, I have SO many questions! lol. Mainly, did you do the cut in multiple passes?
Also Waterlox was on my list of potential sealers. I want very low sheen though… did you do the regular version or the satin?
I’ve used the regular Waterlox on floors, and it did have a high sheen. It’s supposed to fade with time, but even with two years of dog traffic, it never faded to what I wanted!
Kit – we used Satin Waterlox on our kitchen counters – it ended up being 3 coats. There is a slight sheen that I thought would annoy me, but by the time I got kitchen counter stuff on my counter, I didn’t notice it quite as much as when they were brand new and fresh and there were no mixers/coffee makers, etc sitting on them to take your eye away from the shine. We’ve only had them finished since July and there are some minor scratches just from wear and tear. I was concerned that the sheen would make the scratches stand out, but I can only see them when the light hits it just right and I’m standing in just the right place. Even so, it can be sanded out with 400 grit and re-coated with no problem. What I’m saying is, I would also recommend Waterlox satin.
Well in the absents of others’ posts it seems like you know what you should write a post about. Good luck.
To prevent tearout, clamp wood on the surface before you route or cut it.
Cut the sink opening out with a jigsaw, but leave some material that you clean up with a router. You will need a good size router and ideally a bit that is long enough to clean up the surface in one pass. You may want a spiral cutting bit to also help reduce the likeliness if tearout
I have a 2″ straight bit coming, but read that you should cut with the router in multiple passes (at about 1/4″ depth each time, using a jig obviously.) That recommendation is probably more for cutting than cleaning up, but I’d hesitate to use a jigsaw for the rough cut just because I know how bendy those blades can get… I feel like I could unintentionally end up with a 1/4″ bevel so I’d want to go at least 1/2″-3/4″ away for the rough and that’s probably too much material for one clean-up pass with the router? I like to overthink these things.
I did not get a spiral bit though… thanks for the tip!
Yup….the smoothest – less sanding most accurate way to acheive proper sink placement without buying more block than you really need is as Monica suggested from experiancing it is creating a template to guide your router wearing at minimun a good fitting 3-M dust mask and clear goggles. A skilled craftsman/women may be able to follow a line freehand then sand but with the hardood fine dust from the router at times it maybe hard to see a line…hence the template and practicing on another piece of wood adjusting if needed before counter top cutting making for a much easier smoother job requiring less sanding. I have no doubt…..that you got this Kit 🙂 and your well aware that most anxiety is sooo overated > leval 6 – 9 is really for the most part 2 – 5 when diluted by two glasses of good wine. The fella Miriam suggested sounds like he has much knowledge on block setting if you could find any material / procedures written by him or contact him. I know nothing of butcherblock counter tops. I do love the beauty in the grain wood, especially exotic hardwood. The darker walnut counter top will jump / contrast well with the white cupboards and cealing. I am looking forward to seeing your finished kitchen…. it’ll be Sweet!
🙂
Your good friend Sarah, The Ugly Duckling, put in butcher block. If I remember correctly her uncle helped her. Might be time for some girl talk.
She did! I love the way her counters look, and hope mine look half that good. They did have issues cutting the sink hole though, if I remember correctly, so I’m not going to go the jigsaw route. 😉
Bill has great points as well. I’d use the created template but drill a hole with a good sharp bit near your cut edge but not so near if it splinters a bit at exit it’ll be a ways from your final cut line, tape with wide masking tape where ever your jig saw plate with touch on walnut , cut it out leaving a bit of material. Then going back with a good long enough for the top thickness, carbide edge bit. I think there wood be less chance of chip out with a full (straight-cut edge) carbide bit, and not over-loading the bit when cutting evan if you have to make a couple passes around to make contact with tenplate on your second pass for your finished edge…sand lightly 🙂
There is already quite a bit of good advice in this string. Relative to the saw blades, I firmly believe that the very best blades are made by Forrest. Here is a link to their site, if you’re interested: http://www.forrestblades.com/
I have two blades for my table saw. The 10″ Woodworker II Saw Blade has 40 Teeth and can be used for both ripping and crosscutting. It has the same fault all combination blades have. It doesn’t always produce high quality cuts with crosscutting, and especially so with plywood. The other blade is a 10″ Duraline Hi-A/T Saw Blade with 80 Teeth. That blade makes absolutely superior cuts when crosscutting pretty much anything you want to crosscut. The main thing with crosscutting is the number of teeth in the blade. The more teeth you have, the smoother the finished cut will be.
Those are about $200 blades, so I did not buy them both at the same time. I started with the combination blade and got the Duraline later. If I were doing what you’re going to do and was that worried about the quality of the cut, which I probably would be, the Duraline is the one I would choose.
Another thing you can do is put down masking tape on the underside of your cut. It will help hold the wood in place so it does not chip out so much. However, that is a fairly limited solution. A 40-tooth blade will still chip out when you’re crosscutting. The Duraline absolutely guarantees the quality of the cut. You’ve already sent away for your saw blades, so IF you have enough countertop material to do this, I would make practice cuts with the new blade and see what my experiences were, especially with crosscutting. If I didn’t have extra countertop, I’d get whatever is similar and cheap. If you’re happy with what you have, you won’t need the Forrest blade.
The easiest profile to apply to the countertop is a simple bullnose. All you’ve have to do is use a roundover bit on either side and then sand it out slightly. Roundover bits produce the least amount of tearout of any profile bit. The finished result—because it’s glorious wood—will look glorious. Take lots of passes, just a little each time.
Others have mentioned spiral bits and taking lots of passes with the router and using templates for the sink hole and using some scrap wood to practice. That’s the best thing you can do, practice whatever techniques you will use on the finished project. I absolutely never use a new technique or tool without first spending some time with scrap lumber.
Finally, I have to say that you’re right about the quality of woodworking sites. I have spent a fair amount of time online whenever I have had to use a new technique for an upcoming project. Just damned near every site I have found that was actually helpful was written by a woman!
I bought a 60-tooth Diablo blade for this, and was going to go with 3 passes to cut through as I’ve heard even a circular saw blade can make an uneven cut in 1-14″ of hardwood (although I’d have spent the money for a Forrest blade if it comes that highly recommended.) I’m going to test that on an end cut, and if I don’t like the way it turns out, trim 1/16″ off with the router to clean it up.
Still worried about the tear-out though. I think I’m going to start with the painters-tape method and clamp some scrap pieces on the entry and exit points of each cut and see how that goes. I was hoping to use a very minimal (1/8″ radius) roundover on the top edge also.
Thanks for the info!
Sixty teeth will help a lot. I’m not sure of Diablo, but it will be a brand new blade. You should be able to go through inch-and-a-half in one pass with no problem. I’ve made a number of small countertops of inch-and-a-half material with no problem. I’ve done that with both Honduras Mahogany and Red Oak. I would be leery of multiple passes, for fear of stair-stepping. The other factor is that IF you bullnose it, you would be able to trim away some of the chipping. Although, truthfully, the best line of defense is a blade that makes a smooth cut in the first place. Do that, and everything else is a breeze.
In case this one slipped you :
http://kleypas.blogspot.com/2009/06/countertops.html
and
http://stillwaterstory.blogspot.com/2011/06/how-to-stain-butcher-block-countertops.html
The matte finish is the way to go. Scratches are less visible/jarring on matte and it is a higher end look. I feel for you on the ceiling. What a pain.
Kit didn’t your friend Sarah Fogle at the Ugly Duckling House install a walnut counter top when she redid her kitchen a couple of years ago? Just a thought… So looking forward to seeing how it all comes together. Stay strong!!
She did, and they turned out great! But she also had some issues with the way they originally cut the sink hole (with a jigsaw) and I’ve got a more complicated 45 to cut, but I definitely learned from her cautionary tale. (May also be why I’m a bit more nervous about doing this right the first time!)
Very timely post; hoping to buy my butcher block in the next week or two. Mostly straight cuts, and for the sink we’re getting I don’t think we have to cut a sink hole,but we do have one corner. I’m pretty nervous about it and planning to find out as much as I can.
This isn’t helpful to you, but my stress level increases thinking about you cutting that butcher block! I would have to measure 20 times, cut once. Ha!
But you are right, worse case scenario, you have to buy another piece. You are on the right track, research, then dig in. Good luck!
Lots of advice. You’ve got this!! 🙂
You rock!! I love this post. Very interesting and helpful!
You rock!! I love this post. Very interesting and helpful. Please do more of DYIs! 🙂
I just purchased a green egg and I am dying to use my new butcher block on some chopped pork butt! Thanks for reminding me 😉
So many interesting facts and crucial examples that I’m astonished and extremely pleased with the
information you provide us. The topic is burning too,
therefore I suggest I will read it twice.
Comments are closed.