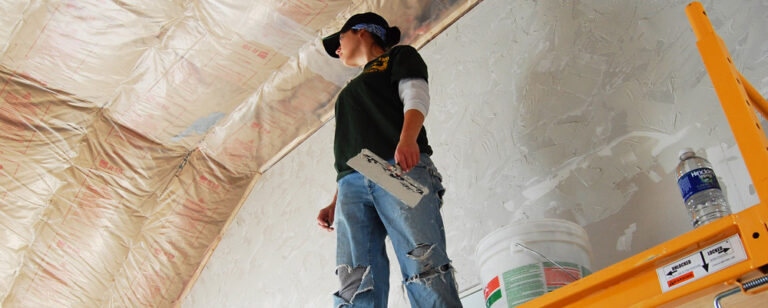
So here we are. Wallboard up and spackling knife in hand– ready to jump in and finish some walls. This is the part most people would rather take a whack on the head with a sledgehammer than have to complete (and the hours upon hours upon hours of sanding it requires if you go a little crazy with the mud), but put the hammers down people, I have a better, faster, more fun, less lame way of finishing your walls.
First, you need to have walls. If you’ve already got them and they’re ready to go, good for you. I’ve used joint compound to texture wood, brick, and standard drywall in dry areas without problems. If you don’t have walls already but you want some, you can check out my info on wall framing and some tips for hanging drywall by yourself.
Now, the nice thing about putting some texture on your walls is that it’s pretty forgiving for a less-than perfect tape job which means you don’t have to spend the rest of your life with sanding block, but I’ve also got some insider info on finishing joints from a pro that will help make this part less painful. And when all of that is finished, then you’re ready for some fun with mud. Let’s get a little dirty, shall we?

Basically this is what you need:
- 5 gallon bucket of joint compound – I tend to use heavyweight even though you’ll strain your back hauling it into the house and it’s a little more gluey. You can also use lightweight without the universe imploding.
- Spare white paint or primer (just a little bit)
- Mixer (You can do this by hand in a pinch, but it’s so much easier with a drill. And also more fun.)
- Drywall knife – depending on the look you want 6-10″
- 5 gallon bucket with water and a brush for cleaning up your tools
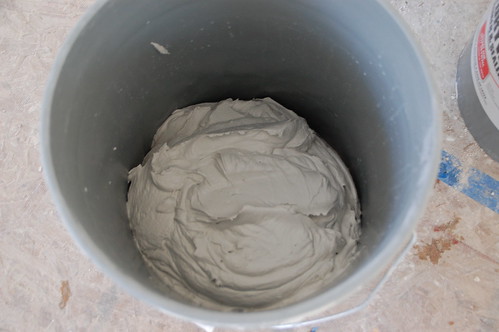
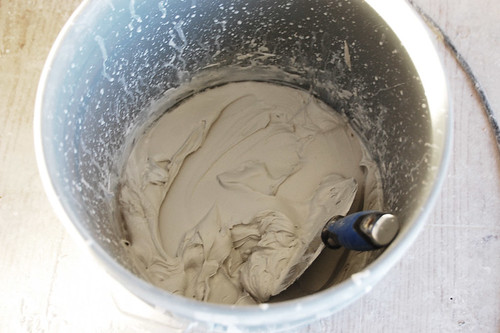
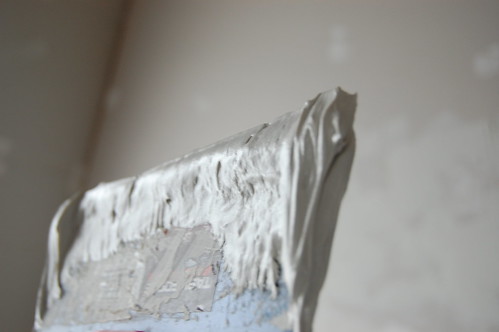
Step 1 – Mixing the Mud
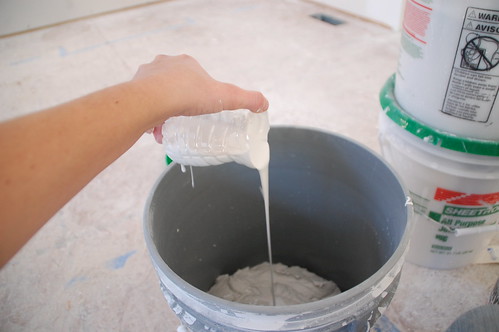
I always thought this was BS, but mixing the joint compound up (even without adding water) really loosens it up and makes it much easier to work with. Since I am almost always doing this at odd hours– after work, in the middle of the night when I can’t sleep, or an hour before I have to be somewhere else– I tend to mix up small batches by putting some mud in a bucket…
And adding a little bit of paint. (That was a trade secret from the pro… apparently it makes it easier to work with and gives it a better finish. Who am I to argue?)
A quick spin with the mixer and it’s ready to go.
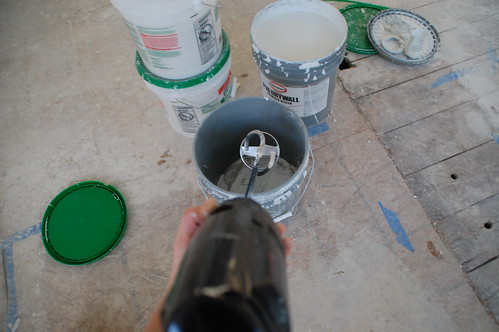
Definitely don’t pull this thing out of the bucket while it’s spinning. You’d think that would be obvious, but making messes comes more naturally to some of us than others. What can I say? It’s a gift.
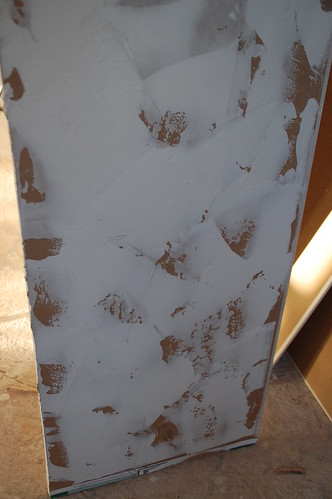
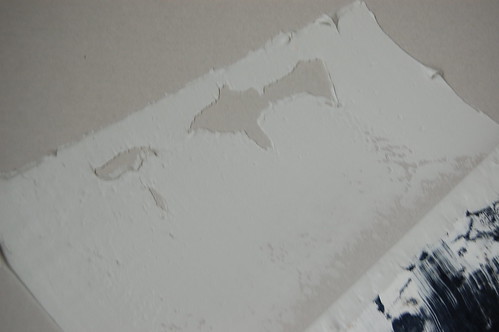
Step 2 – Test Panel
Even texturing is about having a rhythm. I feel pretty confident in my texturing skills and even I do a test panel before I start a new room to make sure I’m using the right knife and the right amount of mud for the look I want. Here are some examples:
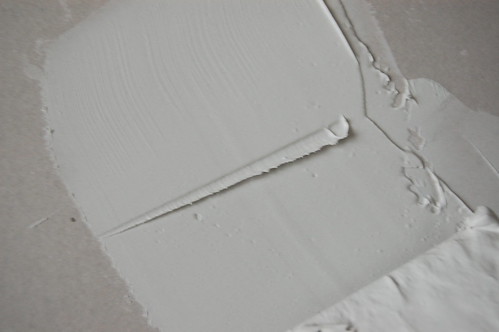
10″ knife, thick application:
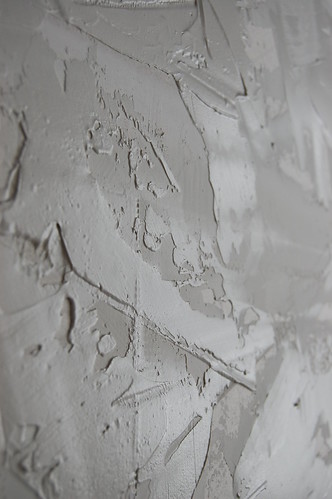
6″ knife, thin application:
10″ knife, thin application:

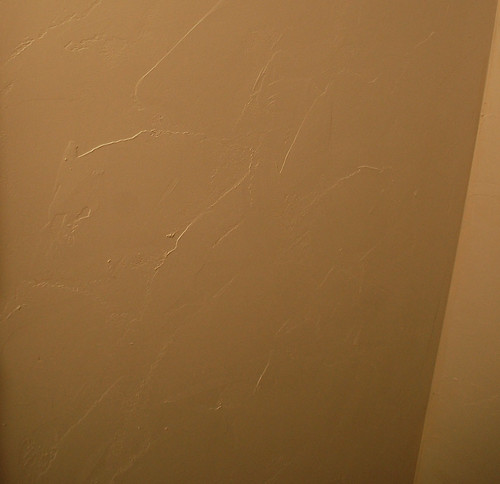
Every time someone sees a wall in this state they give me the you’ve-been-inhaling-too-much-drywall-dust look, and I’ll get into the techniques of application in a minute, but once everything is primed it looks a lot more cohesive.
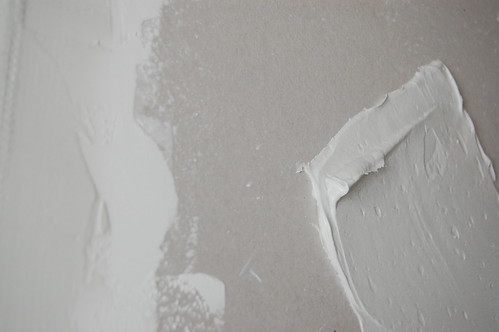
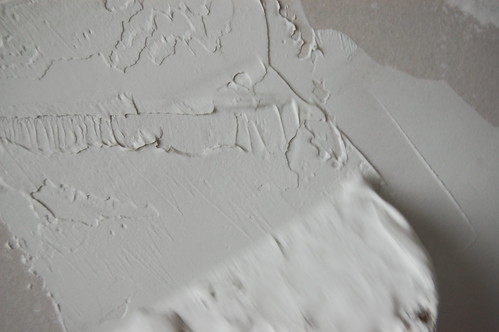
Step 3: Techniques
The trick to texturing is that whether or not you’re doing a thin application, you actually don’t need that much mud, and you don’t have to cover every square inch of wall.
This is about enough… don’t go digging your knife into the bucket and hauling out your body weight in mud to slap on the wall.
Smear it on thinly, and the trick to good texture is to use uneven pressure.
So push hard then light then hard then light as you move through the swipe.
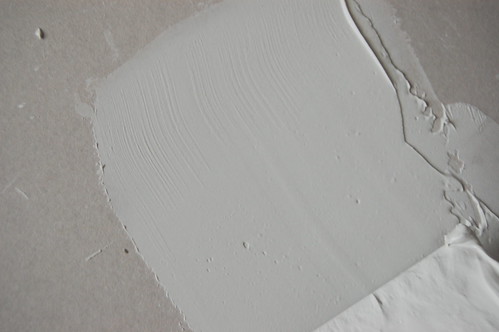
THIS is way to much mud on the wall.
Even 1/16″ gives you dimension. And this will only shrink and have massive cracks in it.
If you find that when you’re mudding the wall things are coming out a little too perfect…
Press your knife into the spot that needs more texture…
Then run it lightly over the top again.
The closer you overlap your swipes of mud, the busier the wall will look. You can see in this sample I use a thin application and wide swipes for a very subtle texture:
Also, change up the way you spread it on. Sometimes go from left to right, then top to bottom, then diagonal.
When finishing a room, it is best to plan to do the whole room at once. For me at least it’s hard to get in the exact same rhythm if I leave and come back. If it’s unavoidable however, I would say at least finishing a wall off is a must. Once a section of wall is dry it’s hard to go back in and overlap some texture without creating uneven spots.
Let’s recap:
- Not too much mud on your knife
- Spread it on thinly, using varying pressure
- Gouge it and then run your knife lightly over the top to create more texture
And there you have the deep, dark secrets of drywall texturing revealed. I know, right? Between this and the end of the Harry Potter series, what is there left to live for?
Now go forth and conquer those flat, boring walls.

120 Responses
Help! I used the compound and it turned out okay maybe heavy but ok. At Home Depot they recommended primer. Now bummer is I decided I wanted a metallic look on walls but originally tried a board with a gold on bottom and brown- way too busy in faux. So I will have to go with a gold of some sort and I guess a glaze close to the base color… Disappointed that I can’t use the metallic paint on the market because it’s too thin & I should have read online that it’s not recommended for textured walls. Any suggestions for how to paint over Kiltz primer. Should I use Behr paint and find a glaze color very close to the gold I pick out to try and calm the wall down? If I could have used the solid metallic gold they had it would have looked great but Ralf Lauren paint is too thin & designed for Sheetrock with no texture. Any suggestions to get something similar to that?
Question: Can you put Joint Compound directly over primed concrete blocks?
I love the effect of your technique and it would greatly help me if I can use it on concrete block walls in my game room.
Thank you in advance for your response.
Yeah, that would work as long as there’s NO moisture coming through those walls. You may need to do a very smooth skim coat first and then a second to texture, depending on the texture of your existing walls. You don’t want to put it on too thick or it will crack.
Can I use the joint compound and a texture roller?
Can this procedure be done over top of wallpaper?
I did use a lightweight joint compound texturing over vinyl wall paper in 2006. First, at the advice of my neighbor I cleaned the walls with a white vinegar and water solution (equal parts). According, to him it will help almost anything stick. 11 years later that texture is still there and there are no signs of crumbling or breaking away.
I hope this helps.
Hi Lin – in response to your question, I would not recommend you doing it on wall paper. It will eventually start crumbling off and you will have lost all your precious time and investment. I hope that helps.
What about using on woodpaneling, any special things you should consider?
I know this is several years old, but yes you can mud over the grooves in good quality paneling. My mother was a professional mud dobber–even did fancy fans on clients ceilings and stuff. Our house was built in ’65 and she mudded over the grooves on the upper half of the living room. They will crack a little when you start hanging pictures, because the whole thing flexes, but ours are still in good shape and that was in 2010.
I am looking at a house that is made of poured concrete and the walls are currently unfinished. In a previous answer about concrete blocks, you stated that as long as no moisture seeped, mud on concrete should not be a problem. Would it help or hurt to prime the concrete walls first? In my case, it wouldn’t take much to spray a binding primer on the concrete, then do this technique. Any idea of material cost per square?
Thank you
I have jumped into a project (resurfacing/faux finishing the ugly backsplash in my kitchen) without really thinking it through. On/over the natural stone ceramic tile that was here I applied a plaster-like coating of joint compound to get a brick/plaster wall look. But now I don’t know how to seal it without painting. We like the way it looks now so I’m considering a penetrating sealer that is wall rated and designed to be used over natural stone/ceramic/grout. Does think sound like a good idea? At Home depot the paint dept told me my only option is to prime & paint over it.
Can you put a light coat on paper faux abitibi
Can I use joint compound over OSB on and inside wall if I prime the sheeting first, I want a stucco look?
I am also interested in knowing if joint compound can go directly over OSB.
Thanks for the paint tip. Going to try it on repairing a hole in my son’s textured ceiling.
Can I texture with joint compound over primed (Kiltz oil base primer) wallpaper?
Can this idea be used to make a wall look like stone and fossils
I am removing painted wallpaper in my basement. Now I am left with a layer of glue which isn’t coming off easily. Can I stucco over the glue instead of scraping it all off?
You can use joint compound over glue.
I have a concrete ceiling that had a popcorn ceiling on it. I removed it and want to use joint compound to get the same effect you got. Do I need to do anything special to the ceiling to have the compound stick to it and not fall down. The concrete ceiling is 20 teams old. Thanks!
You don’t need to do anything special as long as you have a drywall base and it’s free of dust from removing the popcorn ceiling. Using a large drywall knife will work. You can also use a roller and thinned compound for more of an “orangepeel” look that may be easier to do on a ceiling.
Thanks Kit. I am a little lost by what you mean by a drywall base? My plan was to add the joint compound to the existing ceiling (concrete) now that the popcorn is removed. I applied water and removed all the popcorn. The ceiling is nearly smooth with minor imperfections and small air holes. I saw your pictures and wanted to use the sheetrock compound to achieve the effect in your painted picture. I wasn’t sure about a bonding agent being necessary?
Thanks Kit. I am a little lost by what you mean by a drywall base? My plan was to add the joint compound to the existing ceiling (concrete) now that the popcorn is removed. I applied water and removed all the popcorn. The ceiling is nearly smooth with minor imperfections and small air holes. I saw your pictures and wanted to use the sheetrock compound to achieve the effect in your painted picture. I wasn’t sure about a bonding agent being necessary?
I want to use faux brick 4×8 ft panels on my accent walls. Can I use this type of plaster to texture the panels? They have already a little brick texture, but it’s not realistic…yet. Also does any paint work for the mix? Thanks :]
I used a lot of joint compound to make it look like stucco chipping off faux brick panels, how long should I wait befor I paint it?
Hello. I am getting ready to texture my bathroom walls, but apprehensive because I have not done texturing before. Do You Sand the wall after your texture dries? Would you be willing to post your actual technique? I am a visual learner. Thank you for your time.
I don’t sand after texturing although you could do that for a softer/different look. My suggestion would be do to a couple of practice panels first to try out your technique (you can use any smooth surface/scrap drywall for this…) Good luck with your project! http://diydiva.net/wp-admin/edit-comments.php?comment_status=all#comments-form
Can you use your technique on unfinished plywood? I recently built an outside cabinet with a plywood skin and want to make it look like stucco. I like the paint thought I could see adding even a little more paint to help adhesion to the plywood. Thoughts.
So, I think the joint compound would adhere to plywood (assuming we’re talking about OSB) if you applied it correctly, but it won’t stand up to any kind of moisture outside… even if it’s not direct rain, but moisture in the air, it will basically mold and crumble. Actual stucco is a cement-based mixture and is meant to handle the elements. So, it really depends on your application, but I’d think about alternatives for anything that isn’t in a climate-controlled area! Best of luck with your project.
Frank- you can actually use the Ardex Featherlight in the same way that kit uses the joint compound. It is a cement product. If you google it you’ll find lots of people who have used it to create faux concrete counters. You can trowel it on like this thought and get a stucco like texture.
I have some of it outside and haven’t had any problems. (I did seal it with a stone sealer though- the same things you’d use for stone tiles).
My husband and I did this to our kitchen walls after stripping the wallpaper. The paint we picked turned out far darker than we expected. So I divided a 5 gallon bucket of mud into two containers and dumped half of the paint in each bucket. Mix extremely well and go to work. At the time (20 years ago)it was suggested we seal it with varnish or shellac. We are still happy with the results. A strong word of advice divide your paint and mud evenly at the beginning so you don’t have a variance in color.
how long normal time to dry before you can paint?
Can I apply joint compound over old joint compound on wall? Was done in the early 80’s. No idea if compound contained asbestos or not. Do not really want to test or tear wall down.
Any other ideas?
Yes, you can skim coat over existing plaster/drywall.
I love using the joint compound on my walls. I live in a mobile home with smooth walls, they show every mark or mistake in painting. I use it right out of the bucket and smooth it on and paint it. Comes out beautiful
How can you remove the texture from the cement brick wall?
I had a bathroom that was tiled orange tile. I bought a product called STIX. i then painted tje tile with it. When dry i textured my walls with the jlint compound. I use tje pre-mixed. Then i put on some music and little latex gloves and put about 1/4 cup im my glove and smear it on the wslls in hslf circles. Start on the bottom and work up.
Ruby I guess your tiles weren’t uberchic Hermes orange. I was lime-washing, puttying and plastering all day yesterday, listening to M.I.A. on repeat. I mix all sorts of things into the lime: titanium, salt, alum, skimmed milk, acrylic paint, clay. I’ve yet to try joint compound, and I wonder what is in it, but love the sound of your little latex glove technique.
we have a large cinder block retaining wall outside we are going to stucco. Do you think this technique could be used with the material used in a scratch coat.
I am remodeling my bathroom,and am interested in texturing with joint compound. I am going for the ruff cut stone effect,or stucco look. Wondering if it will be to damp being a bathroom. I’m guessing after an oil base paint finish things will be fin. What’s your thoughts or ideas to do the best possible design and finish?
I think it will be fine in a bathroom once painted.
I’m thinking of covering the ugly tile in my bathroom with joint compound and adding a tint to give it a concrete color. I’m going for and industrial/rustic look. My question is, what do I use to seal it so moisture doesn’t affect the joint compound?
Ummm… this is the best DIY instruction ever! Compared to everything else I looked up online, there wasn’t anything more thorough. I wish you had a video 🙂 Heading into the project tomorrow. Thanks for such a great post!
Do you HAVE to paint joint compound. I have textured my walls here in Arizona with the joint compound and like the light color. Is it necessary to paint over the compound.
thank you
I mean, you don’t HAVE to do anything you don’t want to 😉 Joint compound that hasn’t been “sealed” with paint is very susceptible to moisture, staining, and scratching though, so even a flat paint in a similar color to the unfinished joint compound would be a good idea, I think!
Thank you! I’m so glad you said the walls didn’t need to be sanded after texturing! My SIL insisted that every wall had to be sanded after texturing, no matter what. I thought it was extra work (when the walls looked fine).
I have two bathrooms that are textured using this method, and I’m actually looking to remove the texturing from one of them. Do you have any advice for REMOVING the faux stucco texture once it’s been applied and painted?
Ah, no. I’m not sure how you could really do this without just replacing the wallboard (it’s not like popcorn ceiling that could be easily scraped off.) Best of luck to you with that!
I have a painted interior slump stone block wall separating the dining room from the living room. My wife doesn’t like the block appearance and would like me to make the wall with a smooth appearance; maybe a little texture after the blocks have been erased. Will the joint compound stick and fill in those joints between the blocks? Any tricks to ensure the joint compound doesn’t crack?
Hi there, really enjoyed this post. I’m new to homeownership and fixing up my house, and posts like yours are much appreciated.
Question for you – any idea how to do this type of thing to achieve a somewhat smooth look? I’ve attached a link to a photo on Pinterest below… I’m aiming for a bit of a matte stucco finish, almost sponged on maybe? Not quite orange peel though. There are tons of examples of this in stores like Anthropologie, West Elm, CB2, etc. but I’m finding it hard to find out what it’s called or how to do it. Any advice you could give would be great!
Also, I’d be doing it over existing textured walls. Any issue there?
https://www.pinterest.com/pin/178173728993430355/
I used Sheetrock joint compound to stucco a wall. How long should I wait before painting it?
Hi … I’m really wanting to use this to make textured drawer fronts ..really want to make it thicker in places for dimension .. would I apply a second layer .. can I prime then add compound paint then seal?
Comments are closed.