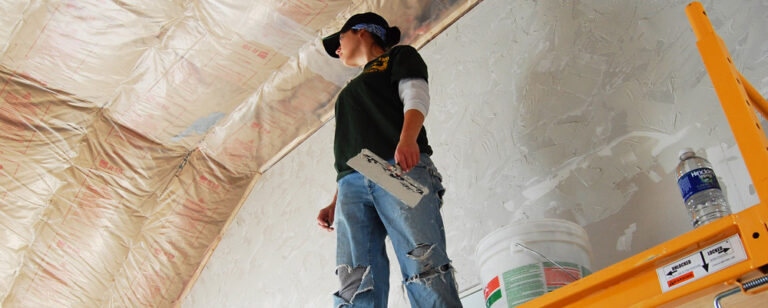
So here we are. Wallboard up and spackling knife in hand– ready to jump in and finish some walls. This is the part most people would rather take a whack on the head with a sledgehammer than have to complete (and the hours upon hours upon hours of sanding it requires if you go a little crazy with the mud), but put the hammers down people, I have a better, faster, more fun, less lame way of finishing your walls.
First, you need to have walls. If you’ve already got them and they’re ready to go, good for you. I’ve used joint compound to texture wood, brick, and standard drywall in dry areas without problems. If you don’t have walls already but you want some, you can check out my info on wall framing and some tips for hanging drywall by yourself.
Now, the nice thing about putting some texture on your walls is that it’s pretty forgiving for a less-than perfect tape job which means you don’t have to spend the rest of your life with sanding block, but I’ve also got some insider info on finishing joints from a pro that will help make this part less painful. And when all of that is finished, then you’re ready for some fun with mud. Let’s get a little dirty, shall we?

Basically this is what you need:
- 5 gallon bucket of joint compound – I tend to use heavyweight even though you’ll strain your back hauling it into the house and it’s a little more gluey. You can also use lightweight without the universe imploding.
- Spare white paint or primer (just a little bit)
- Mixer (You can do this by hand in a pinch, but it’s so much easier with a drill. And also more fun.)
- Drywall knife – depending on the look you want 6-10″
- 5 gallon bucket with water and a brush for cleaning up your tools
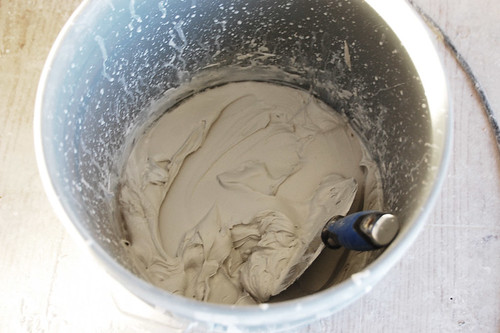
Step 1 – Mixing the Mud
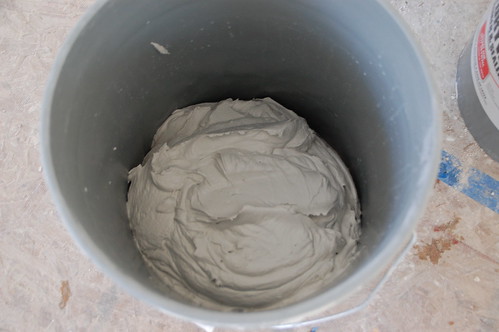
I always thought this was BS, but mixing the joint compound up (even without adding water) really loosens it up and makes it much easier to work with. Since I am almost always doing this at odd hours– after work, in the middle of the night when I can’t sleep, or an hour before I have to be somewhere else– I tend to mix up small batches by putting some mud in a bucket…
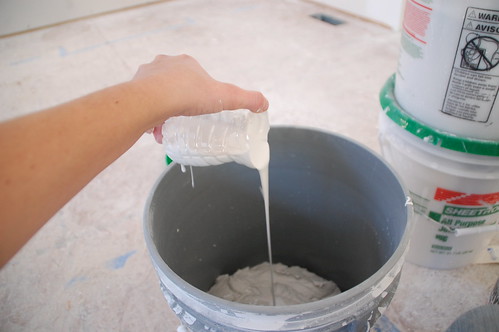
And adding a little bit of paint. (That was a trade secret from the pro… apparently it makes it easier to work with and gives it a better finish. Who am I to argue?)
A quick spin with the mixer and it’s ready to go.
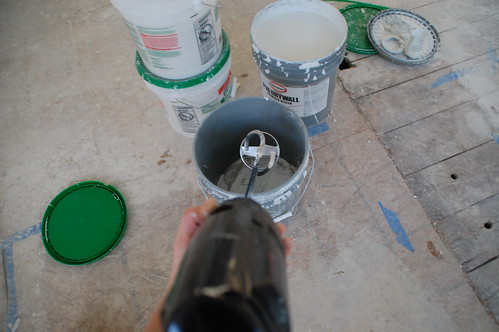
Definitely don’t pull this thing out of the bucket while it’s spinning. You’d think that would be obvious, but making messes comes more naturally to some of us than others. What can I say? It’s a gift.
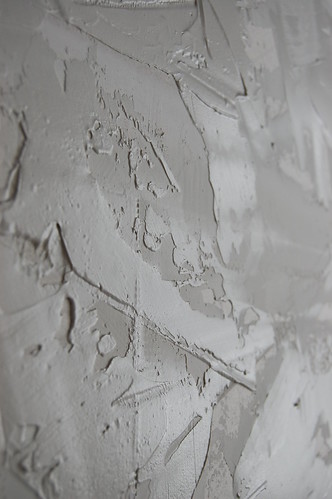
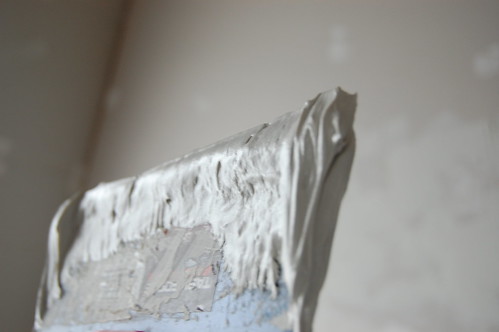
Step 2 – Test Panel
Even texturing is about having a rhythm. I feel pretty confident in my texturing skills and even I do a test panel before I start a new room to make sure I’m using the right knife and the right amount of mud for the look I want. Here are some examples:
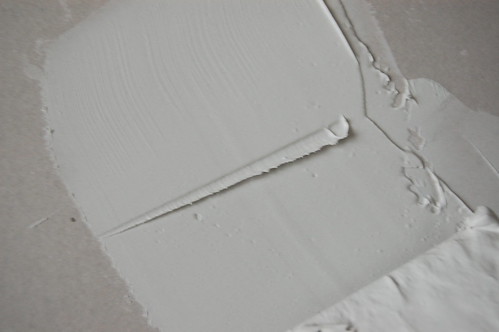
10″ knife, thick application:
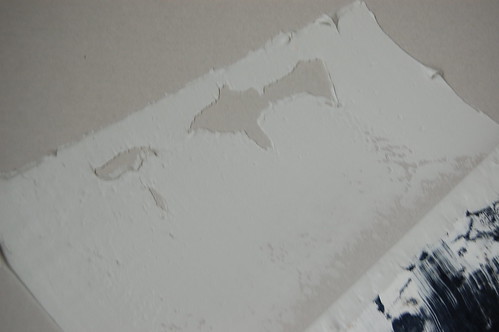
6″ knife, thin application:
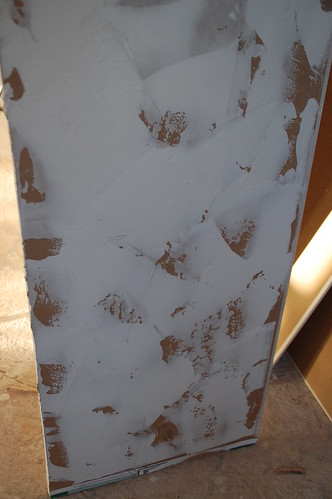
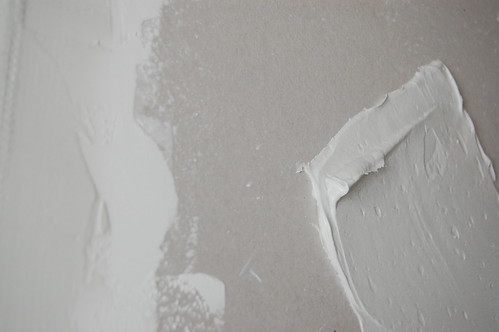
10″ knife, thin application:

Every time someone sees a wall in this state they give me the you’ve-been-inhaling-too-much-drywall-dust look, and I’ll get into the techniques of application in a minute, but once everything is primed it looks a lot more cohesive.
Step 3: Techniques
The trick to texturing is that whether or not you’re doing a thin application, you actually don’t need that much mud, and you don’t have to cover every square inch of wall.
This is about enough… don’t go digging your knife into the bucket and hauling out your body weight in mud to slap on the wall.
Smear it on thinly, and the trick to good texture is to use uneven pressure.
So push hard then light then hard then light as you move through the swipe.
THIS is way to much mud on the wall.
Even 1/16″ gives you dimension. And this will only shrink and have massive cracks in it.
If you find that when you’re mudding the wall things are coming out a little too perfect…
Press your knife into the spot that needs more texture…
Then run it lightly over the top again.
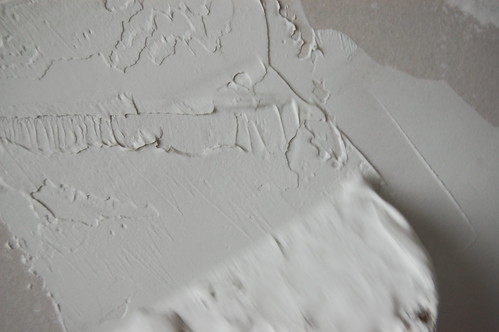
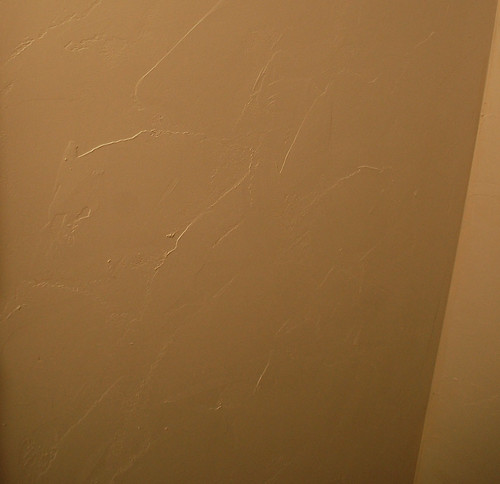
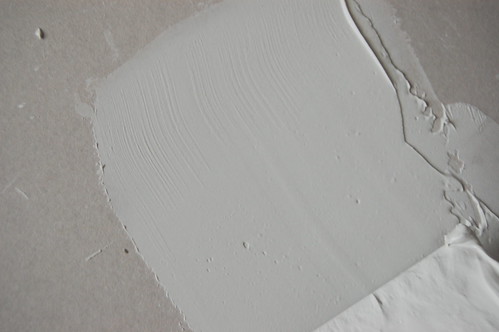
The closer you overlap your swipes of mud, the busier the wall will look. You can see in this sample I use a thin application and wide swipes for a very subtle texture:
Also, change up the way you spread it on. Sometimes go from left to right, then top to bottom, then diagonal.
When finishing a room, it is best to plan to do the whole room at once. For me at least it’s hard to get in the exact same rhythm if I leave and come back. If it’s unavoidable however, I would say at least finishing a wall off is a must. Once a section of wall is dry it’s hard to go back in and overlap some texture without creating uneven spots.
Let’s recap:
- Not too much mud on your knife
- Spread it on thinly, using varying pressure
- Gouge it and then run your knife lightly over the top to create more texture
And there you have the deep, dark secrets of drywall texturing revealed. I know, right? Between this and the end of the Harry Potter series, what is there left to live for?
Now go forth and conquer those flat, boring walls.

120 Responses
Looks great! Can’t wait to see what it looks like when you’ve got it painted…
FYI – I just posted the inspiration structure for the exterior of my home – if you’re interested.
The images look great and I imagine a room done as nicely as you have done here looks fabulous…unfortunately, the previous homeowners in my place did something similiar (although not nearly as nicely) and I curse them everyday.
Thanks for showing everyone how to do it nicely…maybe those people out there who insist on doing this will at least follow your directions so it looks good.
Kristy – You bring up a good point. Not everyone loves this texture… which is all the more reason to be subtle about it. I’d love to see pics of your “not so good” example, just to give everyone the cautionary note.
My previous home owners did something similar… big goopy plaster swirls. They got a skim coat of this texture REAL QUICK. You may be able to do the same thing with your walls and subtle it down a little if it really drives you nuts!
No sanding? SOUNDS GREAT! It also is a great way to cover up messed up walls, I want to see the finished product!
How do you paint over this? Spray? I like the texture and am considering it for a single concrete bedroom wall in my basement. The other three walls will be drywalled. Can I use joint compound on the poured concrete wall? Will it stick?
I took wallpaper down. My walls are uneven, some wood, and paper was right on drywall. I think you get the picture. Do i need to prime the wall first? I like the more busy design. I want to do this for a small bathroom. Can you add color right into the joint compound. I also want to use a glaze to finish. Will this mildew proof it.
Would like to know about putting this in a bathroom. Is there any special treatments to be done for a bathroom?
I love this finish, it covers so many sins. Funny thing, drywall contractors charge a lot for it (they call it “old world” or “skip trowel”), even though it means they have to put in less effort to make it look good. I had it as an option on a couple townhome village projects I managed the construction of out west.
Just found your blog today. Love it when I find chicks who aren’t afraid of power tools. I try to tell women I know (who complain that their husbands aren’t getting projects done on their homes) to buck up and do it themselves, but they always seem so dang aprehensive.
ROFL….you should hear my hubby when I get tired of waiting for him to finish a “project” aka remodeling. I tell him I will do it myself and he tells me he will divorce me. Seven years and spare bedroom is still not done. Last month I figured if I wanted to combine the kitchen and dining room with built in island and cabinets I would have to take matters into my own hands. He got a text from me a few hours after he went (April 25, 2011) to work showing a major hole in the wall between kit and din and when he got home almost all the din side was removed. My “project” is almost complete now, he has helped some but I have done the majority of the work. I even made the blue prints and 3D images using my adobe AI program so that he sees what I am doing. My cabenits are Lowes cheap finish yourself ones, which I did in golden pecan, I have planes for a built in china closet and the finish will be pine tongue in grove. I figure do to money restrainst to be done by end of july. Not bad proving the point if you want something done then get up and do it yourself because most men can’t get past the me Tarzen you Jane thinking. Or is it the woman can’t get past I would break a nail…mine are an inch long and they don’t stop me from doing anything.
Erin J- You can just use a roller to paint, it goes on fine! (You might want to get a thicker roller, but you really don’t even need to.)
If you’re doing this in a basement the trick is that you don’t want any moisture getting to the joint compound, because that would be a mess. I think you could do this right over the concrete walls as long as they were free of dirt or anything else that would keep the mud from “Sticking”
Carmen-
A-men sister.
In the basement I would suggest you paint a coat of REDGUARD elastomeric waterproofing on your walls before you attempt to stucco. This will prevent any moisture from coming through the concrete and ruining the wall mud.
This is a great primer on using drywall joint compound which I hate to do but find that every house we’ve renovated needs it to some extent.
Hi! Just found you with a google search on using joint compound! 🙂 We have a room in our house that was a patio and is now enclosed. So – can you tell I’m working up to asking some advice? Some of the walls are cinderblock and some of the walls are the old stucco exterior walls of the house. I would love to get a uniform finish on this. Do you think the joint compound, with proper preparation, might be a solution? Thanks if you are able to get back to me.
You ROCK!!! I have several home improvement projects going on. I am focusing on finishing them one at a time. I recently built a wall to cover some pipes we had to run up through the corner of a room. I have to say…the wall turned out great and I feel EMPOWERED!! Building that wall and having it turn out so well makes me feel like I can tackle ANYTHING! Thank you for being so inspirational to other women!
This was great and exactly what I needed. My husband and I gutted out basement (it was never finished out right to begin with) and we have most of our drywall up. We are doing it in 3 sections so that we have working room. We just finished up the texturing on our first section and I have to say, this was so easy and we achieved great results. I am so glad that I came across your website – it has really inspired us to get the job done and the textured walls definitely add character to the room. 🙂 Thank you so much!
Did you use the pre-mixed all purpose joint compound (5 gal buckets) or did you mix a different weight mud?
Alex, I usually use the heavyweight premixed stuff. I recommend mixing it with a paddle bit no matter what, but if you want a thinner texture I use a separate 5 gal bucket and mix some primer and some water in to thin it out a little. I’m going to update this with some additional pictures and directions for that soon! Let me know if you have any other questions.
Thanks! I’ve had this bookmarked for about a year now. I’ve finally got around to painting our living room and the 75 year old plaster ceiling is going to get this faux stucco finish to cover over years of visible crack repairs.
Do you prefer the 12/10 inch mud knife or a masonry trowel, ala skip trowel method?
Thanks for posting this! We lived in San Antonio, Texas, and visited many parts of Europe, where this is THE texture of the thick walls there. For the life of me, I’m stunned by how few people know about this. You can do a lot of things with joint compound and then call it “old world”– and using a paint/glaze mixture gets to be called “Venetian plaster”. Looks amazing. We’ve gotten lots of compliments on our glazed/patina walls that were really done mostly with joint compound making this type of finish.
Plus, we felt we had to do something creative b/c there was wallpaper everywhere in our house from the previous owner. When we removed it, even with professionals, there was so much wall damage the contractor “offered” to re-do the whole drywall (for a large fee). I said “no thanks” and did this skipped trowel thing you’ve done here. (Also works for wood panelled walls!) QUESTION: how hard is it to get a totally smooth wall finish? Isn’t it just less of the “skipping” and a more even application, and then some serious sanding? I see why it’s not as appealing (in terms of sanding) but it IS achievable, correct? Why don’t more drywall guys make smooth walls instead of relying on sprayed “orange peel texture”? THANKS FOR POSTING THIS…
I’m simply drooling at your mad skills! I’m old enough to be your mom, and only in the last 10 years did I discover that I like to do stuff like this too! Having so much fun, though I’m nowhere as prolific or skilled as you!
On the wall texturing, to soften the look I used a slightly damp sponge after the compound dries to knock down the sharpness of the texturing or correct any areas. That’s if you prefer a less defined look of course.
That and tiling are about as adventurous as I’ve gotten, but confidence is building. Thanks for taking time to blog and for letting us live vicariously through your work!
OMG, I have used joint compound with a paint roller over some of the most god awful surfaces and materials you ever want to see and have come up with some of the most delighful designs. Mixing the compound with 123 base coat seals the compound and keeps moisture issues down. I did my kitchen 10 years ago this way and have had not one ounce of trouble with the moisture. My house is over 130 years old and part of the walls were covered with…believe it or not….lenolium (sorry if spelled wrong). you got to love old houses built by imagriants, they used every thing, even card board boxes in the walls.
Do practice a bit to get a flow going and work fast so you don’t get dry spots and pull up to much off your designe.
Wow, I love it. Every year in college, back in the 90’s, we would rent out old houses in Pittsburgh that needed serious repair. The first thing I would do is buy a 5 gallon bucket of Joint compound and go to town. LOL, I covered every square inch but see that you don’t really have to.
One question, I am about to do a project again but people have been telling me plaster plaster… what is the main diff in JC and plaster?
thanks.
can you do this on wall panel?
are you talking the 4×8 sheets that is like thin plywood? Personaly I am no expert but if that is what you are talking about I would get some scrap and try it out. Since it is made of thin plys and the jont compound is water base you may get some seperation between top and next layer down. Joint compound is not light. Also you have to consider how flexable the panel is. If you can push on it and it bows in then you will end up with a wall that will crack or flake at the first major bump.
I need some help! My husband and I used the compound in our bathroom and it has turned out gorgeous!!! Going to do another room next-we had a lot of fun doing it! BUT-we do have a part where it I’m guessing went on too thick and we have cracks-a lot of them around the top of our shower area. Whats the best way to fix that?
yep joint compound will shrink when it drys, thus the cracks. Dip your finger in wet compound and rub it in the cracks and let it dry …. like the old trick of toothpast in the nail hole. If you roll it on again….keep checking for cracks and just dip your finger in water or use a damp cloth or spunge and rub over the crack and smooth it together. Make sure you use a good base coat like 1-2-3 to seal it before putting your top coat on. Moisture in time will break down the compound.
Great!! Thank you!
Kel has a great suggestion Teresa. It does happen when you get the compound too thick. I’ve also been known to fill in cracks with a little addl joint compound and really lightly sand it if necessary (not enough to take any of the texture off though!)
i am soooo bookmarking your site!
how awesome that i found your site, thank you so much! i’m a single woman with a house full of character, and am happy to utilize your know-how to do some improvements.
i have a big basement room with bumpy ugly sheetrocked walls. have a feeling the previous peeps had teenagers doing a mosh pit down there, big holes “repaired” bumpy and rough! now i can fix em all myself!
My wife finally broke me down to actually read your post before I finished patching and skim coating our baby changing nook. It looks awesome (way better than what my shoddy skills/patience would have achieved in as far as smoothness). It’s definitely a different pattern that just seemed to work: I’m calling it “coral” because it has a hint of branches that seem very coral-esque. Thanks so much!
Your site is the best one i have been to for how to use joint compound as a ” texture”. I tried rolling the texture that you would buy at say lowes that is already mixed on one of my bedroom walls, then using a long blade to knock it down, I do not like it. I am going to go over it using the technique that you discribe, using the joint compound, very excited,! thank you so much for the info and photos.
After hiring someone to come in and “finish” the drywall for me in a room I am remodeling, and being told I could go ahead and prime and paint… Now, that I’ve seen the horrid job they did (I’m still in a state of shock!), I don’t see how even if I used a “blocks everything” primer that I could ever be able to paint this. I’ve never seen a job done this badly. If I mud it again, I’ll have to really feather it out- I was thinking about doing a stucco finish as a different option. Thank you SO much for these directions!!
I took wallpaper down. My walls are uneven, some wood, and paper was right on drywall. I think you get the picture. Do i need to prime the wall first? I like the more busy design. I want to do this for a small bathroom. Can you add color right into the joint compound. I also want to use a glaze to finish. Will this mildew proof it.
I’ve actually put joint compound right over the top of wallpaper and it turned out beautifully. It’s been almost 10 years and looks like it did the day I painted it!
SO, a question went unanswered, and I NEED some help 🙂 So please, after the joint compound dries, what is the next step to paint it? Do you prime? (I did not prime the wall before I did this to the walls, as it was already COVERED in painted popcorn FUGLY stuff from like 1980!) I am waiting to paint to end this project, but I dont wanna mess up all my hard work… 🙂
After the compound dried, I rolled out a lighter color and then watered down a darker color with a bit of water and color washed the darker color over the top so it added even more depth. I’ve also used a small trowel with little teeth and a stiff brush for two different affects. I’ve never primed the walls first and I have applied the compound directly on top of wallpaper with amazing results!
I’m in the exact same boat, did you ever figure it out?
My hallways are full of wholes and damaged, corners knocked off from kids etc.and previous fixing holes etc, etc. we have had this idea of doing something w handprints, since are children were at home, and now we have 4 grandchildren and one on the way…well 4 of my grandkids are in town for another week. So I was thinking of having some messy fun with lasting memories, any sugestions, open to ideas, I have a hard time making up mind, don’t have a lot of time, as husband is pretty sick, but I need a outlet..I have some latex smooth finish texture paint, that is really old but am able to salvage some, putting the good stuff in a 5 gallon bucket, leaving out the rusty very hard stuff. so please help..my 1st thought was to texture the bottom half of wall and have them put there handprints, or texture semi rough to cover imperfections, and paint neutral color, and add there handprints with other colors or darker shades of the neutral color…just not sure… are house is really worn down so anything is a improvement…I know I need to clean and primer before hand…
Please and
thanks again
Linda
Heya this is kinda of off topic but I was wondering if blogs use WYSIWYG
editors or if you have to manually code with HTML.
I’m starting a blog soon but have no coding knowledge
so I wanted to get guidance from someone with experience. Any help would
be greatly appreciated!
I own all the power tools in this family and have no hesitation tackling a job…..consequently my older son majored in Construction Management. Why didn’t I? Am in the middle of transforming a cottage in the backyard that has been used for storage forever into my dream sewing and craft studio. Textured 3 rooms in our house with joint compound and they look great. It’s fun to make patterns…very forgiving…
wonderful finish..
You so rock. Even your writing is brilliant. Thank you so much. We just did a huge stairwell wall and fortunately nobody likes the color. Now I can prep that and apply your tips over what was a “meh” first try. (It needed evening out anyway.)
The 2010 FIFA World Cup is the largest sporting event in the world and millions of viewers will be watching the games.
The point is that FIFA is the only game in town and they are using that power to
run it as they please. A close examination of the facts
will show that the actions of these environmental NGOs were misconceived.
Do you have a spam problem on this website; I also am a blogger, and I was curious about your situation; many of us have developed
some nice procedures and we are looking to swap solutions with other folks, please shoot me
an e-mail if interested.
At this moment I am going to do my breakfast,
afterward having my breakfast coming over again to read
more news.
THANK YOU, thank you Thank YOU! Your tutorial was excellent, and just what I needed! I had a small basement bath that had 1960’s gold striped vinyl covered wallboard on the walls – one over cement block wall. Due to warping, I had to rip the wallboard off the cement block, but left with what to do? I painted the other walls, salvaged a 32″ section that I put on the bottom of the cement block wall, and textured the top portion. (I primed it first). LOVE the results!! You can no longer tell it is a cement block wall! It’s lovely, and I’m getting lots of compliments. Not sure how to attach a photo…?)
We do this application a lot and i was wondering if we coukd skip the priming step. Always trying to find faster , easier ways of keeping the $ we make. We’ve tried paint/ primer mix but too dry. Tried just paint , but waste too much paint. Tried tinting the primer so won’t need perfect coverage from paint. Anything I might have missed? Love your humor btw
Nettie
I mean, you’re either going to have to use a primer or use more of a paint+primer… there’s no way to get around that. Usually doing a coat of primer is cheaper than using more coats of the expensive stuff. The only suggestion I have is try buying the 5 gallon buckets. It’s cheaper in bulk.
I am regular reader, how are you everybody? This post posted at this web site is in
fact good.
This is exactly what I’ve been looking for.
I’ve been wanting to do this in my bathroom…just wasn’t sure how to get the look I was wanting. Such a great tutorial.
I’ve seen others posting some of the same questions I have but I’m not seeing the answers. How do I see the answers to the questions? Do you email them instead of replying on your blog?
Your style is awesome and your writing totally cracks me up!!
It’s actually a cool and useful piece of information.
I am happy that you just shared this useful information with us.
Please stay us informed like this. Thanks for
sharing.
This is a great site but there are no answers to any of these questions. Are there any? Many of my questions are already here.
You ought to be a part of a contest for one of the finest sites on the internet.
I most certainly will highly recommend this web site!
How much coverage do you get from a 5 lb. bucket of the heavy joint compound? Did you use the entire bucket for the room in this tutorial? I just stripped wallpaper in a 4 1/2′ x 5 1/2′ powder room with disastrous results. After a weekend of patching I already know that the walls will never be nice and smooth – and this looks like a perfect finish!
A 5 gallon bucket will cover at least one or more good sized rooms (12×12 or more) So it will definitely cover your bathroom. You don’t need a TON of joint compound on the wall, just a bit.
this one looks a lot like my own enclosure i actually purchased just lately,
very satisfied with it for everyone found on the
fence about getting one, do it, you wont be sorry
We are buying a house that is about 15years old. It has this technique in the living room. I am not crazy about the way it looks right now. It is painted a (pinkish) tan. Would light or dark paint look better on this finish. And how would you go about removing it, if I just simply can’t live with it.
I’m going to try to do this texture in my sewing room where we peeled velvet (!) off a wall thus damaging the drywall beneath. This technique will be beautiful. I’d also like to try this in a bathroom, but here are the problems with that project area: First, the bathroom is heavily used and has terrible ventilation, thus moisture, and particularly steam, is a big problem. During its first remodel we pulled off ultra-suede (!) from the bathroom wall exposing glue. I thought I’d washed all the glue off, so I waterproof primed, and then sponge painted the walls. It looked great for about five or six years. As the kids grew older and took longer showers, thousands of tiny cracks and bubbles began to appear as well as some mold. Now small chips want to flake away all over the place. It looks awful! The big question is how to permanently repair this?
I haven’t worked much with drywall compound in a moist environment. I plan to scrape as much of the paint off the walls as I can, but then should I scrub and wash the walls again to try to remove more of the glue? It seems a hopeless chore. I will of course bleach the walls to remove the mold. Will a layer of primer, a layer of drywall compound, and another layer of primer hold up to moisture in case my attempts to fix the ventilation problem are fruitless? During that first remodel we also had to completely remove the drywall from a hideously tiled wall. There we installed green board and that has weathered my children’s quest for exemplary hygiene flawlessly. Maybe it would be best to rip out all the rest of the drywall, install greenboard, and skip the texture? That just seems like a ton of cash and work, though. Thanks for your advice and a nice article!
Honestly, I don’t know much about wallpaper glue and any issues that result from it. I would have thought a few layers of primer and paint would have worked to seal it off. If never had issues with joint-compound texture in a bathroom, but I do always prime and paint. If you’re really worried about it, new drywall is the best way to go, but you’re right, it’s a ton of work!
Trying to cover up nail holes in the walls made them look odd. Very little texturing. Would this technique work over the painted walls?
This texture looks great. I’d like to ask you if this technique could work to replicate a certain cement like look that I want to achieve. Also as far as tinting goes, how much paint can be added to the mud without compromising it’s ability to stick to the wall? I don’t want to paint when it’s done, but I don’t want it to be chalky. I’d like to send you a couple of images to illustrate what I’m trying to do.
I’m delighted to find this tutorial, thank you for posting. I helped apply a similar technique to a round, dome-shapes room some years ago and couldn’t remember the details. We did apply it pretty thickly, so perhaps a plaster was used instead of joint compound.
I will be stopping to pick up supplies this afternoon as the wallpaper is down and floors go in next weekend.
Thank you for this information!
‘a tale of two cities’
africa clothing http://africaclothingforsale.com
It’s amazing for me to have a web site, which is valuable
designed for my know-how. thanks admin
Comments are closed.