Granite sounds all well and good until you hear $30 per linear foot and your eyeballs pop out of your head. I’ve tiled almost every counter I’ve come across for the last 5 years– kitchen, bathroom, laundry room– you name it. A couple of sheets of MDF and some tile, you’ve got something that looks better than Corian or laminate for a fraction of the price.
Check it out…
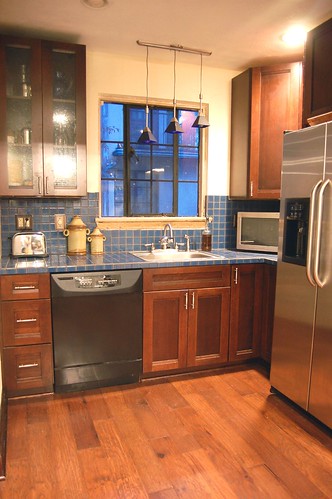
2″ blue tile from Lowes for less than $2 per square foot. The entire kitchen counters and backsplash cost around $250.
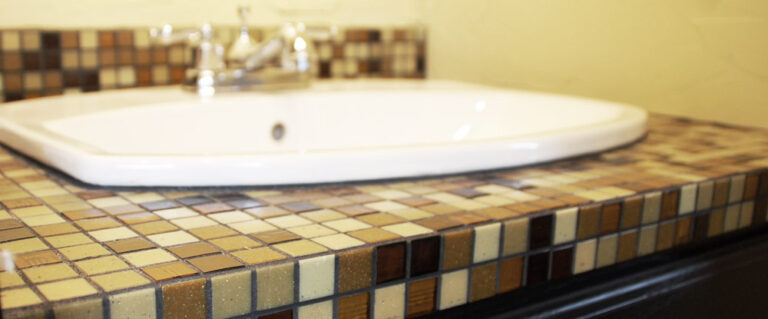
3/4″ glass mosaic tiles came in at around $7/sf. Still considerably cheaper than high-end materials.
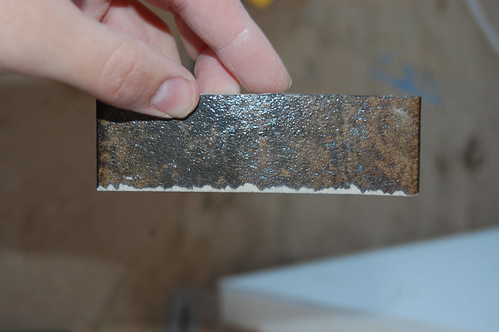
And these 18×24″ ceramic tiles were around $5/sf….

What I’m saying here is that the possibilities are endless, and not that expensive– particularly if you’re willing to get your hands a little dirty. Let’s have some fun, shall we?
What you need to build counters for tile:
- Something to set it on, like a cabinet, or legs
- 3/4″ MDF or plywood, doubled up
- Various saws (if you need a sink hole, you’ll need a jigsaw, otherwise a tablesaw will do- or have them cut it at the lumber yard)
- Drill
- Screws
What you need to tile counters:
- Tile
- Tile adhesive
- Grout
- Notched trowel
- Grout float
- Tile saw or tile nipper (depending on the size of your tile)
- Buckets
- Sponge or rag
- Grout sealer
I’m going to take you through building the counter, and then some differences between those itty-bitty tile and the big 24″ slabs. (And just in case you can’t get enough of tile, here’s how to tile floors, and here’s how to tile walls.) Some days I never want to see a tile again, if you can imagine that, but luckily that day is not today.
Building Counters for Tile
People might say things about fibercement board and blah, blah, blah. Do it if you want but really all you need make a counter fit for tilin’ is a couple of pieces of MDF. I’m in the midwest and I’ve never had an issue with shrinkage or grout cracks, but to each her own.
Start with a cabinet of some sort, or table legs that need a top, or an old door you want to turn into a desk, or whatever. We’re not fussy here.

I always get my MDF cut in half lengthwise at the lumberyard if I’m going to make a counter out of it. I trim it up at home, but it’s easier to fit in the SUV that way.
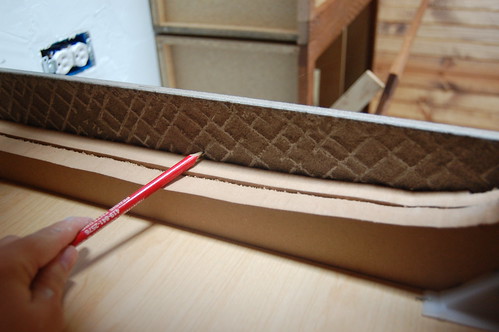
Standard counter depth is 24-ish inches. I say “ish” because if you’re building them you can fudge it an inch or so to keep from needed to cut as many tile. Counters overhang 1/2″-1″ in the front. I tend to make up for this by sticking a 3/4″ piece around 6″ wide behind the counter to create the backsplash. But let’s not get ahead of ourselves… these are just things to keep in mind as you’re cutting your MDF.
Step 1: Cutting
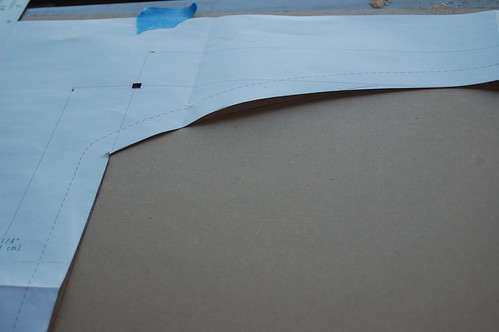
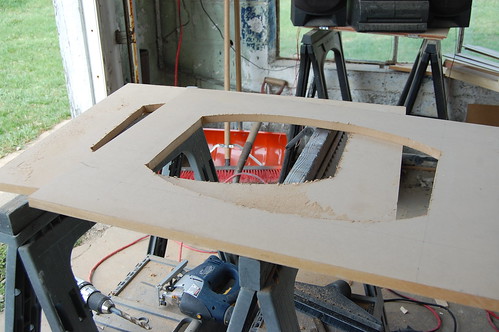
For a sink-base, cut the MDF to length, then use the template that came with the sink to cut out the hole.
A drill gets the big hole started…

And a jigsaw keeps it going…

Once the first hole is cut, I test to make sure the sink fits and that I don’t need to make any adjustments before tracing and cutting the second piece.
And then the dry fit…
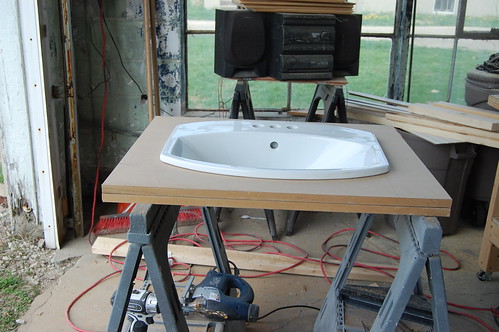
Perfecto!
Step 2: Installing
In my case I needed to cut access holes into the back of the cabinet and install it before attaching the counter. Which meant a lot of contorting myself into tiny little spaces.

The counter is attached with screws through these plastic brackets.
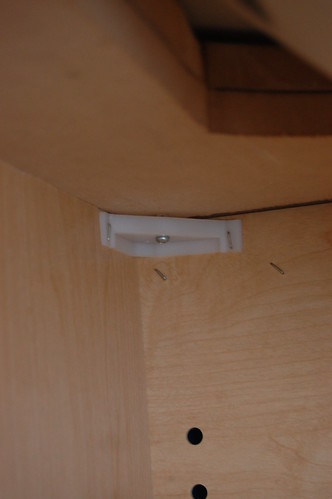
Which are extra fun to reach…

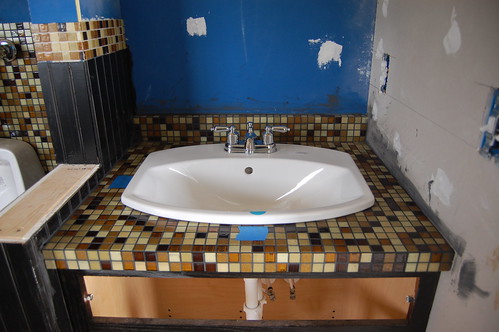
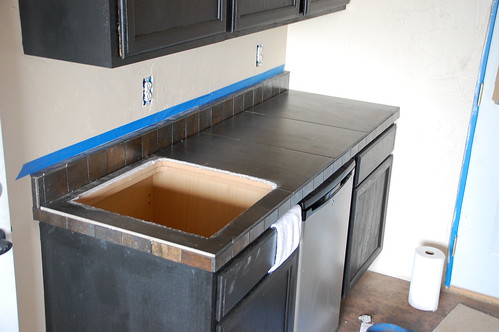
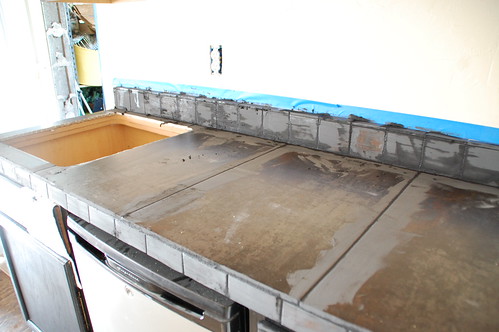
Installed counter with sink dry-fit.
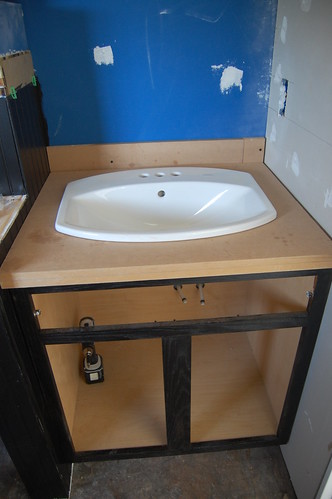
Pretty easy, huh?
Tiling Counters
Step 1: Lay ’em Out
I’m not saying with smaller tiles the layout is less important… okay, actually, yes, that’s exactly what I’m saying. But it’s still important. (Check out this post on installing wall tile for more detailed information on layout out small tiles.)
With larger tiles it’s particularly important to check out where your grout lines will fall, and how your tiles should be spaced. In any application, the tiles should be centered — don’t just start at one end and then cut the tile at the other end. Your whole life will look lopsided like that… trust me.
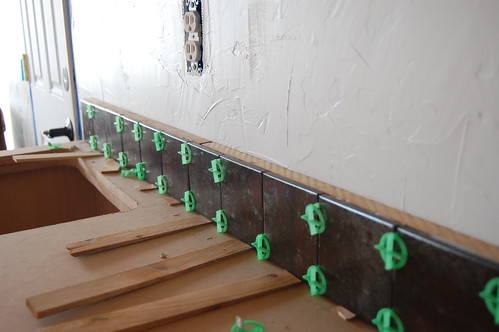
With large tiles I wanted the smallest grout lines possible, so I laid the tile out with with 1/8″ spacers. To minimize cuts, I used 18×24″ tiles on the counter, and 4″ tiles on the backspash.
Step 2: Stick ’em Down
Tile adhesive should be chosen based on the size and type of tile being used. While the adhesive I used was for up to 16″ tile, I felt comfortable using it since it’s not often my counters receive high foot-traffic.
For small mosaic tile, I ditched the notched trowel and just spread on as thin of a layer of adhesive as I possibly could.
Like, paper thin.

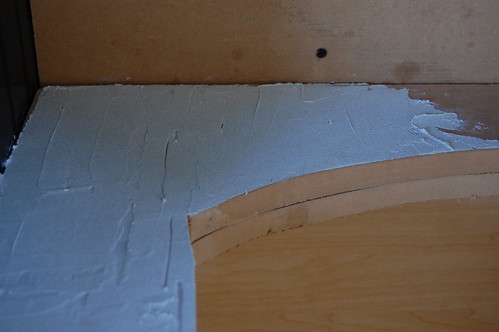
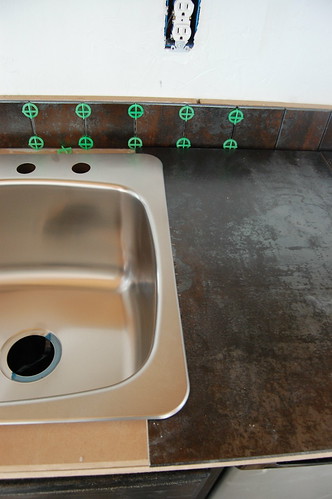
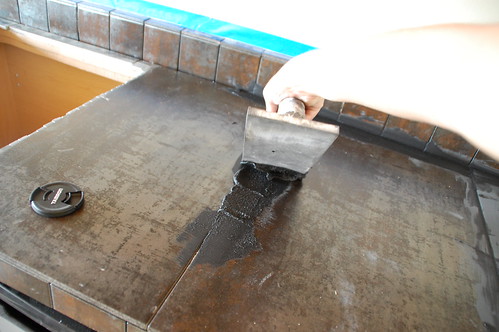
For the larger tile, I used a 1/4″ notched trowel to spread on the adhesive. In this case I chose to do the backsplash first…
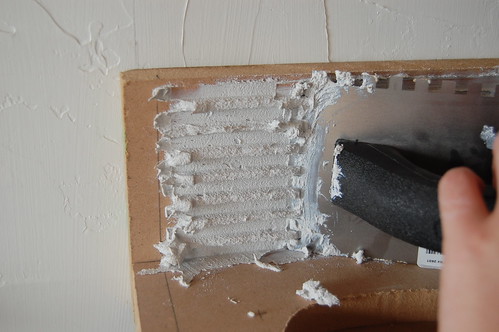
And here’s the adhesive for the big tiles.

I put the adhesive on a couple of tiles in advance, then lay them, then spread a little more adhesive. Just in case I run into something unforseen.
Here is how the 4″ backsplash tile went on. Push in and give it a little wiggle to make sure it’s firmly adhered.
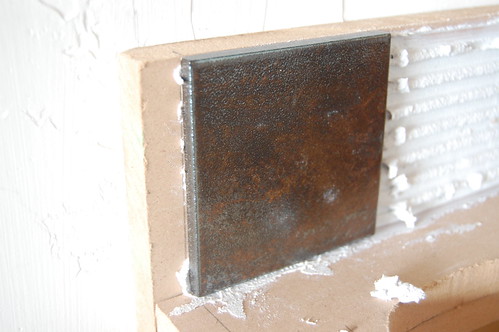
In this case I shimmed the tiles just a bit to keep them level with the top of the backsplash.
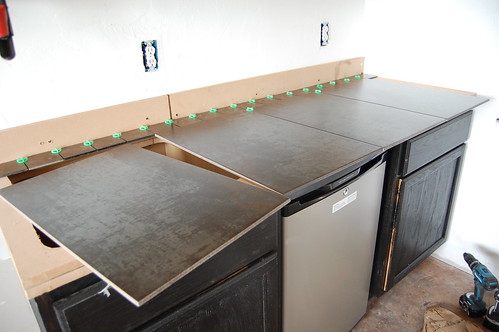
Then the counter tile went on, one extra-large tile at a time.
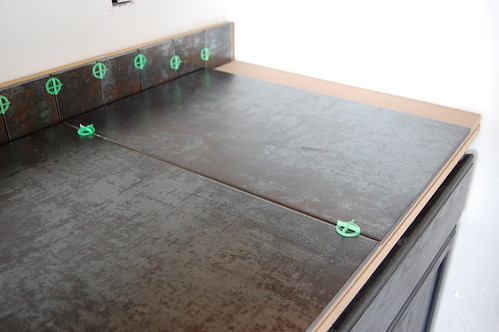
I tend to put the whole tiles in first, and then do all my cuts at once. I hear people who really know what they’re doing cut as they go… but as usual, I choose to do my own thing. (More on cutting in a minute).
For the mosaic tile, it was all about cutting the 12×12 sheets into manageable sections. In this case it was lucky that two whole tiles covered the lip of the counter without any tile-snipping.

Step 3: Snipping, Sawing, Snapping
There really are so many different ways to cut your tiles down to the right size. Here’s a few that work for me in different situations.
For small glass or ceramic mosaic tile, tile nippers are your best bet. And no, I don’t make up the word “nipper” for a laugh, swear to god, that’s the technical term for them.
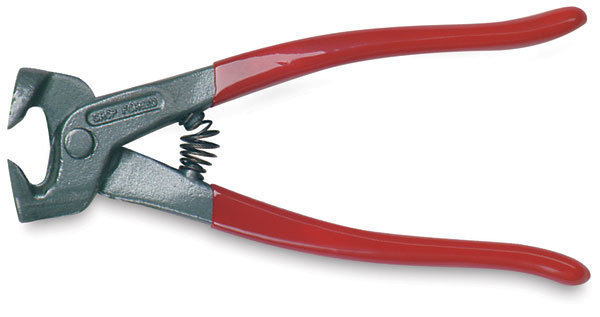
Nip where appropriate, and voila! Tile is all in place.

The larger tile are quicker to lay, yes, but the cutting stage is where you have to spend a little more time with them.
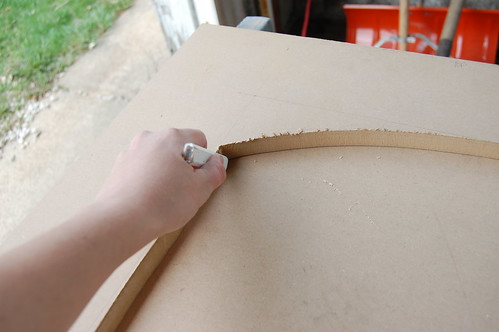
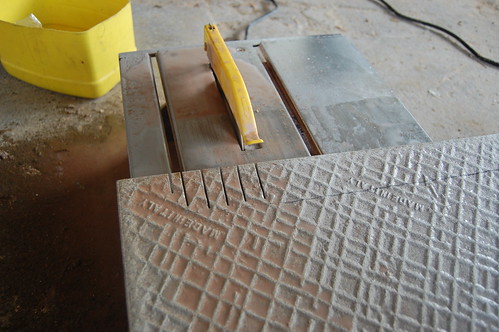
To get the rounded sink hole opening in 24″ tile, I started by tracing the overlap.

Then used the wet saw to notch the area that was being removed.
To ensure none of the little pieces went rogue when I snapped them off, I started by scoring my traced line with a utility knife.

Then grabbing a hold of those babies with the nippers and giving them a good yank.
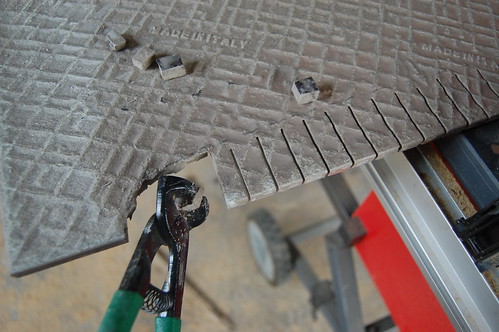
And after a dry fit, you can see that took care of the sink hole.
There were still tiles to cut for the top of the backsplash and the lip of the counter, however, and I found that with the type of finish on the ceramic tile, the wet saw was tearing the edge up.
While I prefer the wet saw for control, a score-and-snap style cutter was a better choice for keeping a clean edge on these pieces. The “cut” is not a straight, but the overall effect was way better.

See?
Step 4: Filling in the Cracks
This is the part where you get to play with mud. Fun! Grouting is actually a big old mess, but fairly easy.
There are a number of different types of grout — sanded, unsanded, colored– I’m a traditionalist and almost always use sanded grout, because I like it.
For sanded grout, mix according to package directions. I never measure, but I’m sure that’s a bad habit. Once it’s about at the consistency of toothpaste, you’re good to go.
For small tile, it’s just a matter of spreading grout over the whole thing, making sure to push it into all of the little cracks.

For larger tile, there’s no need to make such a mess. I do one swipe across the grout line…
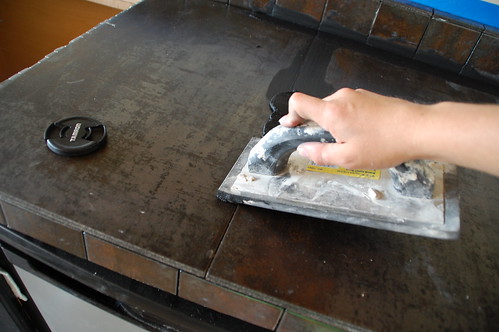
And one swipe with the grout line…
To make sure I’ve gotten the whole crack filled.

My rule of thumb is to let it sit for, oh, 10-20 minutes before doing the first wipe with a wet sponge or rag.
After the first wipe– where you should remove most excess grout– let it sit another 30 minutes and then give it one more wipe with a damp sponge.
Step 5: Clean Up
Then you need to go over everything with a dry cloth to remove any excess grout haze. You can do this an hour or so after the final wet wipe, or the next day if, like me, you tile after midnight and at some point need to get some sleep.
Also, note the use of painters tape to keep grout from getting all over my wall. It definitely helps keep the mess in check.
Step 6: Seal It Up!
The hard work is done, people. Now just a spritz or seven of grout sealer to finish everything up, before you’re ready to stand back and admire.
And that’s all there is to it. A little wood, tile, glue, and mud, and you’ve got gorgeous and unique counters for a fraction of the price of other counter materials. Go forth and tile, my DIY friends.
If you have any links to great tile counters in your home, make sure to leave a link so we can check it out!

63 Responses
Woman, where the hell are you finding granite for $30 a linear foot?! The cheapest I’ve found in WI is $40 a square foot, at HOBO. Ugh, but it’s worth it….I love a smooth counter! I don’t even care if it’s granite, silestone or solid surface works fine, too.
I am loving those big tiles, though. Very “industrial-sexy” with the dark cabinets. Every time I try to use a manual tile cutter, I end up with a tile broken in half. I just don’t have the touch I guess! Great tutorial.
Great tutorial! I’ll be referencing this post when we remodel our upstairs bathroom.
hey, thanks for taking the time to give such good info. i will be starting my shower tiling project tomorrow morning and the tip about scoring the curved part before nipping was a good one. thanks. madeleine (on an unrelated note: i luv my impact driver)
I am so inspired right now… i just want to go buy some tile! I searched for tips on tiling a table-top and now I am thinking much bigger! Bring it, nasty downstairs bathroom! I know I can do this! Especially with your awe inspiring tips!!!
Thank you so much!
tara
I was searching around for instructions on doing a tile job for my master bath. I have a dresser with some great cabinet space and want to use it as the cabinet for a modern vessel sink. Your tips are not only so well detailed, but I like the encouragement! Yes! I can do this!!! Glad I found your site and will keep it as great reference for my future projects! WIN! 🙂
I have this table 1 ft deep and 4ft long. It had a drawer, an empty space in the middle(going down)and a shelf towards the bottom for shoes or whatever. A great piece for an entrance way since we don’t wear shoes in the house. My cute little grandchildren broke the drawer but the wood on the sides are still in tact.My idea is to tile the top and on that front area that had a drawer I thought I would cut and tile a thin piece of wood and attatch it there. I am also thinking of tiling the area where we kept our shoes. What do you think and do tou have any suggestions?
Jen
Why, did you not use cement board before
thin set?
I thought if it got wet the MDF would fall apart?
Thanks for reply, regards, Susie
You could, or you could put a tile vapor barrier down. For me it just seemed like an unnecessary step. Plain MDF will bubble up with water, and may fall apart if it’s sitting in standing water, but I’ve never had an issue with any of the kitchen or bathroom counters I’ve done this way. The amount of moisture that gets through the tile/grout is negligible.
Thanks, for the info. I appreciate your reply.
I just did kitchen counter with tile and did use cement board,after rebuilding the whole wall of floor cabinets. Previous owner used press board in the sink base cabinet, on top of counter tops, under laminate counters, and under sink..On top of hardwood floors. Our original R and L base were 100yrs old. when the leaks sprung, the sink base and counter tops were wasted.We had no idea for a while it was leaking and it turned to soup.LOL I learn day by day how to do this stuff and I love it. Thanks again, Susie
O.K. I’ve never tiled anything in my life, so this is pretty impressive. I’m wondering why you can’t just adhere tile to a countertop that is already on there? Won’t the grout stick to that just as well?
Thanks … not a carpenter either.. you might have guessed 🙂 ~
I had never tiled anything before either until about 4 years ago. I decided to try tileing over my laminant countertops. I started with a small bathroon counter to see if it would hold. Then I did the other bathroom and kitchen. I didn’t have or know how to use a tile saw so I pieced all different sizes of tile together to fit and filled in with grout.When I decided to do my floors, I bought a wet saw. Not hard to learn at all. Now I am a tileing freak. Looking at my counter tops now I see all the things I could have done different. But everyone that has seen them is amazed at how gorgeous they are. Especially compared to the green ones I covered up. I am in the process of building a kitchen island using my china hutch. This site gave me some great tips on building the top. Thanks!!
I would also like to know why I can’t tile over the existing. laminate. which is ugly. but in tact.
Hi, I love your mosaic tile countertop. How did you position the tiles at the edges? Are the edge tiles cut on a 45 degree angle, overlapped or not overlapped and the gap just filled with grout? Thanks!! Karla
Hey Karla – Those particular tiles were very thin (1/8″) and naturally had a bit of bevel on the end, so I did not cut or overlap them and just filled the gap with grout. If you did this with a thicker tile you might end up with a big grout line on the edge (not necessarily a bad thing). With larger tiles I’ve also strategically overlapped the top tile and that worked too!
Hi Kit, Thanks so much! Your countertop is gorgeous.
Karla
Hey Kit, I found some glossy porcelain tile 24×24 inches in size. I was thinking of trying to obtain no grout line at all by using clear silicone to glue the tiles down and between each tile to prevent water from seeping through. What do you think?
Was thinking of doing the same thing since my 24×24 is “rectified” on the edges (ground down so completely straight for good fit together), but the store guys recommended using an epoxy-based grout :
– apparently its stickier and more viscous perhaps for filling small grout lines…
– perhaps like no-sand grout, super waterproof and stain resistant,
– but it looks like a pain to clean the extra off after grouting – need special product to dissolve the extra epoxy rather than just being able to sponge it off, they don’t recommend mixing small batches because you might have the wrong proportions of the 2 ingredients…)
Anyone else ever try this? (silicon for super-thin joints on countertops or backsplashes)
I read your article and I agree with everything you wrote except I would have caulked between the counter and the backsplash. The reason is because the counter and the backsplash expand and contract at different rates. Over time the grout will chip out. If you caulk it will remain flexable
What kind of tiles are the ones you used on the kitchen? The big ones?
They were 12×24″ tiles that came from the Tile Shop. That was a few years and two houses ago, so I don’t remember the specific name.
Nice ideas but I have a question, why not use melamine covered MDF for the counter tops?
Yes a bit more expensive but the melamine will act as an extra barrier if any water does get thru the grouting.
See link below for picture of what I mean:
http://s2.postimg.org/vul9d77jd/Ideas_For_Vanity_Water_Protection.jpg
Because the laminate will be pierced where you have to cut around it and install a sink, which is also where it is MOST likely to get water damage.
Just do it right the first time and use plywood topped by hardibacker. NOT WONDERBOARD. Hardibacker.
Awesome tutorial!! I’m petrified to tile my mdf bathroom vanity! People are saying no way to me using mdf by water 🙁
I live in ultra humid NWFlorida…what to do!! I have the sink set into my antique dresser and caulked and now I’m at a stand still due to my fear of failure! I am about to seal my mdf with a weld bond water mixture so I guess I’m about to find out….
Go to the Account Help Contact Page, and send a detailed message
explaining your problem. Once you have identified this icon, you are ready for the next article in this series: Configuring your GMail client for the Black – Berry.
Go down to “Check mail using POP3:” (we are still on the Accounts and
Import page).
Some question the usefulness of the Combine results, and whether or not it should continue further.
Dunn is the perennial fantasy football sleeper, it seems; always too small, too old, past his prime, facing
competition, too fragile, too risky. Being a coach
preparing the game arrange for the upcoming opponent, the very first inquiry a defensive coordinator must ask
himself is who’s the best player on the other half team.
People from all kinds of backgrounds from different places
frequently visit Gurgaon city. One of the best places to stay is in the charming village of Sospel.
WABC-TV reported that the police first received a report from an Econo-Lodge at 11:
30 a.
Jonathan Kittley is the airline employee, and wasinterviewed on: where you can learn all about cheap flights
and free flight upgrades. On the other hand, the discounted
tickets are available only through the travel agencies.
But how safe is it, really, to go abroad to save money on elective surgery, such
as cosmetic procedures.
Thanks for the info and pics, this looks like a more cost effective way of doing counter tops than using granite / caesar stone.
I enjoyed your tutorial. The only think I do differently is how I cut angles.
I call it the “pumpkin teeth” method. Using the wet saw and cutting in so far,to the marked line. When you get those all cut, just hold the tile over a trash can, use a metal open ended wrench,and hit it!It makes a ping, sound.Your done.No tile nippers needed. Great for cutting around a commode base.
Every weekend i used to visit this web site, as i wish for enjoyment, since this this web page conations really good funny information too.
Kit;
I’m in the process of building a counter top. I used 1″ X 4″‘s for the frame and than used 3/4″ mdf for the top. I then put 1/4″ fiber cement board on top of that and am using a shower liner on top of that to keep the moisture away from the backer board and mdf. Did i screw up by not using two sheets of mdf? i know that on a regular countertop they use a single sheet of mdf with laminate glued right on top of it. Thanks for any help you can give.
Larry
Asking questions are in fact nice thing if you are not understanding something completely, except
tbis paragraph gives pleasant understanding yet.
Do you have any video of that? I’d like to find out some additional information.
Pretty! This waas a reallky wonderful post. Many thanks forr
providing this information.
This is great! By the way, it also looks amazing! I think tile counters look so nice, and it is very different!
Great tutorial. Been searching all over for something like this.
I have a already installed wash basin,,,so it makes it a bit more challenging,but heading for a under washbasin drawer cabinet.
So my challenge lies in getting the mdf overboard cut out.. I’m going to leave aprox 10 cm of height,from washbasin to the start of the top board,as the washbasin isn’t made for a buildin.I will do it all by my self.(ehehe,stubborn blond Swedish) I will also use a hardibacker cement board on top of the mdf,just in case,Yes ican do this, right? It will be a lot of swearing,I’m sure. Any advice that I should keep in xtra mind? Then thinking of using a beautiful Italian mosaic tile I found. I’m not sure how I will get into the edges of the top board if I install it b4, so was thinking if I tile top board first,@ least around edges of the wash basin…but still not having it installed, then raise it from underneath of washbasin,then insert the drawer cabinet,mount it on the wall,hmmm? Or it’s to complicated work for me? And finally tile the rest? Pls any advise on my idea. Very much appreciated. Grazie from Italy,Milano
Hey I am so happy I found your website, I really have found you by
accident, while I was looking on Bing for anything else, Nonetheless I am here now and would
just like to say thanks for a fantastic post and a all round
thrilling blog (I also love design, I do not have time
to look over it all at the moment but I have book-marked it
and also added in your RSS feeds to my bookmark, so when I have moment I will be return to
read much more, Please do keep pace to date the superb jo.
Have you ever thought about including a little bit more than just your articles or blog
posts? I mean, what you say is valuable and everything. But think
about if you added some great visuals or videos to give your posts more, “pop”!
Your content is excellent but with pics and clips, this site could
certainly be one of the most beneficial in its field.
Wonderful blog!
Nooooooo. Keep it simple! So sick of DIY’s who think they’re making a movie. Wasting time wading through tgeir amateurish cinematic attempts.
I intend to try your method of tiling my bathroom counter, but I will need to ask questions as you lost me with “MDF” .. I had to look it up. Thanks
Live in New England and I’m installing some kitchen base cabinets in a pool house and would like to install a tile counter. Any suggestions on tile type and ways of constructing the counter that would hold up throughout the hot summer ( high humidity ) and winter ( unheated ).
Yep, Mike, my suggestion is OSB for the base and then put either a layer of tile membrane over it (durock makes a version) or actual 1/4″ tile board over it, depending on what you want the thickness of your counter to be. If it’s not heated in the winter make sure to use an admix or some kind of plasticizer in the grout as well. Best of luck!
Great post with good instructions. We are considering a tiled countertop in our new kitchen, partly due to cost, but also because we like the look of it. We have received a lot of comments from well meaning family about tiled countertops being a pain to clean. I’d greatly appreciate any thoughts you have concerning this. I have three kids and a hubby, who are all bad about cleaning.
The idea that tile is harder to clean than anything else is ludicrous. I clean mine the exact same way as everything else, with a damp rag and soap. Especially if you use larger format tiles, which minimize grout lines, but even in the rental where they had installed 4″ tile with GINORMOUS grout lines – still no harder to clean than anything else.
Great tutorial!! This is very helpful, but do you have any examples or suggestion for an undermount sink; I see with a drop in, you’re covering at least an inch and half of wood.. Would you just cute tile to fit it?
If you are using an undermount, you will need quarter round to trim around the inside edge. Make sure it is properly sized to account for the thickness of your tile and the underlying substrate – which should definitely NOT include ANY MDF for an undermount sink as the chances of water getting through to it are much much higher.
I wouldn’t use MDF under any kitchen countertop ever, at least not where there is plumbing anywhere along it, anyway, but ESPECIALLY with an undermount sink avoid the MDF at all costs.
Hi, i have to go back to those that are questioning why you cant use the old countertop? is it because striping the vinyl off is a chore or is there another reason. I love your vid and suggestions thanks johndig
Because its a pain to deal with the lip at the front and the integrated backsplash at the back. And in many cases, the only reason to replace a laminate countertop is that it is ruined/past its useful life. Mine has had water seepage along the miter line and it has swelled up there, plus somebody thought (incorrectly) that installing a wood cutting board in it PERMANENTLY so that you cannot remove it to clean was a great idea, which means I would have to remove that because it sticks up (for one thing) and then I’d have a big hole to patch – which is just another point for water to attack somewhere down the line and ruin the tile on top too.
But the BIGGEST problem is dealing with that lip at the front. You have to shim to over come that and its just a lot of trouble. Personally I find it easier to just cut plywood and Hardibacker and replace it and start with a fresh level field and no weird problems or having to sand the surface and then clean up all the dust to give the stuff something to stick to.
What a terrific DIY tutorial. Just what I have been searching for. Thank you!
Wow! So glad I found this! I’m getting ready to tile a small counter in my bathroom that I’ve been remodeling and your directions and pictures are perfect! Thanks so much for taking the time to do this!!
For those that were asking – yes you can tile over your existing laminate counter top but you need to sand it down to take off the gloss and some roughing up to give the thin set something to grab on to. One issue you might have with your existing counter top is making sure it’s absolutely level, if not you may have problems. When I did mine I finished the edges with wood trim which covered the unfinished edge of the tile and the old laminate and attached with brads nailed into the existing MDF. Worked well
Brads will not hold in MDF. Pretty soon that trim is going to come loose and come off.
How do you stick the 2 layers of MDF together? Glue?
Hi! I was wondering if it’s possible (and advisable) to tile over existing laminate countertops? Or would it just be easier to take them off completely and build them like you did here?
Awesome! Its really amazing post, I have got much clear idea about from
this article.
I was going to use a high grade doubled up 3/4 ply $$$, then 1/4 hardy backer board. But like the MFD ! Great product/great price. One of the best presentation with great pictures. keep it up!
Thanks
Hmm it appears like your site ate my first comment (it was super long) so I guess I’ll just sum it up what
I had written and say, I’m thoroughly enjoying your blog. I too
am an aspiring blog blogger but I’m still new to the whole thing.
Do you have any tips and hints for beginner blog writers?
I’d really appreciate it.
How much of a grout line do you allow when you are laying kitchen tiles 12×24?
why bother with the 3/4 ply(or MDF) on the wall? stick the tile right on the wall, then you don’t have to cut tile for the top edge if it.
and yes, silicone at the change-of-plane (c’top meets backlash) is best practice.
c’top should always be done first THEN backsplash. one, it looks better(correct) and two, it’s better to have that horizontal grout line instead of a vertical one (especially using mdf and no silicone at the corner).
Magnificent! It’s a truly stunning post, I have a lot of clear thoughts from this article.
Comments are closed.