
Let’s just go ahead and add this to the list of Things I Should Have Done Four Years Ago But Didn’t Because I Like My Life to Be Difficult and A Complete Disaster.
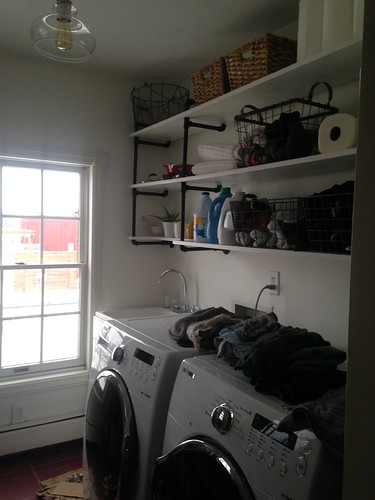
The thing is, this wall above the washer and dryer in the laundry room has been begging for shelving for a long time…
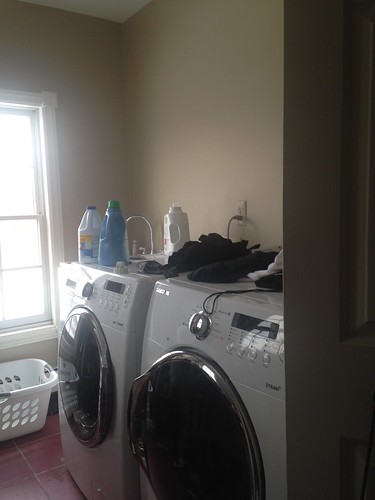
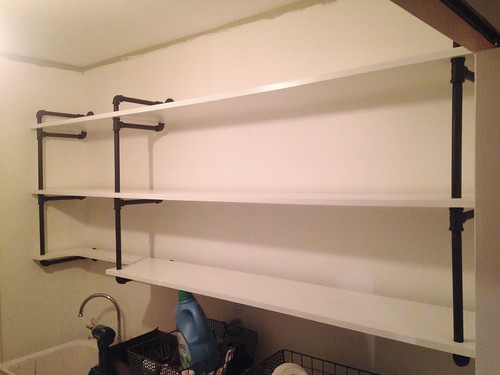
Look at this. WTF is going on there? Nothing. That’s what. And yet there’s typically laundry supplies and actual laundry all over the top of the washer and dryer and cleaning supplies and things like spare paper towels and gallons of paint (and maybe chicken feed) shoved under the counter. And all over the floor. And sometimes spilling out into the hallway.
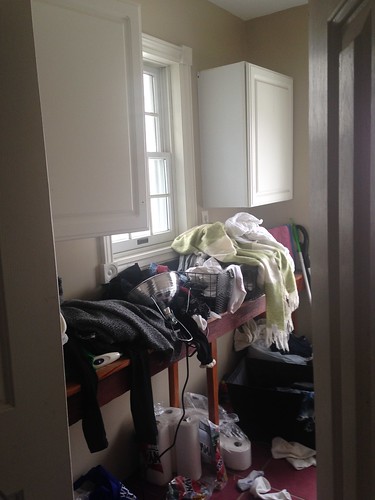
Yep. That’s not hyperbole. It’s an effing mess, and at least half a dozen times over the last couple of years I’ve gone so far as to almost buy some standard wire shelving to put up there, you know, “temporarily” until I got around to really re-doing the laundry room. (So…never?) I mean, listen, I know myself well enough to know that a lot of times temporary means “uh, I’m probably never going to get around to this again, and yet every time I look at those cheap wire shelves they’re going to drive me nuts because I know I can build something better.”
So, that’s basically what has gone through my head every time I’ve done laundry for the last four years (and let’s be honest, that’s way fewer times than most other people would have done laundry in four years, but still…it gives me pause.) I’m trying to reign in my “if you give a mouse a cookie a girl a hammer” tendencies–like, hey, you know what would be a good idea? To finish the upstairs bathroom project I started over a year ago before tearing apart a perfectly good laundry room–but with a rapidly-approaching kitchen overhaul and the general state of disaster in the house, this shit could wait no longer…
So. Shelving. This is how it went down.
Remember when I built this closet in my last house?
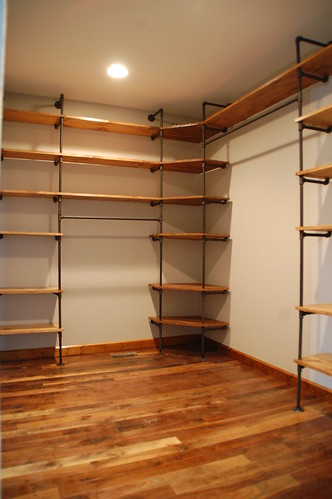
Actually…why the hell would anyone remember that? It’s been like 5 years, and I barely remember it. (I think I only got to use that closet for a month before I moved out. So. That.)
Still, it was a pretty awesome closet. I don’t love a lot of shelving brackets that are available these days, so I figured the laundry room was either going to need to be floating shelves (like these awesome ones that Sarah built in her laundry room, I’m jealous.) Or, the old standby a la the Memorial master closet… some gas pipe and wood.
Pipe shelves are a little bit of a pain in the ass to build (i.e. three trips to Lowe’s in two days to exchange and buy additional pipe fittings) but building floating shelves in a house that doesn’t have any square walls was going to be beyond the amount of patience I currently possess… so.
Let’s do this.
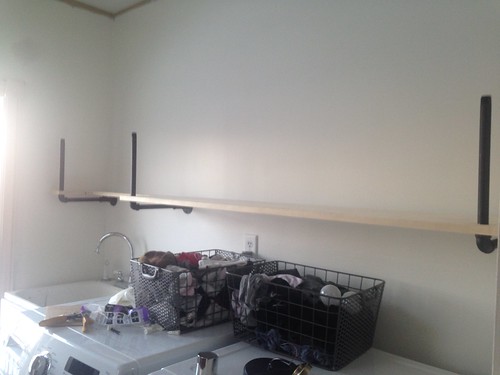
I used 12″ select pine boards (which means the surface area of the the shelves is about 11.5″ x 7′) but they come about 13″ off the wall, and– with 3 shelves– are 31″ tall.
This is what the final assembly looked like for the pipe pieces:
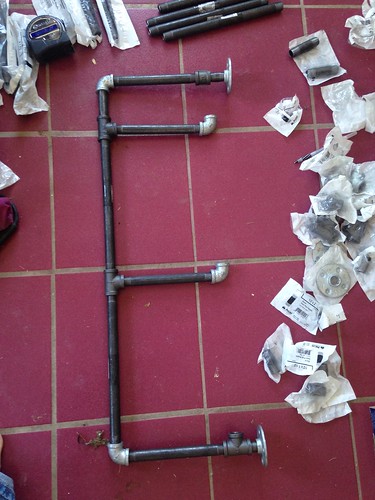
I used 3 of these assemblies, and each one consisted of:
- 4 – 90-degree elbows
- 3 – T connectors
- 2 – long pipes (length of the the space between shelves, mine were 12″)
- 3 – short pipes (length determined by the depth of the shelves, mine were 8″)
- 1 – very short pipe (to extend the front over the top of the top shelf, I used a 3″ fitting)
- 1 – straight connector, used at the top for spacing reasons (you could also use a longer pipe on the very top part of the assembly, but I used the connector to allow me to adjust the length a bit if needed)
- 1 – 1.5″ nipples
- 1 – nipple (smallest size available)
- 2 flanges
Definitely “dry fit” everything… this is where (if you’re me) you can expect multiple trips to Lowe’s until you have all the right parts in the right sizes.
Holes are drilled in the shelves to slide over the “front” of the assembly, and the back of each shelf rests on the top of the “back” fitting. The assembly is secured to the wall at the top and bottom with the flanges. (I’ve seen these built with flanges on every level and that’s probably overkill, plus I think it looks a little clunky.)
Here’s an example of how it starts to come together:
But that’s jumping ahead. Before I got to this point, here’s what I did:
- Spent a lot of time staring at the wall.
- Made some decisions about the spacing of the pipe assemblies.
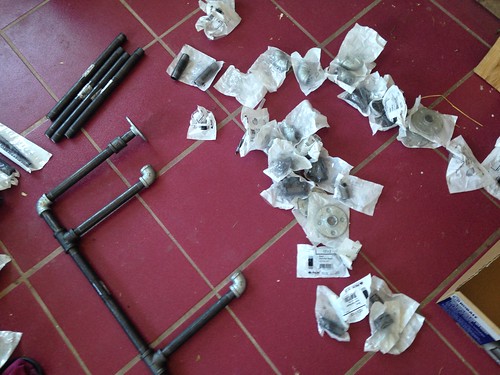
- Washed all the pipe fittings, let them dry, and then spray painted them… in my not-ventilated basement, because I live dangerously.
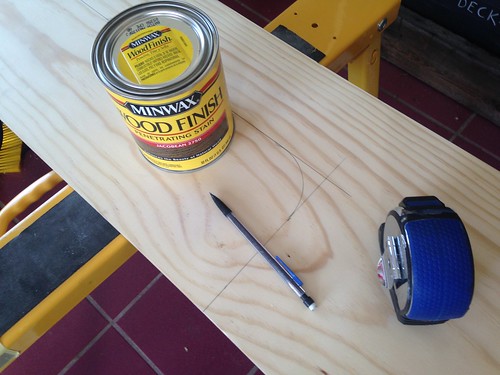
- Cut all the shelves down to length and sanded them.
- Drank a beer.
- Did stupid shit like this…
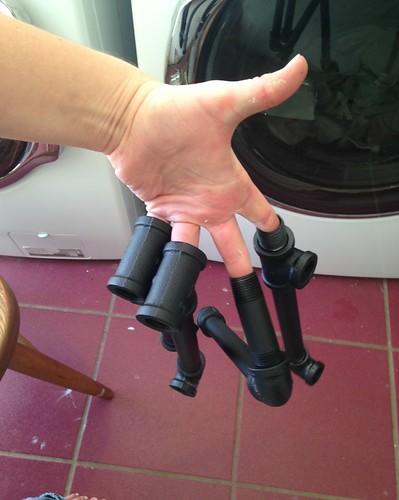
Edward Pipehands?
Anyway, in all of that fun I did make a decision about the area over the sink, which is that the bottom shelf needed to have a cut-out, so that I can still easily lift my water tote (used for hauling water out to the barn in winter) in and out of the sink easily…
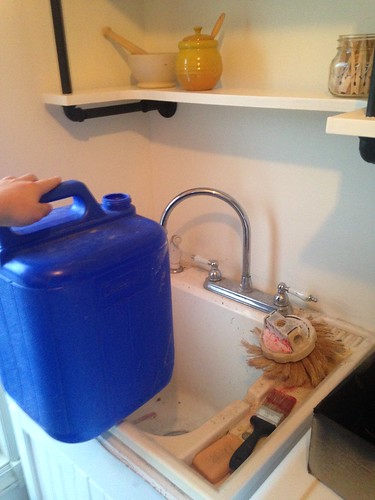
I like to make sure I create very precise and technically correct rounded corners when I lay out a cut like this… ha. No. Actually I just grab the nearest cylindrical object and trace it.
WORKS.
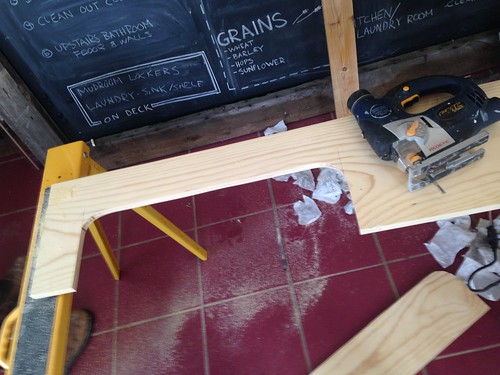
And, actually, in order to get the holes for the pipes to go through the boards in the right place I used my fallback build-as-you-go method. So I installed the first section of the assembly on the wall, then put the first board on top of it, marked where the holes should go, and then used that board as the template to mark the holes on the other 2.
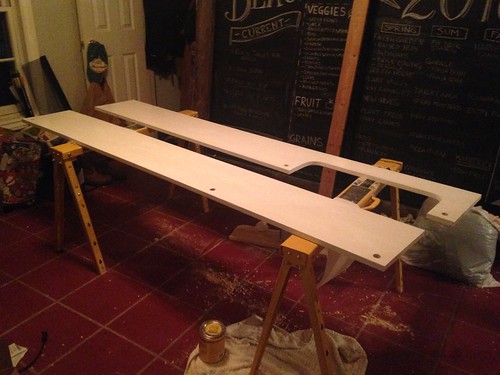
Then, paint. Every night for 3 days. Super fun.
Pretty much every time you see shelves build like this, the boards are stained–in fact, I couldn’t find a picture of pipe shelves built with white boards on all of Pinterest, if you can effing believe that–and I actually bought stain to use for these as well, and then I made a game-time decision to go white. (Which actually required me to re-paint the laundry room for the second time that day. True story.) Honestly, I hadn’t really thought through how this room should look, but I do know I want to use a walnut butcher block as a counter over the washer/dryer and new utility sink, and having stained pine shelves and beautiful walnut on the same wall made me cringe a little.
So. White.
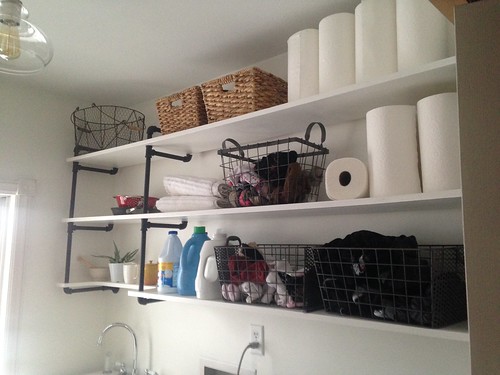
I actually don’t have a lot of feelings about how these shelves turned out, other than relief that I finally have a place to put things other than the top of the appliances or the floor. Maybe I’ll spring for some walnut boards for the shelves some day… when I don’t have a tractor payment anymore.
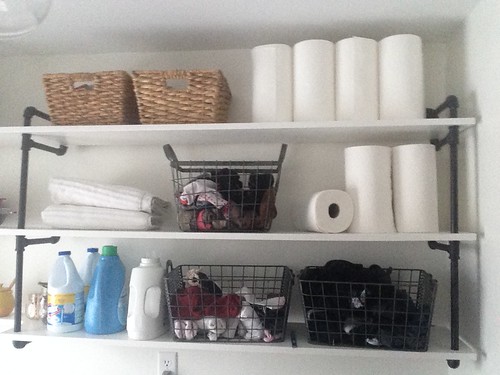
Here are a few weird things about my life/laundry situation: First, I keep all my clean socks and workout clothes in the laundry room. I’m always barefoot in the house, and the idea of hauling all my clean socks upstairs, and then inevitably needing to run back upstairs to get socks every time I want to leave the house (or switch into my workboots) is just ridiculous. Luckily the laundry room is right next to the mudroom, so this works well for me.
Same deal with my workout clothes. I always toss them into my gym bag right before I leave the house, and this makes my life so much easier.
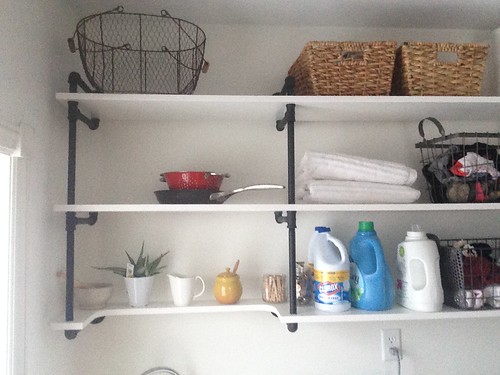
Since the laundry room is going to serve as my temporary kitchen here realsoon, and I’ve started cleaning the real kitchen out, the left side of these shelves is reserved for cookware and other kitchen-things. Good place for the foodstuffs… right next to the bleach.
Anyway. As far as finishing off the rest of the room, I have a bit more organization to take care of and a new utility sink that should be here in a week or two. I’d love to get the butcher block in before the big kitchen becomes unusable if I can. Then I won’t loop back around to this room until all that fab pink floor tile gets pulled up in here and the mudroom (when I have a working kitchen again, so… years? Ha. Haa..aaaacutally that’s not funny, knowing me it could really be years.)
My ultimate plan for this room includes a tile backsplash between the top of the appliances and the bottom shelves, and two floor-to-ceiling pantries on the other wall (replacing the bench and the wall cabs.)
But for now I’m just going to go ahead an be glad that most of the shit is up off the floor. Turns out installing 21 linear feet of shelving is actually a game-changer as far as life on the farm goes.

33 Responses
Sweet!
Kinda wish you had taken more pics of assembly sequence.
So attach first horizontal with elbow and vertical to wall and slip board in place. What does back of bottom board rest on? Pic from under bottom please?
Thread on next horizontal with vertical assembly..I assume not screwed down tight but tight as possible while aligning horizontal?…slip next board in place.
Then top assembly threaded on and flange screwed to stud?
Hey Anne – look at the very first pic of the assembly on the ground before it was painted… that’s exactly what it looks like on the wall. The back of the shelves rests on the upright piece of the T (lowest shelf) or elbows) other two shelves.)
Everything is as tight as possible while still being lined up as needed!
Ah, yes, see the T now.
Actually Kit, I moved onto my little slice of paradise acreage four yr ago in May. Before I purchased and in the following days after possession, I made mental notes what I’d like to do to improve value, appearance, finish some unfinished projects started by previous owner and give it my own personal tweeks ~~~ different than Miley’s twerks. All that intro leading up to I need a fucking chalk board – my head can’t hold it all let alone get to Lowes and remember where I put the list for all the pipes fittings. I have a spot for one in the shop, until then I print them out.
I indeed liked your pipe shelves you built at the Mem house… wrap-around ceiling, clean neat looking. I’ve never built any but like the neat clean look of floating shelves as well. Your light walls, white shelves and dark painted pipe will look awesome with your walnut counter top over the washer n dryer. I’ve been telling myself for three plus yrs that I could easily build a 6′ counter with back shelves n cabinet base w/doors to go in between my washer and the wall and have been looking at the empty space quite often during that time and folding stuff next to the soap,dryer sheets n borax on top of them and just couldn’t continue doing it anymore so I purchased a 6ft. resin folding leg table that fit the space which doubled great this year as a venison prepossessing table in the shop.
Weird things that work, I drank coffee @ midnight for 30+ yrs. that’s effing nocturnal but worked at the time 😉
impossibleisnothing
I knew I shouldn’t have drank that last 25 oz. CheLada last night, I maybe seeing dbl
I love it! I really truly love it! I am notorious for both things you mention: starting a project and getting sidetracked, and putting off a fairly simple project that could make life so much easier!
My word for 2016 is FOCUS. I think that could help with both areas for me!
Love it ~ love the white. 🙂
Only question is are you going to be able to keep it this neat and photo-ready when you start stashing paint cans and such in there!? I have a fairly tidy laundry room with plenty of space to organize, but periodically I just open the louvered doors, look in and quickly close them.
Only time will tell, but hopefully I’ll be using all of those paint cans to paint the kitchen! I have 3 actual spots to store paint that aren’t in the laundry room, but supplies for current projects usually find their way into that space.
Excellent choice on white shelves and I am going to love the counter! I, too, get sidetracked … usually at end of project as in “I’ll put that last short piece of baseboard up tomorrow … and it’s 2 years later!
The picture of that closet is what first brought me to your website, when I was looking at pipe shelves, inspired by a bookshelf porn search. The writing made me stay. Someday I will make some, as part of puppy proofing my life. I like that they are raised off the ground, which should also make cleaning easier. I only find the dust bunnies behind my current shelves when I move.
My first thought after reading about your clothing storage location and logic behind the choice was of how Marie Kondo would disapprove. I read her book “The life-changing magic of tidying up”, there are things I liked and didn’t like, though I mostly liked the book. I liked how it is not about making your place look like a magazine spread, but about imaging how you want your life to be, surrounded by what you love, and an approach of how to get there. The things I didn’t like might come down to the book being a translation, and cultural differences, a brief part read it read as advertisement for her consulting work, and the word tidying became a bit annoying after a time. The part about potato rolled socks in the book made me laugh so hard I cried since I am guilty of that but it makes quickly grabbing a pair so easy. Despite some of her very decided opinions on storage I think it can be a useful fast read on organization. As a bibliophile I say ignore what she says about books.
Here is a link to my favorite white pipe shelves, though they are white washed. I like them and the closet since they show two different approaches to corners.
http://modernmealsfortwo.com/2011/10/30/pipe-shelves/
I like the idea of white shelves, but I also think an ebony finish might be nice as well, only time will tell what I pick, ah I dream of a drill press and saw.
I like the white shelves as I think it looks very clean. These shelves look great. And I do remember the closet from the Memorial house. It has been inspirational (even if I’ve never made pipe fitting shelves). I did make a pipe pot hanger though. That doesn’t sound right. Rather I used pipe fittings to make a place to hang my pots and pans.
Thank you very original and beautifully turned out!
Hooray, storage! That’s quite a serious hooray, I might add – I love having places to put things. Nothing makes me more uneasy than having something that doesn’t have a place to go.
Which, heck, that’s probably a good thing, since it pretty much means I end up buying way less stuff since I tend to think about where I’m gonna put it once I buy it. If I can’t think of a place to put it, I just don’t get it!
This looks amazing! I just moved into a duplex which I’m renting and there is so much potential and room for improvement in the laundry room. Unfortunately, I’ve always been worried to make big changes to a space I’m renting, but I will make a mental note of this for the home I eventually buy.
Are you sure you don’t have a plumbing license? This is a very cool and beautiful idea.
looks amazing! LOVE the white. going to look awesome with the walnut butcher block and non-pink floor.
WOW!!! I mean who can be this artistic just to make the laundry room look good or at least managed. You really have tried to change the way that people neglect the laundry room.
Moreover, being able to do this much without a plumbing license is just too great man…Cheers!
I never seen this kind of nice compenation of Wood & Pipe Wall for Laundry Room. It’s such a nice idea for Wall Shelves.
Great looking shelves! A few questions:
– Did you use 1/2 or 3/4 inch pipe?
– How strong are the shelves – would they work equally well to fill up with books for an office bookshelf?
– Were you able to anchor directly into a stud or did you use a high strength drywall anchor for the flanges? Just want to make sure they don’t fall down in the middle of the night sometime.
Thanks!
Hi Kit, one more, is that gas pipe or water pipe? And is that galvanized pipe? Thank you
Having shelves in the laundry is a great idea but it takes great DIY skills to pull up something like you have here.
Thank you very much for sharing great blog!
First of all a very impressive blog.. Thanks for sharing.. I was really impressed . I have never hered about using pipe for making shelves. A very good shelve from scratch. I am loving it..
Regards Aklesha
Thank you so much for sharing.
Great tip! My lovely dog always sleeping on my carpet and it smells like.. well, I think you know that smell. I’ll try your tip to solve it. Thanks for such useful tip!
Looking a perfect laundry room! Good combination wood and pipe to make a wonderful shelves. I have need a beautiful shelve like your shelves to keep my house clean. This is a very cool and beautiful idea. Thanks for your great article.
Hi Kit, one more, is that gas pipe or water pipe? And is that galvanized pipe? Thank you
Holy crap!! I wish I could read this out earlier. This seems a fruitful post to make my laundry room look gorgeous. And the way you described everything insisted me to laugh out loud. And one thing I must admire is that the images you provided really help me catch the whole process out. I am going to apply these tips to my laundry room today.
Hi Kit.
These will help us keep our home organized and beautiful.
Comments are closed.