
This one tiny little hallway– literally the smallest space in my house– has officially become the mecca of insomnia fueled awesomeness in my life. It started with this light (that I just barely remember purchasing after midnight) and then this really tall chalkboard (that I definitely don’t remember purchasing after midnight) and culminated with a couple of salvaged doors that I definitely remember purchasing during actual daylight hours (but one might say the urge to cut them to pieces was certainly a hey-I-haven’t-slept-in-two-weeks kind of idea.)
And all of that has brought us here:
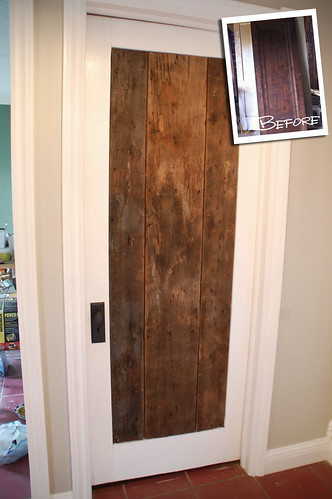
Did you just fall over from the awesomeness of that door? I mean, holy shit, not to be immodest here because I have some crazy-ass ideas that are a complete fiasco, and frankly, this one should have been one of them, but I pulled a magic rabbit out of a hat with this project and it turned out better than I could have imagined. I mean, the laws of physics and old houses pretty much state that there is no way in hell you’re going to find an old wood door that will fit the opening for your current hollow-core prehung swinger, and then modify the shit out of it, put the old hinges on it, and be able to open and close it. No way.
But I gave it a shot, and let this project be a testament to why you should always follow through with your crazy ideas. Here’s how it all went down…
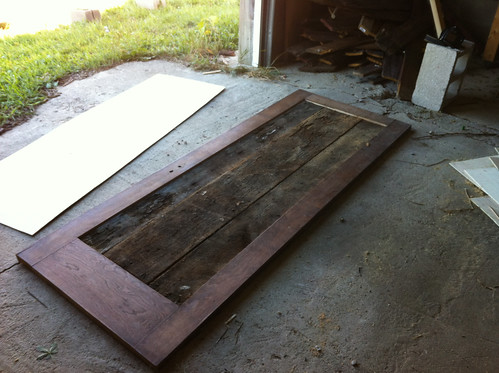
I was lucky enough to find this door at the local salvage place for $50, which was (supposedly) the right width, and about 3/4″ shorter than my current door:

It was somewhat damaged and painted on the reverse side, which made me feel not the least bit bad about chopping it to bits:
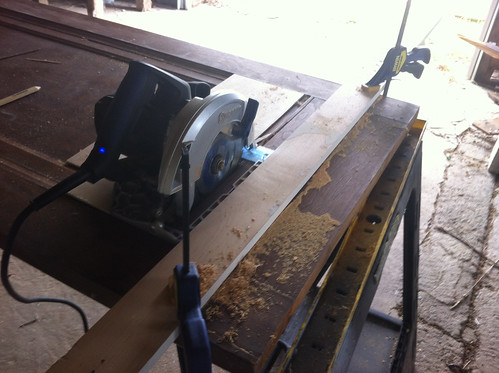
I did some careful measuring, clamped a board in place to use as a straight edge, and used my circular saw to make a plunge cut just inside of the center panel. I considered using the jigsaw, but I wanted as straight a cut as possible and the circular saw did a fantastic job.
Four cuts later…
Then I went out to my barn wood pile and hunted down a few different pieces that would fit the size of the opening. There was quite a bit of nail removal at this point, followed by several splinters and some swearing, but eventually I got to the point where I could trim the boards down…
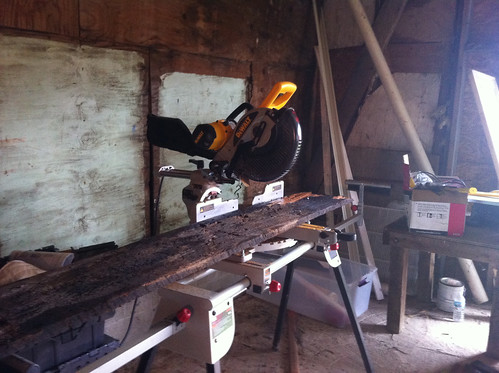
(I don’t know what it is about that picture, but it makes me want to be out in my shop smelling some sawdust right this minute. What can I say? That saw makes me feel all warm and fuzzy inside.)

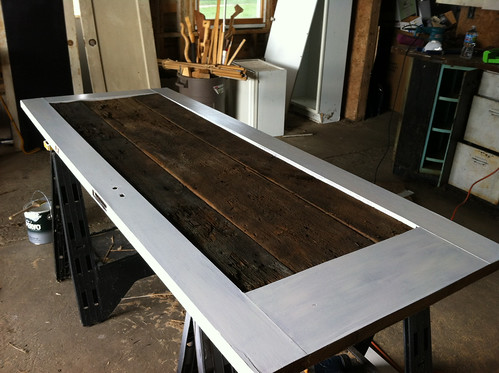
I lucked out that these three pieces fit perfectly inside the door frame without needing to be ripped down, which means I go to keep all those beautifully worn edges. What are the chances of that? I’m telling you, the soul of the old barn was smiling down on this project from barn-heaven.
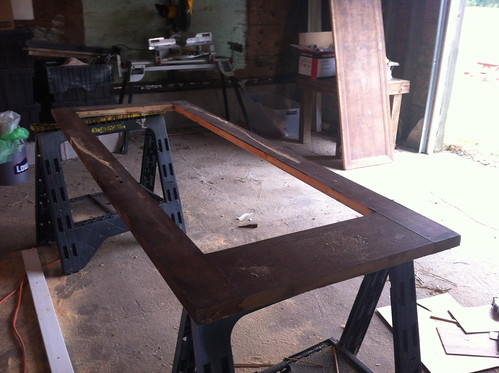
Because the wood was fairly deteriorated, I used a piece of 1/8″ luan as a backer for the new panel. While I was waiting for the paint to dry on the frame, I cut the piece of luan to fit inside the opening. Then I put everything together on sawhorses, and screwed each board to the luan from underneath. The panel itself I attached to the frame by shooting 18ga finish nails through the old wood and into the frame on an angle.
There was a lot of little touch up work at this point… using a nail punch to set the finish nails farther into the wood, caulking around the interior panel from the back, covering the luan on the back with some beadboard and old trim (which, apparently, I never took a picture of, probably because I was so blinded by the awesomeness on the front of the door.)
I’ve been working on it here and there over the last couple of weeks, and finally this weekend there were no more excuses to keep me from wrestling the thing inside (it weighs at least ninety pounds) and attempting to hang it. By myself. While standing on the edge of the top step of the basement stairs.
I figured my best shot at getting the hinges in the right place was to clamp the old door up to the new one to mark their placement…
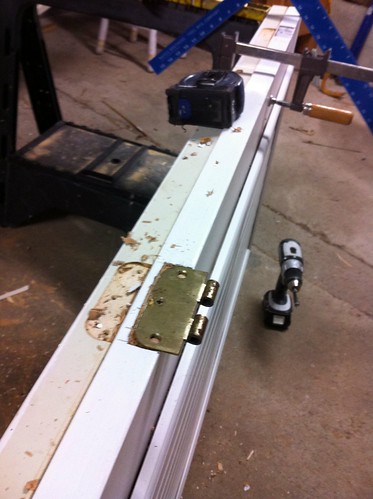
Which worked surprisingly well, actually. I got the door attached to the frame with minimal swearing, and I thought, “no effing way that was that easy…” And then I tried to swing it closed and the damn thing was 1/4″ too wide. Even though I measured both the door and the opening about 37 times, and the little notches told me it should fit with room to spare.
This is where the Laws of Old Houses trump the Laws of Measuring Tapes. Don’t try to fight it, just take the hinges off the door and go get your hand planer.

God bless power tools and having as many of them as my bank account will allow for.
I’m not going to lie, it closes, but it’s not 100% straight in the opening . I actually think that has to do with the frame itself because the original door would also swing shut on it’s own. A more correct way of doing this would have been to build a new door frame, pre-hang it, remove the old trim and door frame, and then install the new door. But I wanted to see the door in place before I turn eighty, so I’ll live with the fact that it’s not completely level.
(It’s actually slightly open in the pic below while some touch up paint dried… it’s not that crooked.)
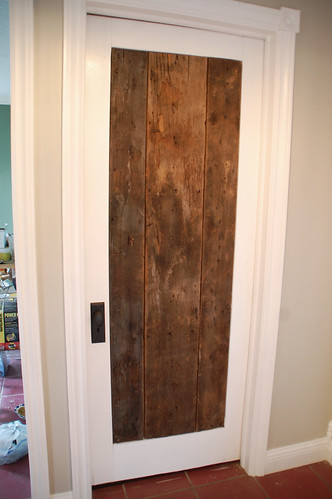
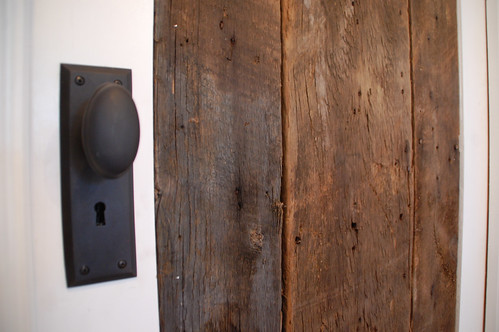
And now, on to my favorite part of this door. You might think its the old barn wood (which does make my heart go pitty-pat) but the thing that clinched it…
This door has a working skeleton key.
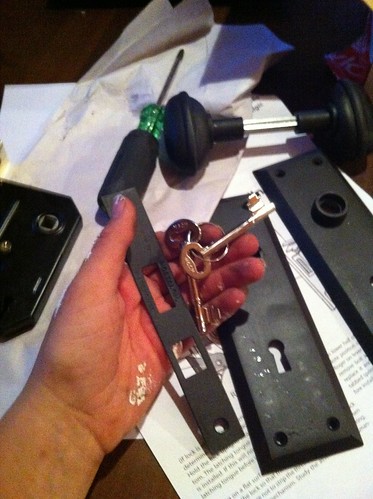
What? You didn’t even know that was possible? Me either, but I am so geeked about this, I can’t even tell you. And the full credit for it goes to Jake from www.directdoorhardware.com–who I’m pretty sure is my very own door hardware guardian angel– and just so happened to email me at almost the exact minute I was staring at 13 open browser windows on my computer, trying to decide what kind of hardware I could switch all of my ugly 80’s brass knobs out for.
Jake generously provided the handle for this door (and for my in-progress laundry room doors) and I couldn’t be more thrilled with them. He provided excellent guidance and also taught me some fancy new words, like escutcheon, which I seriously could not pronounce correctly if someone offered me a million dollars.
While they did provide the hardware for this project, they didn’t ask me to blog about it or do any kind of review… I’m just telling you what I think, which is that this is the most awesome door hardware ever invented.
Specifically, it’s the Nostalgic Warehouse New York Plate with Homestead knob, which is a lot fancier than my regular hardware will be, but I just felt this door deserved something special. (The egg shaped knobs and ORB finish will be a common theme though.)
So, okay, enough drooling over my knobs (and holy hell, that sounded inappropriate.) Here’s a shot of this room way back when I did my first walk-through of the place…

And now…
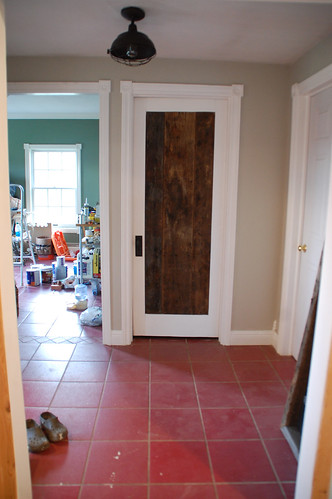
I mean, the pink floor has got to go, (not to mention the green in the tool room) but–gasp!— it looks like I may actually be making progress…

33 Responses
That is beautiful!
absolutely beautiful. i have some old barn wood in my garage and about 15 doorways….come to my place and have at it. hahahahaha
That is a gorgeous door. And the only reason I read this blog is to drool over your knobs! Ha! Seriously though, that door is beautiful. I wish I had a source of old barn wood.
here in chicago i have plenty wood from barns that i have taken down…feel free to send me an email
kind regards
I wish I lived closer to you, but I’m too far, so won’t even try asking for the wood as it would be more expensive to send it than to order something from here: http://www.thwindowsdoors.com/, where they have lots of great doors.
Jeez, Kit, it just gets better and better at your blog! Beautiful door and I love skeleton keys!
You are ten million times better at hanging than doors than me, and I envy you. I had a fiasco this week trying to hang some LITTLE doors in my basement this weekend. Lord have mercy.
But your door looks amaze-balls.
There was no small amount of swearing involved. And a wood clamp, if truth be told.
The door turned out beautiful!
That door is fantastic! That tile though…what were they thinking?
I know… any color but pink, guys, and I could have made it work for a while. I’m debating trying to paint it for a short term (less than a year) solution, or just biting the bullet and ripping it out.
That door is ah-may-zing. Love it!
I love it!
I seriously need to get over my fear of my saw… so I can create doors like that! You rock!
Yes! You just need to work up to it Debbie. A plunge cut is no joke, but I’ve spent a lot of time with that saw over the last few months and am very compfortable with it. Start small and get a feel for the tools… then move up to the tricky stuff!
Hurray! Love it! Nice job!
I am drooling over your knob and I have a thing for your door and thank you for the run down on how you did it, I may very well come back to this one day for a door of my own. It’s amazing and it matches that light cover so well! Great space.
That is flat out amazing. It looks beautiful. The knobs too. Incredible.
Is your vision back to normal? Has your sharpie tattoo faded?
Vision is 100% Lucy, thanks for asking. It was actually fine by late Friday afternoon… verdict was an optical migraine without the headache, so other than the blank spot in front of my face, I felt fine!
The sharpie tattoo didn’t last long, but I’m considering making it permanent.lol
That skeleton key/lock is pretty much the coolest thing ever!
Also, I’m totally jealous that you have a tool room, even if it is a not-so-awesome shade of green. I get to bring my miter saw out to the garage during the summer, but now that it’s getting cold and the cars need to get back into the garage, I’m resigned to an unfinished room in the basement where I get to work on the floor 🙁
That door is uh-mazing. For real. Come make me one..? Also, hell yes for working skeleton keys. We have a number of doors in our house that have the original skeleton keys sticking out of the locks that still function. I love it.
What kind of paint and primer do you use for doors and trim? I just painted a few smooth doors and it was a b**** trying to avoid the brush marks, not to mention it took me forever. Sand, primer, paint, sand, paint, flip over and repeat. I rolled it on then finished it with a brush to avoid the texture of the roller and used Ace Door and Trim paint.
I love a beautiful door!
MD
So totally barn woody and custom! Your fingerprint is going to be all over that house. I am already crushing on the pairing of the barn wood door and that fabulous light fixture. Great combo!
That door is utterly awesome! The tile…yeah, not so much. I wonder if there’s a paint treatment out there to make it look like slate? That would look hot next to your sexy door. 🙂
I don’t think I ever told you this, but I LOVED the smell of Papa’s workshop. His workshop was attached to his garage. I loved walking in there and smelling the sawdust. He made a rabbit cage for me once. Mamie followed him around in all the things he did…his vegetable garden…. and all his woodworking. He built a wall of stones around the property next to Cedar Point. He was always working on something. And I know it brought joy to his life. Mimi was more of a homemaker. She did all the cooking, cleaning, and laundry. It doesn’t matter. Your work, whatever it is, it should bring you joy and a sense of accomplishment. I love you, Kit.
Gah! Cutest Mom ever!
Looks like the house’s style is taking shape!
Two thumbs up!
The door looks awesome as well as the hardware, however the trim style is something to be desired. There is something cool and rustic about barn wood that gives a home a comfortable feel. Colonial trim and rosettes (formal) along with barn wood don’t equal comfortable it says come on in, relax have a beer…but dammit take your shoes off first.
The door is drool worthy and so is that light fixture. Where did it come from?
Custom Printed Boxes
Present your products in the best light with Paper Mart’s custom printed boxes. Choose from our many custom options to make your packaging come to life.
Custom Packaging
The Custom Packaging Boxes provides custom printing and packaging Boxes Services with free door step delivery worldwide. Get Free design support
Comments are closed.