So, here’s something fun on a Monday… this afternoon (Monday 8/26) I’ll be participating in Lifehacker’s Ask an Expert series from 3-4 PM EST. It’s a live chat, and I’ll be fielding questions related to my area of expertise (which, given the day, could be DIY, power tools, and what to do when chickens have taken over your kitchen.) I’ll post links to the chat on Facebook and Twitter around 3 PM EST if you want to join to ask a question or point and laugh at my spelling errors and EXCESSIVE USE OF CAPS. What can I say? I get super excited to talk about tools.
In the meantime, however, let’s talk about barn doors. Now, if I was just a little bit meaner, I would have titled this post “How to Build a Barn Door” and then google would direct eight million people to this website, all of whom would take a look at this thing…
And go, “WTF google? I can’t put that shit in my kitchen.” (Insert evil cackle here.) Seriously, when’s the last time you saw someone build a barn door for an actual barn? It’s impossible, because when you search the internet for anything barn door related, this is what you get:
Which, let me tell you, when you’re twelve hours in to building an eight foot door and decide to search for “barn door hardware” to determine if it makes more sense to salvage the eighty year old track you’re working with or buy new, and google vomits 400 images of pristine kitchen barn doors and their impractically decorative hardware all over you… you will say all the bad words about Pinterest.
Except, of course, all of those doors are effing amazing and I need to build a couple for my master bedroom right this minute.
Instead, I exercised a modicum of restraint (ugh) and decided to deal with the problem at hand before building decorative doors for my bedroom. That problem looked like this:
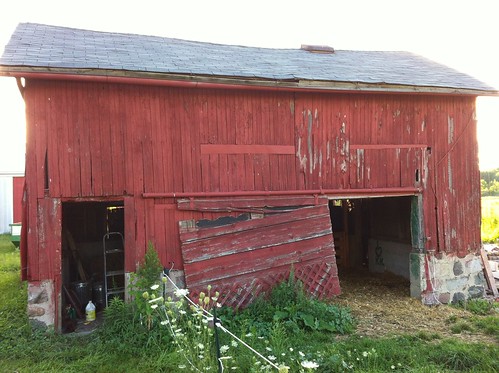
Not pretty.
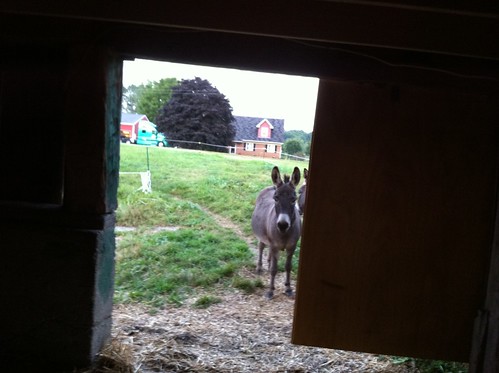
That barn door was never in great shape, but a few weeks ago it finally crossed the line between ugly and non-functional. When you have two donkeys that will take off mid-vaccination so that you’re forced to chase them around an acre of pasture while they have a needle sticking out of their neck (Parker, I’m looking at you), a functional barn door becomes a necessity.
So, last weekend I cut down a couple of sheets of T1-11 to use as the door panel…
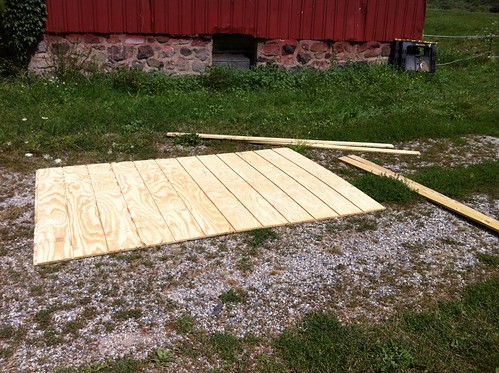
And my progress pretty much stopped there.
This weekend, I expected it to be a fairly quick job to tack them together, but there were rabies shots to contend with, as well as one very vindictive carpenter bee who spent most of Saturday making kamikaze dives at my head (which resulted in a lot of yelling, arm-flapping, and running around in circles, but not a lot of progress on the door, oddly.)
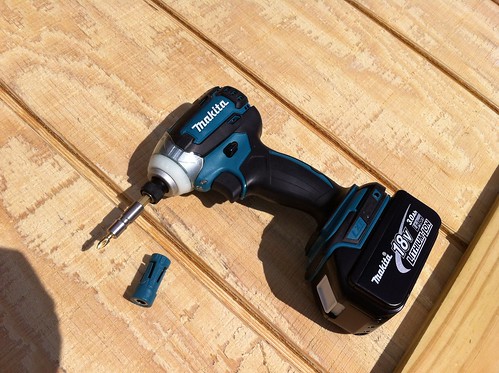
Still, I had some new tools to play with, which meant even slow progress was fun. (More on this beauty later.)
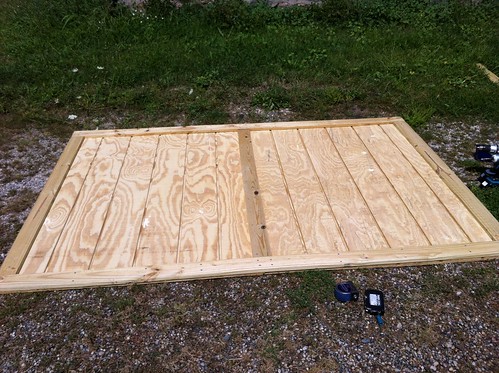
My original thought was to create on big X-brace in the center of this door, which would have been a good idea structurally, but visually it just didn’t have the right proportions to the rest of the barn. Instead I opted for a vertical brace down the center of the two boards which, with the liberal use of deck screws, seemed to do the job.
Then I created some purely aesthetic X’s for the sides.
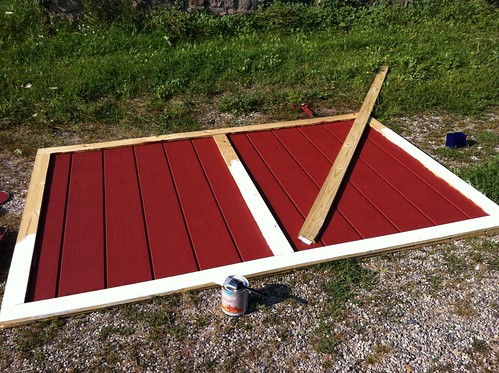
There are two ways you can do this. The first would be to use two full boards, mark where they cross in the middle, and then chisel half of the thickness out of each of them to create a flat X (similar to the way I built these picnic table legs, or the braces on the chicken coop doors.)
Since these pieces of trim were for decoration only, I decided to just use one full board on the diagonal and cut two smaller pieces for the other side of the X.

To cut the pieces, I lined the board up and then use a straightedge to mark the angles.

This is not an exact science, but it has the benefit of not requiring you to do complex mathematical equations after 6 PM on a Sunday.
After some debate (and frowning at Google), I also decided to re-use the old hardware, which got a quick coat of black spray-paint.

Meanwhile, back in the pasture, someone was pretending to innocently play with their ball while my neighbors and I prepped the door for transport to the barn…
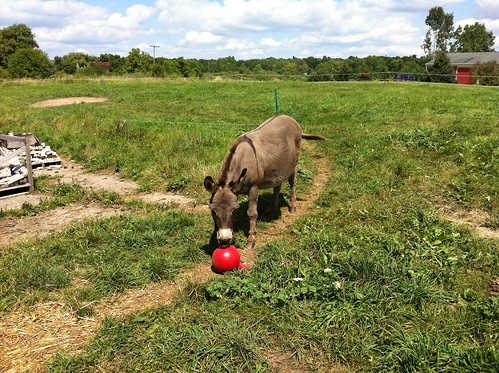
Do not be fooled.
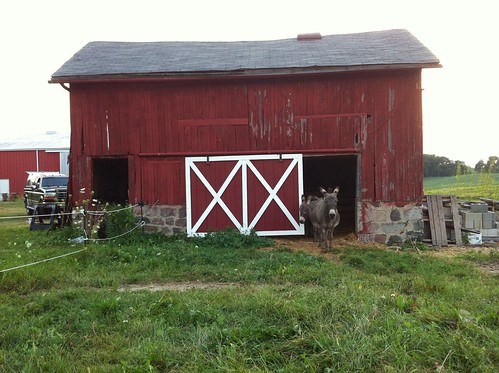
In the seven seconds we left the gate open, Doc made a break for it. Luckily the sight of a beautiful new door on the barn lured him back in. (Or else it was the treats.)
The only issue with re-installing the door on the tracks was a stuck bearing. I tried hitting it with a hammer, my neighbor tried the slightly more subtle (and effective) approach of using a little Liquid Wrench.

Dammed if it didn’t work. It’s not perfect, but for using hardware that’s older than I am, it actually runs pretty smoothly…
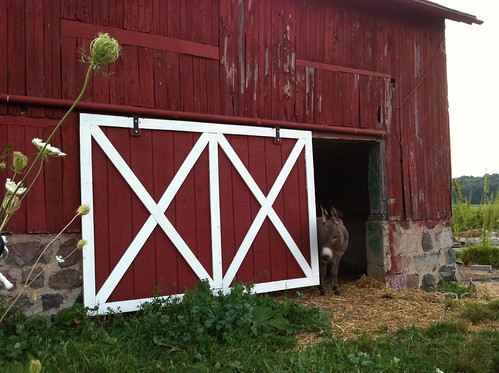
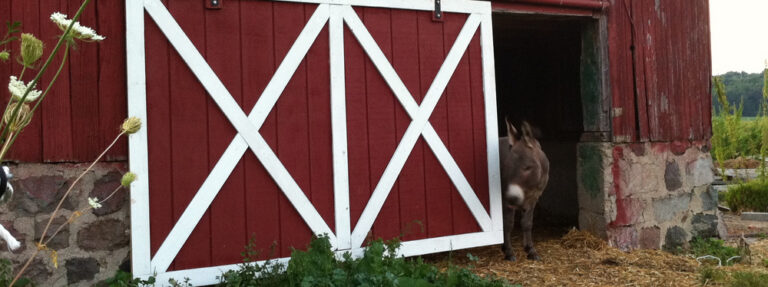
And passed the donkey inspection.
The only problem is, it looks so nice that now I’m going to have to repaint the rest of the barn…
Dammit.

58 Responses
Lookin’ good!
do you think the door would keep in cows our door is probably as old as yours.
Mine keeps small donkeys in!
thank you so much for this idea getting strating this week
Wow. Sweet barn door. Looks great.
Looks really great!
As someone who’s building two oak carriage house doors at the moment, I completely sympathize with the google image search conundrum – there have been several sets of virtual shoulders I’ve wanted to shake while screaming “that’s not how to build things!” while crying into my sawdust. The door looks great, and the hardware will outlive us all with come occasional lube and paint . . .
Make sure you actually use oil on those door carriers or they’ll freeze up again. Liquid Wrench and WD40 are not really suitable lubricants and not weatherproof. One is purely a penetrating oil and the other is a water displacer.
Lithium grease in a spray can or plain old motor oil are both a good option.
Great point. We actually greased the shit out of them (with actual grease, not oil), but we had to use the Liquid Wrench to help un-stick the one bearing. I’m guessing no one has done that in a few decades, and I’m surprised just one of them was locked up!
Amazeballs. And I’m sure you priced out the new hardware. Holy expensive! Yay for reuse!
You are a kindred spirit. I always get a giggle when I need it from you. I myself am a one woman wrecking crew, mama to donkeys, horses, chickens, cows, 2 farms, gardens, orchards, mid-remodel old farm house and barns and that’s before the 3 kids ( one with special needs)come home off the bus, the husband from work and I have to take the straw hat off and put the apron on and play homemaker instead of hillbilly superhero. You have always gotten into something that is totally, hilariously, relatable and it is so nice to know I am not the only “BAT s*#t” crazy woman who dreams of power tools and a day to actually get to use them. Thanks for your blog.
that makita impact looks nice. doesn’t look like the brushless, though. i heard that the brushless doesn’t keep the light on after actuating the trigger, in which case i’m planning on keeping away. also heard that the new drills use plastic gears and have severe run out. pretty disappointing if it’s true.
I’m glad you brought that up. I am going to be look for a new one soon. My old hand me down died a long time ago and I have been using my brother-in-laws Rockwell, but it is so heavy and a bear to hold on to for larger jobs.
hers looks like the lxt218 to me. the lxdt08 doesn’t keep the light on after the trigger has been released. i’m currently thinking about upgrading to the lxdt06. the milwaukee brushless also looks good and has a longer battery life (4.0ah). panasonic always has excellent reviews as well.
then there’s the festool ti15… 🙂
Nice job. I was actually thinking, when I saw the finished door, that you were going to have to work on blending it in.
But my first idea was to save time and stress the doors…;-)
I’m with David, stress the doors & save your stress! You can always repaint everything later … you know, when you have spare time. 😉
Thanks for posting how you did the corners. I want to trim out the flat panel doors in my basement to make them look a bit more farmy, and this was the look I had in mind. I’m sure I would have figured it out eventually, but I appreciate you saving me the trouble. I’m sure this post will come in handy on the slightly less decorative side of things too when I finally give in and tackle the doors on our driveshed. One original door is gone replaced with a cheap roll up garage door and the other won’t slide because the track has such a sag. I frequently look at the hardware trying to figure out if it’s salvageable.
Awesome door. This inspires me to replace our chicken coop door in similar fashion soon. Side note, around here (Western Wisconsin) we found some actual sliding barn door hardware at Fleet Farm. And it doesn’t cost $500. And it’s functional enough for outdoors and I’m using it for my bathroom “barn” door indoors too. I’m not sure if you have those stores around you but it’s worth a look. Fleet Farm is pretty much where we shop when we “go to town”.
I like the doors, but am concerned about the sloping roof line in the first and last picture… please make sure the whole barn is not ready to drop inward on the family. Is it an optical illusion?
Looks fantastic. Glad you put an X on the door! It just wouldn’t have been right without it! Cheers.
Kit, I’m one of those people lurking … greatly enjoying … but have never posted to your site. Just wanted to suggest that you put some good solid hooks and hoops/eyes on your door in appropriate places in order to fasten it down so the wind can’t bang it around or knock it off the rail.
Such a great idea Karen. The original door had some wood blocks that I think were meant for that purpose, but since I usually keep it half shut, the hooks/eyes might be a better solution!
I was reading the article with one thought in my head – “This guy has to repaint the barn now” and you said it at the end 🙂 The donkey is pretending to train to become a great footballer or is just used to healthy lifestyle (may be like its owner). Will you draw more crosses on the barn? I believe it could look cool.
This guy is actually a girl. And unfortunately was never much of a good footballer…
Very cool barn door! the simple design and your DIY step by step directions can get a few homeowners to build this themselves. Great idea for a post!
Good job on the door! Now, about that roof ridge…
Hey Kit, Great jobjob on th doors, I’m sure you thought of this but just in case….hope you ran a bead of caulking where the trim meets the T-111 or the water will get in there…. Cheers, Clark
I’m a dedicated lurker to your blog. I love where it’s evolved to with the farm life and all. My life is also evolving in a similar way. We just built a barn and brought goats into the fold. We need to paint our barn now, so I’m on the hunt for a good barn red color. What color did you paint your doors? Did you use just exterior paint or like deck/fence solid color stain?
Great door. It took a while to google it, but it eventually showed up. Kind of like destiny, since I’m doing a couple of doors for my older than dirt, converted horse barn, garage. I’m looking at the runner (great photos, by the way) and am wondering if it is one continuous piece or is a couple of pieces strung together and how that is done? I can’t find a single piece anywhere that would accommodate and 8 foot door, and your place looks too far away and too well guarded for anyone to help themselves, so to speak.
Hello Kit,
Just discovered your blog. I googled “how to build a barn door”… who knew so many people were using barn doors inside their homes!
Love the doors you made. Not what I was looking for but I may get some inspiration for what I need.
I am not as much of a DIYer as you, but loved working with my Dad over the years. Sadly he’s no longer with me, and the barn doors won’t build themselves, so it’s time for me to get it done myself.
Will definitely be checking more of your blog!
Regards,
Tallie
I found your website because I have the same problem with my barn. I’m a girl who needs to build new barn doors for a REAL barn with real horses who would rather be in their pasture instead of getting their dewormer!!!! Thanks for the great blog!
The Xs are NOT purely aesthetic. They prevent the entire door assembly from parallelogramming. They are especially important when hanging the doors on hinges, but will keep the door square regardless of how it is hung, used and abused.
Uh, they are purely aesthetic on the doors that I built–and which I was referencing–because I used T1-11 instead of boards for my doors. That shit will never NOT be square because it’s cut out of one sheet…
OMG…I just had the eye stab pleasure of googling
“how to build a barn door”. No. Not for my plush bedroom. SMH
Thank you for actually putting out how to make a real barn door – I need to do something like this and this is the first one I have been able to find that isn’t so complex that I would need a PHD to put it together as well as a ton of specialty tool – I like specialty tools but need to get something done quick. THANKS
Thanks for posting this and I’ve found as you did nearly all indoor home/barn doors and no installations on real barns. How did you lift the door in place? We have a door that fell off our barn due to a rotten post and I’m guessing it weighs over 300 lbs.
I bribed my neighbor with beer. Two of us lifted and his wife guided the rollers into the track. Good luck with yours!
Building a 14′ X 9′ EXTERIOR sliding barn door. Its going to be HEAVY! Will adding more wheels help displace weight? Also poured chains into slab for security. Want to keep my tools. Unfortunetly the fear I have found does not look secure unless in box channel. The other gear I found looks like you could lift door right off. Any ideas before I get 8 hours into this. Already wasted 10 min looking at interior crap. Shawn
Hey i m getting ready to build a double door the same way you did this. I was wondering if when you fastened framing to the panel did you add bracing on the back of the door sanwiching the t1-11 between the two. Thanks for any help in advance great looking door.
I didn’t on this door, it’s only braced on the front so that it can still slide on the outside of the barn without getting hung up on anything. It’s been a couple of years now and seems to be holding up fine!
Did you use 1×4 for the framing?
I did… mostly it was for looks and adding a little stability to the panels.
I need to build a door to cover a 12′ wide opening to my woodshed. Any idea where I can find exterior tracks that don’t cost an arm and a leg? I live in No. Cal. Love your T1-11 door!
I got everything I needed from Lowes special order. I did two 8 ft. bi-passing doors and a little 2 foot 3rd door. You didn’t say how far North in CA, but Lowes does have stores in Stockton and in most places south of there. Nothing is cheap anymore, but the pricing was not unreasonable, and after you get done, you’ll say it was worth it.
If you have Tractor Supply stores in No.Cal, that would be the first place I’d check!
I just have to say thank you I could not have said it any better… UGH with all the how to’s for your interior sliding barn doors…. I have been looking for actual barn door tutorials and only found yours… Kudos
Hi, It looks great, and I feel your pain about the googling barn door!!
I have to build a barn door (for my BARN)this weekend and want to know what you used for the frame on this one? How did you attach the T1-11 boards to the frame? is the frame 2-sided? or 1?
Thank you!
Lisa-Jean
Thanks for the post! It was educational and humorous. Enjoyed it.
Hi. Doors look great, and a great affordable approach!
I know you didn’t need them in your case, but do you happen to know where to get actual barn door hardware for such a project? I’m doing my garage doors and would like a slider much like you created, but can only find interior cheepo hardware for closet doors and laundry rooms,etc…nothing industrial.
Try places like Tractor Supply, Rural King, or any lumber yard in a rural area!
I laughed, he gets my pain. My wife wants sliding barn doors for the barn, and I cringed trying to look for the hardware. I said Tractor Supply or Rural king. It’s one of the few times where the internet isn’t necessarily better.
I just went through this very search and didn’t find you until I put “actual barn” in the search. Now…..where to find the actual hardware??
I would try Tractor Supply or a rural lumber yard. I know my local TSC sells barn door track.
Amazing, but I had just gone to the web to look for barn door designs. I saw your site after I frustratedly entered into Google, “barn door designs for an actual barn”! Don’t people build barns anymore? I enjoyed your input.
Thank you, Thank you for this post. It not only exceeded my expectations of finding how to build a barn door that was functional it looks amazing too! I was drowning in all the interior barn doors and really cracked up at your post because it hit home! You are very funny. Seriously, Thank you for the laughs and knowledge!!!
The sliding hardware can be found at Tractor Supply. I am building a barn door for a barn and that is the style I’m using.
Now that its been almost 10 years since building, how are the doors holding up? I just bought a home that has a 53′ barn, and the previous owner had placed an overhead garage door on the opening. There is a slight lean on the barn, and the door is inoperable. I found your blog (as previously mentioned after many frustration Google attempts) and your method provided a definite option for this as it is a 16′ opening. Two sliding, overlapping doors would definitely be the ticket, and be a great look for this 1891 barn. Thanks for posting these type projects!!
Thank you for posting this! So far you are the only place I found that actually replaced a real barn door. However, I needed a little more in depth post. We have rotted wood where our door is supposed to hang and we need to reframe that area. Can anyone lead me to a post, either here or elsewhere, where it shows how to replace the rotted wood for the door frame? Thank you!
Comments are closed.