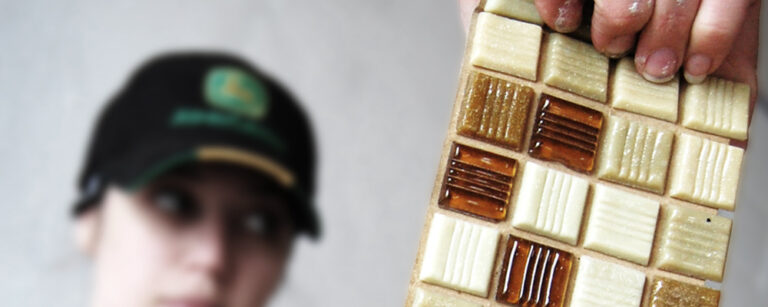
Once you learn the basic principles behind installing tile you can apply them to any number of projects– floors, walls, countertops, tabletops, and about anything else you can think of. I recently spent a day installing 1677 itty-bitty tiles on the wall of a urinal stall and there’s an item that wouldn’t have gotten crossed off my Bucket List if I wasn’t confident in my ability to slap some glue on a wall, stick some tiles up there, and smush a bit of mud between them. What can I say? It’s a technical process.
If you’re already going blah, blah, blah, just tell me how to get this tile on my floor without the universe imploding then you can skip right to any of these step-by-step tutorials.
- Tile 101: How to Install Floor Tile
- Tile 101: How to Install Mosaic Wall Tile (Or any wall tile, really.)
- Tile 101: How to Build and Tile Countertops
If you want to gain a little better understanding of the tools, materials, and process involved in tiling before diving in to specific projects, read on.
Overview
All tiling is essentially the same, though there are different products and techniques used to achieve different looks.

1.) Surface – This is where it starts… horizontal, vertical, permanent, moveable, other than a ceiling (which I’ve never attempted) you can stick tile to almost anything.
2.) Glue – something must be used to adhere the tile to your surface. Occasionally called thinset mortar, mastic, or tile adhesive, these are all different products used in different applications that essentially do the same thing: stick stuff to other stuff.
3.) Tile – this is the fun part. You can use big tiles, tiny tiles, glass tiles, stone tiles, ceramic tiles, broken tiles, and even old china-ware if it suits your fancy. The tile you use will often dictate what other tools and materials you will need to finish the job.
4.) Grout – affectionately referred to here as “mud” because hey, it’s dirt and water, why fancy it up? Actually, sometimes there isn’t even any sand in it, so I should probably use the technical terminology. Again, there are infinite colors and types of mortar, and some are better than others in a specific application.
5.) Sealers- The unsung heroes of tiling, if you’re using any type of natural stone you’ll want to seal your tile, and you will always want to seal sanded grout. Based on your materials the type of sealer will change.
Material Basics
So mud, tile, glue, and something to stick it all to… ready? Go tile!
What? You need more info? Internet, you are so demanding. I don’t know why I stay in this relationship.
Before I go on, here’s a caveat: I am not a professional tiler. Tiler? Tile installer? Tile installation professional? See? I don’t even know the proper terminology for a person who installs tile and gets paid for it. On the other hand, it’s somewhat likely I know what the hell I’m talking about because I’ve been tiling every horizontal and vertical surface in my life for the last five years. Nothing has spontaneously combusted yet.
Backerboard
Let’s work from the ground up. In nearly any application you’re going to want to put tile backer-board down first. (Exception: Concrete floor.) Here’s why… it keeps the expansion and contraction of your wood sub-surface from ruining your grout.
Backer board is generally fiber-cement, and comes in a variety of thicknesses. I’ve most often used 1/4″ for flooring, but have also been known to use 1/2″ on the lower half of walls to make it flush with drywall.
It goes down first with a layer of “thinset” (read: adhesive… we’ll get there in a minute), then is screwed into place, and the joints should be taped and mudded, similar to drywall. Good news, no sanding.
For more detailed instructions on installing backerboard, check out these instructions from Hardibacker.
Adhesive
Adhesive comes in two types (really 4,674 types, but let’s simplify, shall we?)
- Thinset – Also called mortar, it’s a mix of cement, water, and fine sand. It comes pre-mixed or in a “just add water” bag. This is best used in commercial applications, “wet wall” applications– like a shower floor, or with heavier tiling materials.


- Mastic – Is an acrylic adhesive. It’s okay to use this for floor tile in residential applications, but be sure to read the label because different types of mastic are needed to accommodate different (particularly larger) tiles. Also, some mastic is okay for walls that are “intermittently” wet, but it doesn’t hold up as well to water as a thinset does. On the other hand, it’s more glue-like a better for wall applications, or adhering tile to gypsym wallboard (drywall). Mastic almost always comes pre-mixed.

Either type of adhesive will go on with a notched trowel. (More on notched trowels in the tools section.)
Tile
Okay, backer, glue, blah, blah, blah– let’s get to the fun part: Tile. Here are the most common types:
- Ceramic – Ceramic tiles are easily the most common. They come in a number of sizes and finishes. For floors 12×12 or 16×16 are the most common tile sizes, though you shouldn’t let that limit you. I tiled my bathroom floor in 2×4″ tiles laid in a brickwork pattern. For walls you can find anything from a 6×6 tile to a .5x.5 mosaic. Ceramic is great for cutting and clean-up and you can usually find an inexpensive ceramic option.
- Stone– Slate, Marble, Granite, and even river-rock pebbles are used to create stone tile. It has advantages ( looks awesome) and disadvantages (costs more). Natural stone tile may be heavier than ceramic, and options like slate are soft and can be difficult to work with.
- Glass– Glass is most often found in smaller tiles, such as mosaics. It’s an expensive option with a 12×12 mosaic sheet selling for anywhere from $7-$20/sq. ft. (Whereas ceramic can often be found for $1-$5/sq. ft.) Another interesting property of glass tile is that often you can see through it, so it requires a little more preparation of the surface you’re working on as well.
- Metal– Hey, they’ll make tile out of almost anything these days. Again this is most often seen in smaller tiles and mosaics.

The tile is adhered to the ground using adhesive. That’s a bit of a “duh” statement, but I thought I ought to throw it in there for good measure.
Grout
Grout fills the spaces between the tile and keeps any moisture away from the adhesive holding your tile to whatever it’s stuck too. Hopefully not your boyfriends forehead.
Like everything else these days, there are plenty of options, but let’s just talk about the two basics:
- Sanded grouts – Better for larger grout lines
- Unsanded grouts – Better for grout spaces smaller than 1/8″
There are also fancy epoxy and resin grouts, but they’re not used often in residential applications. And really, why make things more difficult than they are already?
Sidenote: For a good chunk of my formative years my family owned a concrete company. Whenever I’d call in to talk to my Dad, I’d be stuck on hold listening to their pretaped message that went something like this “The terms mortar and grout are often used interchangeably, but they are not. Grout is pourable, mortar is not.” And finally that bit of useless trivia that has been floating around in my brain for the last 20 years has a purpose. There are some basic compositional differences between grout and mortar (the addition of lime, for example) but really it’s just a matter of more water.
Anyway, the other thing you should now about grout is that it comes in any color under the rainbow. And if you put it down and don’t like the color (hi mom!) they also sell stains you can use on the grout afterwards. Now, moving on…
Sealer
Sealing grout (and tile) is an important step. One I often leave out because I’m on to the next project thankyouverymuch. Also, the tile aisle at the big-box stores is crammed full of sealers and it’s a little intimidating.
Here’s the deal: Sealing grout helps it from getting stained, and keeps the moisture out. Sealing natural stone that is more porous than ceramic tile serves the same purpose, and it also gives everything a more “polished” look.
An all-purpose grout and tile sealer should be good for general applications, but again, make sure it’s compatible with your material types.

Stone like slate or marble will likely require something more specialized. Particularly if you want a little sheen.

Tools
The fun ain’t over yet. Choosing the right materials for your project is only half the battle. The other half (and the slightly more fun half, if you ask me) is having the tools to do the job right.
Basic Tools – No matter what you’ll need these
- Score-and-snap tile cutter (for larger tiles) – This is a cheaper alternative to a wet-saw, used to cut your tile down to size.

- Tile nippers (for smaller tiles)- I like calling these “snips” because I feel like a bit of an idiot running around the shop going “Where are my nippers? Have you seen the nippers anywhere?!”

- Drill – For installing backer-board.
- Notched trowel- For spreading adhesive. The size of the notches corresponds to the size of your tile and how much adhesive you need. I most often use 1/4″ for regular floor applications, and 1/8″ for small tiles — like glass mosaic tiles.

- Spacers – For spacing tile to get consistent grout lines.

- Grout float – For smushing grout in-between the tiles.

- Sponge – For wiping away excess grouts.
- Buckets – To use as a helmet.
- Okay, just kidding on that one. You’ll need at least one to hold water while rinsing off the grout. Maybe two, if you’re mixing your own grout or thinset as well.
- Gloves – Your fingers will thank you later.

Other Tools – Not a necessary, but fun to have. And really, isn’t that the case with most tools?
- Wet Saw – For precise cutting of any size tile. Except for those itty bitty ones – it is still a saw, and I’ve heard you can lose a finger.

- Grout mixing drill attachment – Come on, it’s just fun to use.

Also, make sure you have the proper PPE (Personal Protective Equipment) when cutting tile with anything. i.e. Wear safety glasses or they’ll be digging tile shards out of your eyeball and that will ruin the party.
Laws of the Universe Regarding Physics and Tile
Now that you know the basic materials involved – for more detailed step-by-step instructions on different tiling applications, check out these How-to’s:
- Tile 101: How to Install Floor Tile
- Tile 101: How to Install Mosaic Wall Tile (Or any wall tile, really.)
- Tile 101: How to Build and Tile Countertops
Still here?
Okay, here’s the really high-level overview, but I’m telling you the step-by-step tutorials have pictures and everything, so go there next.
- Measure your space and get an idea of what you want before you buy materials
- Buy the materials for your project making sure you’ve got the right adhesive for your tile, and grout for your spacing, and all that goodness
- Prep your surface. Install backerboard if necessary (and it probably is.)
- Layout your tile before you start getting all glue-happy. Tile should always be centered in the middle of a room (don’t just start at one end and work towards the other, it will look lopsided).
- You can pre-cut pieces, or lay your whole tiles first and do the cut tiles later. Up to you. I do it both ways, and the world has yet to implode, so it must be ok.
- Start laying your tiles by spreading adhesive with the notched trowel. Push tile into adhesive and jiggle it a bit for a good set. Use spacers to properly align them.
- Once your tile is down, let it dry for 24-ish hours before grouting. Use a grout float to get the grout in all the cracks.
- Remove excess grout with sponge. Let set for 30 minutes and wipe it down again. Then let it dry overnight and wipe everything down with a soft dry cloth the next day to remove grout haze.
Tip: For large grout lines (more than 1/2″) misting the grout with water every hour or two will help reduce shrinkage cracks. - Seal. Seal. Seal. Seal. Seal. Do not start your next project. Do not belly-slide across your new tile surface. Pick up that sealer and get back to work.
- Now you can belly-slide across your new tile surface.
Now get to it. Make sure to leave a comment if you have a good tiling tip, or a question I can help answer.
Question: Does grout come out of your hair?
Answer: Eventually. Probably. Um… come back in a month and let’s talk.

81 Responses
I just finished applying mini pebble tile to a countertop. 24 hours later, the tile and backing is loose and falling off. What happened? I used dry mix mastic adhesive on top of pine plywood base. I’ve tiled before with no trouble…not with these little pebbles. I was thinking it might be better to actually use glue to set these. Also, they seem to be so tight, I can’t imagine how the grout can wedge in without losing most if the pebbles. Can I set these pebbles with the colored grout from the back side, allowing the grout to find its way up to the surface, where I can sponge it away as I see fit? I’m doing a big project with these tiles in the coming weeks. Your response is appreciated.
It’s difficult to say… what kind of backing are they on? Mesh? When the tiles come off is the mastic still stuck to the plywood? Or to the back of the tile? That would give you an idea as to what kind of adhesion issue you’re having (whether it’s holding to the stone but not the plywood.) Grout is really meant to be a filler and not an adhesive though, so I wouldn’t use it in place of a mastic or mortar under the tiles.
I visit day-to-day a few blogs and websites to read content, except this
webpage offers quality based writing.
This is the best description of procedure I have read!!!!!
Thank you,
Jan
ZOMG thank yah girlie! I have the dubious distinction of being the most handy person in our house and I am the one to whom the responsibility of repairing the crumbling tile wall in the bathroom (which has glorious plaster and lath as well as a 1949 cement based wall repair – how do I know it was last repaired in 1949? the sunday comics said so when I pulled them out of the wall!)
With all that said, I just wanted to say thank you for the intel. You cleared up a few mysteries that 4 hours of searching on the net failed to clear up. soo THANK YOU!
–Angie
-= who is learning to love being a DIY’er-=
I have glass tiles that I want to remove the back off of. Not just the mesh stuff but there is some kind of white backing on it as well. I want to be able to see through the glass. Any ideas on how to remove it?
thanks!
Chinese Marble Tiles
Morestone Interior is managed and operated by Morestone Granite and Marble Limited
which locates in Xiamen China. It specializes in the production and
export of marble tiles, marble step, marble medallion & mosaic, marble molding with a wide variety
of marble color and texture to choose.
Chinese marble tile producer
Locating in the biggest marble import and exporter center of Shuitou enable us to find various marble block and slabs for the cut to size production.
We listen carefully with the demanding of interior architect, designer, builder, developer,contractor and contruction company, and produce the right marble product for their
projects.
Chinese marble tile supplier
Variety of marble color and textures are available, and we are able to produce
marble tile floor and wall, marble tile kitchen and bathroom, marble counter top,
marble column, marble balustrade and marble medallion etc.
For more
http://www.morestonemarble.com
single row black glass tile in stalled. no drying time was allowed.black unsanded grout added to tile. result when finished, white lines showed through grout lines. why the white lines. please give me an answer please!
There are a lot of possibilities – With a grout that includes portand cement (usually sanded) white or splotchy grout may be from efflorescence, usually due to moisture content of grout. If it’s unsanded grout I’m not sure what’s happening in your particular situation.
What’s up to every one, the contents present at this web page
are in fact remarkable for people knowledge, well, keep up
the good work fellows.
First of all, I love your humour and attitude toward the work you do:)
Second, I have a slight problem because none of the information that I have found on the Net has addressed the issue that I am concerned with.
Third, the issue: Installing a variety of artistic tiles of various thicknesses and sizes.
Fourth, I am applying the tiles to drywall that has been painted and sanded. Water seepage is not an issue.
Fifth, I read somewhere that you can butter the backs of the tiles and just stick them on and that is what I would prefer to do.
I truly hope you are still answering questions and PS:
After the tiles are stuck onto the prepared drywall I intend to follow the grouting and sealing process you have described here.
Thanks in advance, Matuga
Even though the drywall has been painted I might suggest a tile membrane (something like this) before you tile. Even any adhesive you use will have some moisture in it, and drywall doesn’t hold up well to that, particularly when it’s holding the “weight” of the tiles.
As far as buttering the back of tiles and sticking them on, yes, you can totally do that. From all the pros I’ve seen do this, I would recommend a layer of thinset/mastic on the wall first, and then also butter the back of the tiles. (Work in small sections because it takes much longer this way!) It’s better for good adhesion. Good luck with your project!
Hi,
I live in oregon where it RAINs. We have a small space between our patio and our chicken cage. I am tired of walking through the deep mud *( you sink in by about 4″. I was at a garage sale yesterday and got some big kitchen floor tiles ( about 12″ by 12″) Is there a way to put them outside in themud without them breaking?
Also years ago I started a patio collage with glass. It is in cement but I never grouted it 5 years ago + . It is a covered patio but does get wet. What kind of grout shouls I use? Thanks. I hope you get this still~ Carolyn
Hi Carolyn – I’m assuming your weather in Oregon is similar to mine in Michigan. Any indoor/ceramic tile probably won’t make it through the winter because of the moisture/freezing. Concrete pavers are probably the best way to go!
For grouting, you just need grout and a grout float (used to push the grout into all of the cracks) and a bucket of water and sponge for cleaning excess grout away.
Good luck with your projects!
Currently it appears like Drupal is the top blogging
platform out there right now. (from what I’ve read) Is that
what you’re using on your blog?
It’s an awesome paragraph designed for all the internet visitors; they
will obtain benefit from it I am sure.
Hello I am so delighted I found your website, I really
found you by error, while I was researching on Digg for something else,
Nonetheless I am here now and would just like to say many thanks
for a remarkable post and a all round entertaining blog (I also love the theme/design), I don’t have
time to read through it all at the moment but I have book-marked it and
also included your RSS feeds, so when I have time I will be
back to read a great deal more, Please do keep up the superb work.
What are your thoughts on tiling over tile on the floor?
Specifically…
Ground floor condo, on a cement pad. The floor is tiled (probably in the 70s) with standard four inch tiles that are normally used on shower walls. The tile is actually in good condition, but it’s dated and I don’t know if I can get all the stains off.
1. How would I remove the existing floor tile?
2. Or, is it okay to tile right over what’s there and what kind of prep would you suggest?
Thank you!
Hi to all, the contents present at this web page are truly
awesome for people experience, well, keep up the
good work fellows.
I am working to tile the top of my glass topped kitchen table. I am wondering if I should use adhesive with the trowel or glue that I can apply to the backs of the tile. Your blog is awesome the best information I have found anywhere. Thank you for posting.
Wow! Thanks for this post.
I have glass tiles that I want to remove the back off of. Not just the mesh stuff but there is some kind of white backing on it as well. I want to be able to see through the glass. Any ideas on how to remove it?
On my tiles I remove the molding and then reinstalling it once the floors laid down so the molding is over top of the tile and you don’t have to grout to the wood to fill the gap
Comments are closed.